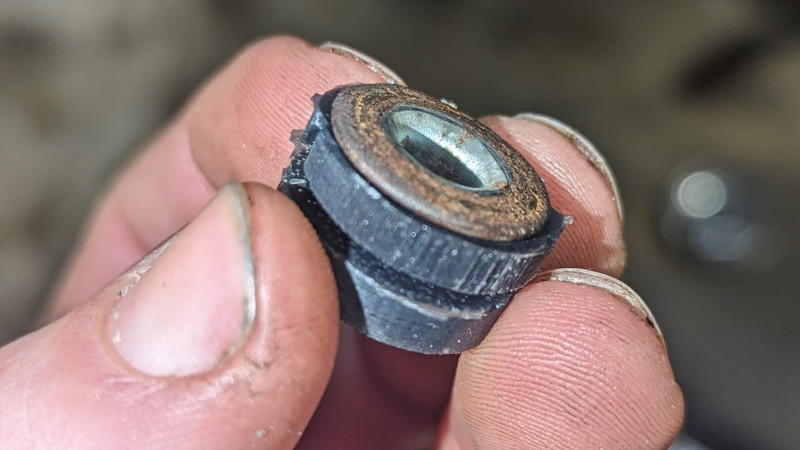
It’s a sad fact of owning older machinery, that no matter how much care is lavished upon your pride and joy, the inexorable march of time takes its toll upon some of the parts. [Jason Scatena] knows this only too well, he’s got a 1976 Honda CJ360 twin, and the rubber bushes that secure its side panels are perished. New ones are hard to come by at a sensible price, so he set about casting his own in silicone.
Naturally this story is of particular interest to owners of old motorcycles, but the techniques should be worth a read to anyone, as we see how he refined his 3D printed mold design and then how he used mica powder to give the clear silicone its black colour. The final buses certainly look the part especially when fitted to the bike frame, and we hope they’ll keep those Honda side panels in place for decades to come. Where this is being written there’s a CB400F in storage, for which we’ll have to remember this project when it’s time to reactivate it.
If fettling old bikes is your thing then we hope you’re in good company here, however we’re unsure that many of you will have restored the parts bin for an entire marque.


The process is really instructive, and I’m think about other grommets on my bike (GSXR750) that are really hard to source.
By the way this gaskets really look like another cushion than can be found on suzuki bikes, which is easy to source and affordable (see 09320-09016).
The CB400F was a tremendously fun bike. I sold mine (a ’75 with 4 into 1 exhaust, low-restriction air intake, and overjetted carbs) in roughly 1998. I did a lot of mile one that bike, and ended up replacing the points ignition and advance with a homebrew electronic setup (a PIC did the trick, and also allowed a digital tach), partly due to a parts availability issue for the advance mechanism.
Note to myself: Never eat while scrolling thru HaD again. Disgusting photo.
What were you eating and what was the photo? If you find fingers disgusting, where and how did you type the comment with? I’m confused.
Oh no, a mechanic doesn’t have manicured fingernails! Anyway.
You wouldn’t suck on those fingers?
Grow up there’s a lot nastier things in the world than dirty fingers after working on a machine
I don’t understand … Reading this article gave me the idea to eat some liquorice rolls, maybe because I was focussed on the rubber part instead of the fingers.
Talking about disgusting things: I hate to repair keyboards and mice for which their owner ate (or drink) while using them. Cleaning and repairing such things is really disgusting: you really don’t want to know what the things you removed comes from…
Don’t eat while using your computer :)
I had a CB350 when I was a young airman. Fun bike!
I had one also. Really quick off the line. Fooled a lot of people with it’s commuter bike looks.
He didn’t use mold release? His write-up doesn’t mention it. Is it generally true that silicone doesn’t stick (or sticks poorly) to the PLA?
Hey, I’m the original author. But you are correct no mold release whatsoever. The silicone doesn’t stick to the pla whatsoever. The only concern would be if you had undercuts that mechanically prevent removal of the part from the mold. Even then the elasticity of the material allows you to get away with quite a bit
A good trick for casting Silicone in PLA* is – for mostly-closed cavity moulds – to melt a pot of beeswax of at least the volume of the mould cavity. Pour the molten wax into the mould then immediately pour it back out again. Done quickly, this will leave a thin layer of hardened wax on the inside surface of the mould. Unlike a spray or wipe-on mould release though, this layer will be just thick enough to smooth over layer lines giving a very clean cast, with only a minor loss to dimensionality (that you’d lose for other post-processing steps anyway like hand-sanding or bondo), and unlike spray releases this is a one-shot technique rather than needing multiple layers with drying in between. Plus, in the event your mould is not watertight the wax will plug up the gaps with ease. This means you can use very thin moulds, even printed vase-mode if your cavity geometry allows. A thin cavity can be considered single-use, so instead of a two-part or multi-part mould for complex geometries you can print a single piece mould and peel it off the part once cast.
But beware! The hot wax will soften PLA, so an unsupported cavity can easily slump in the process. So you can print a single-wall-thick mould, as well as a more robust support that you insert the mould ‘skin’ into for the wax process, and for general handling (so it acts as a base too). Gotcha here for processes that require vacuum degassing of the silicone within the mould: make sure you use an infill that does not trap air, such as Gyroid (forms two continuous cavities) and then drill a hold into the part to vent the interior, lest your ‘support’ implode spectacularly within the vacuum chamber.
*particularly for Addition Cure silicones. Condensation Cure silicones are more tolerant of materials in contact with the mix, but Addition Cure silicones will be cure-inhibited if you look at them funny.
What mold release works for silicone?
I’m not an expert, but silicone doesn’t like to stick to anything (even itself sometimes). I’ve done acrylic coated resin printed molds (resin off-gassing can inhibit silicone curing) FDM molds and alginate molds. Silicone comes out nice and clean with no release agent.
Why not just print them in rubber?
I considered printing the pieces in TPU but that material can be a bit fickle to print with. Additionally, from what I read supports with TPU can be a point of a nightmare, especially since I don’t have a multi-material printer. That said I haven’t worked with TPU filament much so maybe it would be viable here.
Finally, once you need several copies of something you eventually hit a point where casting is faster than printing.6 is realistically not quite there yet, but it’s getting close and it was a good excuse to learn a new manufacturing process
I confirm that printing using TPU can save the day for some gaskets (I already printed petcock gaskets for my bike with success), but, as stated by Jason, dealing with overhang parts is a nightmare (while it may be easier with double extruder, I didn’t try). Without saying that printing TPU itself is really time consuming, first because you have to design your part taking account printer limits (DFM : Design For Manufacturing), then because TPU is hard to print (in my opinion).
Casting seals seems the way to go for parts that can’t be printed easily, and I am waiting for updates to this project, since some rubber parts cannot be obtained separately without buying the reference that includes it. So this is really a useful hack to know: thanks for sharing it !
Related HaD blog post: https://hackaday.com/2022/04/20/gaskets-can-they-be-3d-printed/
I found Robert Tolone to be a fantastic resource when attempting something similar. He has guides for casting without the more expensive equipment; however, having that equipment makes life easier.
A supplier suggested that black parts are the most tricky and a suggested pigment for black is printer toner.
Resin or rubber casting is a very useful process for parts restoration.
Aquire a block of black rubber and a sharp knife.
Fine for a one-off, but doesn’t scale if you need to make more
I bought the GT750 instead… Regrets.
Where I look at this, with that original part number (31403-323-000) sources for cheap, original parts are plentiful (part number also points to Z50 monkey). I appreciate and support diy solutions absolutely in almost every case, but in cases like this when original parts are available and cheap (and practically whole world is full of similar rubber grommets, just pick the right size) there is no point doing things overly complicated way. Especially when parts made with such complicated way are still way inferior and wrong material when compared to original and probably fail soon.