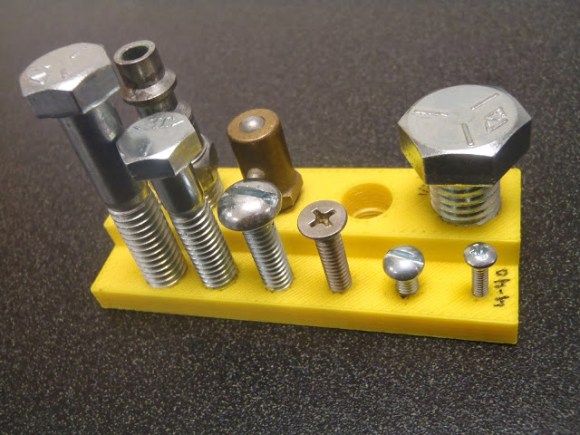
Ever been curious on how to fasten 3D printed parts together? There are lots of ways to do it — but what’s the best way? [Chris Lopez] works in a machine shop and decided to do some testing of how best to tap 3D printed parts, so you don’t have to!
The typical ways to add fasteners in 3D printed parts include designing the thread right into the part (only works for big threads), adding a press-fit insert, drilling and tapping it like any other material, inserting a Heli-Coil, or even by using ultrasonic weld inserts. In fact, this Stratasys blog post actually goes into some good detail on the pros and cons of each!
But, there’s a much easier way. To tap a hole normally you need to locate it accurately, make a pilot hole with a center drill — ensuring it is straight and true — then drill through with the undersized tap drill, and finally, thread it with a tap. Luckily, your 3D printer takes care of almost all these steps. By simply designing your holes to be the tap drill size you can hand tap fairly strong threads in your 3D printed parts. Just make sure your wall thicknesses and or infill settings are high enough to make sure there is material to engage!
[Chris] also goes into some detail on creating captive nut geometry — but for that you’re going to have to check out his blog. And if you’re interested in another style of fastening 3D printed parts, why not inset magnets into them while they are printing?


I tap these parts all the time. The printing process produces some pretty dense nylon parts. My company has several components 3D printed offsite by independents. So, you could say that we are printering advocates.
Love this one!!!
I do this with laser and other CNC stuff too. I think the 3D printing guys get a fixation on 3D printing itself and forget about other methods of fabrication. Like this. :)
I’ve used self threading screws with 3d printed pilot holes with success. Pretty sure I got the screws from McMaster.
I wonder if you could use the acetone methods detailed here: http://hackaday.com/2013/03/23/smoothing-3d-prints-with-acetone-vapor/ to make a stronger interface?
Threaded inserts aren’t a lot of work. I like to have a slightly small hole, heat up a soldering iron, then use the hot iron to push the threaded insert in. It locks in pretty well.
I’m assuming you’re talking about thread inserts meant for plastic? I’ve had good results with those as well. I could see something like a thread repair (i.e. helicoil) doing equally well.
Rampa Inserts would also be an option.
If you use UV photopolymer inks at a high enough resolution AND MODEL THE THREADS CORRECTLY, you can print tapped holes directly, down to #6 or #8 or so.
EXCELLENT tutorial and the demo block deserves a Hackerdom Shrine niche…I tried to have a friend replicate some Nylon66 electrical standoff blocks and found some redesign is needed from my not having scaled the loadings for larger threads. Details may end up as a FAIL report:>
There’s a realm of underestimated force vectors when threaded parts are loaded above even trivial torque specs. Take the “Captive Hex Nut” concept as example. The crush/thrust forces are governed by the laws of force per unit over the contact area. With non-intuitive vectors of destruction. Parts simply get crushed or split unless you use good design if luck does not save you.
Lest we forget the history lesson of High Heels denting metal aircraft decks..Serendipity in those searches will educate on cross impacts being overlooked where metal floors and tiny contact surfaces took a while to figure out “what caused it” factors. .
Do the math on HOW much crush a lowly 1/4 wingnut on it’s bolt can develop in a camera mount type clamp. Thence design your print for oh- a larger washer embedded in the hole as a reinforced shoulder. Print the hole at fastener hex or shaft diameter “so far” thence it leaves a recess for the washer- which is inserted mid-print thence printing continues over the now captive washer.
This used to be seen in variants for ceramic electrical parts where the “bottom” housed a hex nut and the “top” had a washer recess. Some examples -Knife switches and fuseholders.
Never forget to review past.designs for applying in new materials and processes .
A quick and dirty trick you can try if you don’t have a tap and for some reason you are still compelled to use a fastener otherwise meant for joining metal parts to assemble your plastic ones. Place the fastener in a vice by clamping the head. Now with a file for metal or with a saw blade meant for metal cut a groove into the fastener at the tip (farthest from the head) along the length of the fastener. You need at least five threads and go as deep as possible while leaving a sharp edge. For plastic you just made a self tapping screw. It has worked for me a number of times.
– IMPORTANT FOR FDM-
Be careful about “going WITH the grain”. If you print a cylinder SIDEWAYS threading and inserting a bolt can split the layers. This is not an issue when inserting a bolt that is non-parallel with the extrusion lines.
I usually make the m3 threads in pla with a threading tool that was first submerged into water. Then, about 0.5 to 1 rotation per second on the handheld drilling machine with the tool inserted. For deep threads, a drop of water in the printed hole helps a lot.
Also any metal inserts, e.g. helicoil or similar are superduper for screws that require constant operation. I have seen this first on a test part that DLR brought to a 3d printer exhibition.
screws for panels that need to open, rivits for everything else.
No love for carriage bolts? you’d just need to print a square recess where the head of the bolt engages.
For small holes I’ve had good luck with simply letting the screw itself create the threads. If you screw it in fairly quick it will heat up considerably melting the plastic around it and forming the thread. But that’s when I’m lazy, tapping works really well too, just make sure you use enough shells/wall thickness and don’t go to quick.
Tapping is easy but if you have a lot of tapped holes, it can be a pain. I have found that with ABS if you split the major and minor diameters, a screw (I use #2s, #4s, #8s, #10s) will tap itself with pretty good strength. You have to have some pressure to get it started but after a thread or two, it proceeds as a tap would.
Being able to put things into the print while it’s printing and captivating them is one of the main advantages of 3d printing. I use it to repurpose old hard drive magnets: http://www.thingiverse.com/thing:15723 I love these things, I’ve only made half a dozen or so, but I’ve got a few more donor drives laying around…
Hi!!
I using Rotites to fasten the arms of my 3D printed quadcopter and I’m very happy with them, I have weight reduction, no more nuts and bolts and a cleaner design… this means more endurance to my small workhorse ;)
you can check a video of my explaining this quad and the rotite elements here:
http://aldux.net/rd/tego-v3
if my website is too slow, you can look at the video directly here:
https://vimeo.com/78085774
and the Rotite website of course: http://www.rotite.com/
Cheers!
Ugh! A company website that forces you to watch a video to see their static product!
They do have somes words hidden in a few images. “low profile helical dovetails” is the best example.
It is a clever idea, but not a sound business. I’m not sure the company is going to survive the 3rd printing revolution. These look way too much fun to design in openscad or solid works.
Great thing for captive nuts, make the hole too small, warm and squidge into place with soldering iron,
Interesting article.
If you would like to learn more about the effects of 3D Printing on parts manufacturing, I would like to recommend “Adventures in 3D Printing” which is available as a free PDF at the 3d printing repository Thingiverse.
http://www.thingiverse.com/thing:223763
and also at Grabcad
http://grabcad.com/library/pdf-ebook-adventures-in-3d-printing-1
My favorite trick: use a straight flute chucking reamer to finish printed holes to size. I use this all the time for my Itty Bitty Double Extruder designs.
Clearance holes printed for M3 hardware often end up with a little trash or out-of-round that makes inserting the screws difficult. A reamer in a cordless drill will go right through with no drama–even with the grain without splitting. Use a spiral point gun tap for the threaded holes, and you’re good to go very quickly.