
Laser cutters are CNC power tools, which means an operator uploads a job digitally and then pushes START to let the machine do all the work while they lie back in a hammock sipping a margarita, occasionally leaping out in a panic because the sound coming from the machine changed slightly.
Like other power tools, laser cutters are built around doing one thing very well, but they require an operator’s full attention and support. The operator needs to handle all the other things that go on before, during, and after the job. It’s not too hard to get adequate results, but to get truly professional and repeatable ones takes work and experience and an attention to detail.
People often focus on success stories, but learning from failures is much more educational. In the spirit of exploring that idea, here are my favorite ways to fail at laser cutting and engraving. Not all of these are my own personal experience, but they are all someone’s personal experience.
Ways to Fail Before the First Job
Failure to plan (and budget) for the extended needs of the laser cutter. A laser cutter requires not only power, but also exhaust and cooling. Exhaust might be either a fan and ducting, or a fume extractor / filter system. Generally speaking it’s good practice to keep any exhaust tubes as short as can be and with as few bends as possible. If the laser tube is water-cooled (which is likely) a cooling system that circulates distilled water through the laser tube needs to be nearby as well.
Failure to install in a place where noise and smell won’t be a problem. The exhaust fan, laser cutter, and cooling system aren’t as loud as table saws, but it’s still loud and a laser job can run for an extended time – especially when engraving. If there are people nearby, they might object to the noise. In addition, even with proper filtration and exhaust there will probably be at least some smells from laser cutting – which will range from burning wood to melting plastic depending on the material. Even slight smells wafting in might be unwelcome to others depending on the environment.
Failure to provide enough airflow. Hooking up an exhaust fan to suck air from the printer cutter and vent it somewhere isn’t quite enough. That air needs to not only go somewhere, but it needs to come in from somewhere, too. An open window should do it, but not everywhere has windows.
If there is insufficient air intake, the exhaust system will cause negative pressure in the room. If there’s a drain anywhere, that negative pressure will pull gross smells up into the room through the drain.
Failures Before the Job is Started
Failure to engage (or have) a compressed air assist. Blowing compressed air at the area being laser cut helps prevent flare ups and keeps things clean by directing vaporized material downward and away from the cut, and away from the machine’s lenses and mirrors. Failing to engage (or failure to have) an air assist can lead to messier cuts and engravings than usual, and can increase the chance of flare-ups.
Failure to anticipate proprietary software and toolchain hassles. A cheap laser cutter from China will probably want to run its own proprietary software (although it is possible to upgrade to an open-source controller like RAMPS or go directly to a project like LaserWeb). On top of dealing with proprietary drivers and interfaces, every CAD software seems to have quirks about what will or won’t import or export without problems when it comes to drawings, even with supposedly standardized formats. It is annoying at best when you discover that there is a proprietary interface, that a favorite CAD program’s exports are not reliably compatible, or that you need to replace the controller on the machine that was just installed.
Failure by assuming power and speed settings for a material are correct. I have literally never pulled settings on the Internet (even for machines similar to mine) which give good results on the first try. Sometimes they are not even close. Treat them as a vague general direction in which to test, and don’t go straight to cutting or engraving production material without testing first.
Failures During the Job
![Unattended laser cutter fire [source: Arcbotics]](https://hackaday.com/wp-content/uploads/2016/05/burnt-laser-arcbotics-com.jpg?w=400)
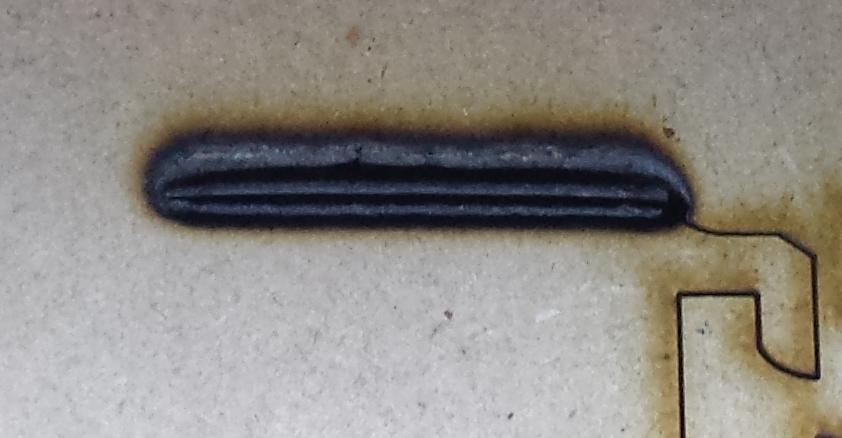
I had a job somehow become corrupted in the laser cutter’s memory which led to a red-hot glowing gash where there should have been a thin cut. The air assist kept it from bursting into flame at first, but if I had not been around to hit the e-stop, it certainly would have ignited regardless of the air assist. Glad I didn’t need to use my fire extinguisher.
Hardware failures such as stepper motor malfunctions or belt breakage can result in fire risks as well. A laser cutter needs to be attended while in operation, no matter how boring the process has become.
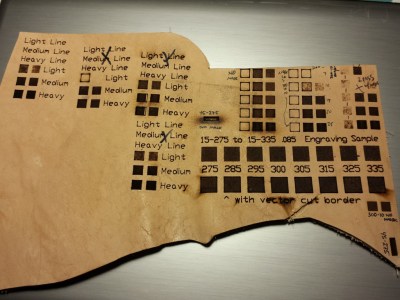
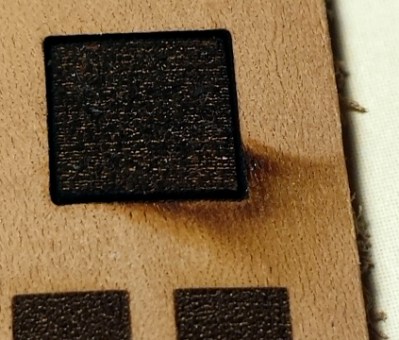
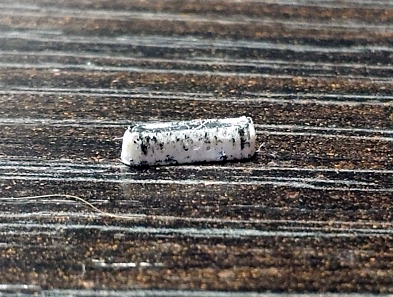
Failure to test on a sample. There is more to getting a good result than just correct power and speed settings. Even if the laser power and speed are technically correct for the material, only a test run will reveal any special handling needed to fully eliminate cosmetic blemishes like scorching or the piece moving during the job. On the right is a piece of leather filled with the process of finding how to get the best and most repeatable results.
Failure to have adequate cooling. A bucket of water and a submersible pump will get a laser cutter up and running, but isn’t appropriate for anything more than very light use. A chiller like the CW series (CW-3000, CW-5000) or equivalent circulates a water supply through the laser tube and cools it actively.
Finding out a bucket and a pump doesn’t cut it can wreck your budget if you haven’t anticipated the cost of an active cooler.
Failure to adjust focus before starting the job. The lens must be a fixed distance from the work surface for best results. It is possible to de-focus the laser intentionally for special purposes (such as thicker vector cut lines, or for Laser Origami) but forgetting to focus usually means the job is ruined.
Failure to zero the machine. There’s nothing worse than having everything set correctly, then realizing as soon as the job begins that the laser isn’t in the intended place on the material.
Failure to apply masking when needed. Apply a mask of tape to the material prevents scorching from marring the surface, and generally gives cuts and engraving a cleaner finish. Many plastics come with a protective film on one or both sides. Application Tape (sold at sign shops) is a good alternative for most materials.
It’s also possible to fail to apply masking properly. If the mask lifts or shifts, that can ruin the piece.
Failure to remove masking when not needed. When lightly engraving something, then it’s best to not apply masking, and remove any that exists. Light engraving through masking or protective film just gives a sort of melted plastic look. I have never found any setting or combination of settings that cleanly and completely removed the masking (and the adhesive) but only lightly engraved the material below it.
![Engraving the front of a mirror yields a double image [source: obrary.org]](https://hackaday.com/wp-content/uploads/2016/05/engraved-mirror-front.jpg?w=250)
When cutting thin and light material, the featherweight pieces can flutter during cutting, or fly away entirely out the exhaust once cutting is done. One solution is to leave little ‘tabs’ to anchor the part to the rest of the material.
Failure to clean out debris. Normally the laser – after punching through material – hits the laser bed and doesn’t do much of anything. If it’s hitting bits and pieces left in the bed of the laser cutter instead, those are fire and scorching hazards.
Failure by cutting something bad. Some materials don’t belong in a laser cutter. Cutting PVC will release chlorine which will corrode pretty much anything it can reach inside the laser machine. Some types of glues and materials can emit foulness that will gum up mirrors and lenses when hit by a laser. I spoke with a fellow who once tried to laser cut some kind of magnetic sheet material. “I had to replace every mirror and lens,” he said. He didn’t like to talk about it.
Happily, at least when it comes to polymers, a few simple tests can reveal a lot about what a material is made of if you are unsure.
When Failures are Absent

If everything went well, you can get some very nice results! Here is a piece of leather I engraved for a client. Any one of the things listed above would have ruined the piece completely, so the test piece of scrap (pictured earlier) was critical. It was also important to do a test run to make sure the material didn’t behave in any unexpected way either during or after the engraving.
Failures Discovered After the Job
Failure to account for side effects. Some materials can have side effects. The job goes well, but closer inspection reveals something undesirable but inherent to the process or material used.
- Very thin plastics can deform from the heat of the laser. Narrow lines bend from the heat, and pieces can get a slight “bowl” shape as the corners lift up. Annealing the plastic by leaving it for a couple of hours in gentle heat just below the material’s softening point sometimes helps.
- Some types of plastic end up with tacky edges where the cut happened. A wipe with mineral spirits will clean that up.
- Laser-cut wood tends to smell like a campfire. The smell will dissipate over several days if left somewhere in the open (preferably in sunlight.) To speed the process up, I have had promising results from wrapping small freshly-cut pieces in a foil bundle and putting the bundle into gentle heat (100-120F) for a couple of hours.
- When engraving or cutting a white or light-colored plastic it’s easy to contaminate the freshly cut or engraved surface (which is full of micro-ridges) with… just about anything, like particles from other engraving, or even a dirty fingerprint. Scrubbing doesn’t help much, but I have had good results with ultrasonic cleaning for those times when it matters.
Failure to account for kerf (width of the laser cut). When cutting parts whose cut edges are intended to fit into or within other parts (for example, finger joints) this is a concern. Parts will probably be too tight or too loose.
Failure to account for hidden costs. Significant mainly for non-hobby use cases. Laser cutters do only one thing at a time, and must be attended fully while in operation. Even small jobs have a nontrivial cost because it’s not a fully automated tool – a job might take 1 minute in the laser cutter, but for the operator it can take a great deal longer from start to finish. Also, an unexpected error can ruin a production piece and require a do-over.
Using Failure to Improve
To avoid repeating mistakes, cultivate a sense of documentation and constant improvement. After all, failure is only waste if nothing was learned. If you are using a laser cutter professionally, any steps you can eliminate or streamline will have payoffs down the line in any repetitive task. Don’t get distracted trying to improve the laser cutter itself to make it do more, and faster. The machine may seem like the bottleneck but it should be everything else around it that qualifies first for improvement and streamlining, because between the tool and the operator, the operator is the more flexible one doing the most tasks. As with any other CNC tool, there is a lot more to the process than transferring a file and hitting START.


” Cutting PVC will release chlorine which will corrode pretty much anything it can reach inside the laser machine.”
Pyrolysis of PVC produces HCL as a final product which is responsible for the corrosion. Also don’t breath any of this. Just sayin’
I did a sign once with material that unknowingly contained PVC. Is there any way to correct the damage that may have been done?
It’s unlikely that a one-time mistake caused any lasting damage. The gas is corrosive, so it typically shows up as rusting parts inside the laser, things like drive shafts and bearing rails. If you do see rust, there are rust removers you can get that convert the rust into a form that won’t further degrade.
If it ends up as HCl (hydrochloric acid), one idea would be to wipe down housing (NOT bearing or optical) surfaces with a rag dampened with a baking soda and water solution, to clean out and neutralizes of the acidity. Caution is advisable as obviously adding moisture to equipment is not good.
Thanks for clarifying that!
I cleaned up a bunch of lasercut extruded acrylic plaques with rubbing alcohol once. It seemed to get most of the schmutz off (before I learned to mask them). Then I heard this crackling sound, and all 5 or so plaques had micro cracks around every laser cut edge.
Also, I had my compressor die due to tripping the circuit (13A compressor, 15A circuit), and to thermal cutoff on a particularly busy day. Both times, it would have likely caused a fire.
And I had my ventilation fall apart without noticing until it started getting really smoky in the basement.
It is certainly not a fire and forget solution.
Obviously it was forget and fire situation.
+1
An air pressure sensor seems helpful here. Remembering that sensors and wiring can fail too…
I’m waiting for the Ron Popeil laser cutter. “Just stet it, and forget it.”
Just a comment that not all laser cutters require cooling systems. My 75 watt Epilog Legend 36 EXT runs fantastic with just compressed air for air assist and an overkill exhaust system. Never have odor issues as long as I leave the exhaust fan on for at least 30 minutes after I cut large jobs. For wood , the leftover smell of campfire is usually enjoyed……
All in all, very good article and covers a lot of areas where I have seen issues at one of the hackerlabs I have spent some time at. Some people get blinded at the wow factor of what a laser can do and fail to remember laser basics like this article points out before they use one. This is also evident by the “extra” warning signs that the hackerlab owners felt necessary to post near the machine.
That’s a very good point – Epilog machines use some really nice (and expensive) lasers which do not require liquid cooling. Most other laser machines are CO2 lasers with big glass tubes that require water to be circulated inside them for cooling. It would sure be nice to not have to bother with external cooling!
Air cooled metal enclosed ceramic lasers still don’t like running hot, if your area of work is at 30c say then you run the laser the output from the laser will drop as it heats up
Larger RF tubes are still liquid cooled, once you hit 130 to 150 watts air doesn’t work for cooling
Some other good failures I’ve seen – done on units with six figure price tags and several kilowatts of power.
– Failure to prevent a water cooled laser from freezing when you closed the shop for Christmas vacation.
– Failure to keep your optics clean. Any contaminated spot tends to absorb heat. On kilowatt range lasers, this failure is rather explody.
– Failure to level the machine correctly.
– Failure to align the mirrors or nozzle correctly.
– Failure to lock out the laser from firing while performing alignment procedures. And no, injuries from a laser beam don’t cauterize themselves.
I use antifreeze in my laser cooling system, works fine for me.
Antifreeze can cause arcing. You can simply spot it by hiss sounds with power loss. I had lots of troubles befor I found antifreeze is the cause. Simply changes it for distilled water and everything gets back to normal.
We had someone leave a ventilation window open overnight. Froze the tube and broke it.
Yes, as someone who has assembled a laser cutter kit (Blacktooth kit from BuildYourCnc.com), I can attest that learning from mistakes is a very legitimate path to excellence. As a result of my own “Murphy-moments” with my laser cutter, I incorporated alarms to signal loss of air pressure, water pressure and vacuum in my system. Even with those precautions, I still occasionally manage to find new ways to ruin a perfectly good piece of birch plywood…
A monitoring alarm/kill is on my to do list somewhere. Air assist, ventilation, water cooling (machine is supposed to not fire if water isn’t flowing, but why risk it?), water temp. I’d love to add flame detection, mirror cleaning, bed cleaning and lens height adjustment, if I could figure out how. :)
Lens height adjustment is a fourth CNC axis, geared way down for maximum resolution over a short travel.
For flame detection, maybe use a capacitive sensor built into the nozzle? Metal cutting lasers use that for height sensing, and it could almost certainly pick up any flames above the material. And using nitrogen as an assist gas can cut down on
As for mirror cleaning, an enclosed flight tube system pressurized with nitrogen or filtered air will help keep them clean.
There are special optical sensors for open flame detection, but they’re not cheap…
Two wires in the potential flame zone and some voltage apllied over them will give you also a cheap fire detector. Fire has some very interesting electrical features :)
The problem is that there are open flames sometimes, especially with cardboard. As long as it moves with the beam, it:s not a big deal.
Being able to “fire and forget” to some extent would certainly free up the operator’s valuable time. Any system that is looking in that direction sounds great to me.
The black-tooth is an interesting beast. We have one at our maker-space. you will end up knowing every bit of that machine intimately. We ended up extending ours and adding a proper drag chain after we had a tube failure when the coolant line got pinched. We also added homing switches an interlock so the laser cuts out when the lid is open. Laser alignment is still a bit of a pain but it has been a fun ride. We’re thinking of rolling our own water chiller and coolant flow interlock but we might be getting another cutter soon and if so it’ll only see light use.
Hint:
Water Cooler not Chiller works also:
I use the cooler of my modular Fronius TPS 450 welder, its consists of a waterpump, a radiator, a tnak and a fan(*), switched on by a relay, that setup is so damn cheap and it works very well, however a non-chilled cooling system will just stay a bit above room temperature. So a chiller should be choosen when the ambient temperature is “considerably warm”
(cooler is equiped with 3-way valves so I can choose to cool my weldgun or cool my cheap ass china laser cutter)
(*) such a cooler is very easy to DIY, car radiators are overkill so far, and you need a pump and some hose connectors.
The other solution would be, to search ebay for some junked pc water cooling equipment, mostly the used parts sell for no money and the hose connectors are easy to assemble, no special tools required.
The downside is that one would need to serialize some of these pc-raditors or use some really violent fans(load),
When you get 80W Laser Power you would need to dissipate 800W of heat away (eff~10% )
My fronius cooler surely has enough violent cooling power so I just don’t need to think about that.
(mostly the cooling units alone are also cheap)
Mashing together the cooler of your welder to a laser cutter is a pretty clever solution, I like that. The industrial chillers only hold about 4-5 litres of water and rely on active cooling during extended use (if it’s a short job the active cooling doesn’t kick in, it just circulates and it’s fine). This lets it be smaller and lighter, but for cases where that’s not super important, a bit more water and a nice radiator you could probably do away with the active part entirely.
I was at tech shop just a few days ago after being away from that site for a while. they changed their air systems to NOT auto-on and now its manual-on. I didn’t know that. I started cutting plastic and it flared up. I had to ask one of the helper guys and he immediately knew the air unit was not on. I wasted time and material and was not happy. I think he blamed me for not knowing (how could I know?)
another story at TS was during STEM classes (sigh, it looks like more of that just started this week) for kids. some kid was putting a curved item into the cutter and just walked away. of course it caught fire. he just stood there and looked at it while it burned. I am not sure – AT ALL – that its such a great idea for tech shop to open its doors to so many kids and monopolize the laser cutters from 9am to 4pm mon-fri. that’s time that paying members can’t get access!
OT: we need more laser cutter shops in the bay area. the only reason I’m at TS is for the LC’s. if another shop with JUST lc’s opened up, I’d go there in a heartbeat. especially if they don’t sell member’s time out and intentionally cause overlap and overbooking (like TS is doing these days with its ‘summer camp’ program).
Lasers are one of the huge draws for that kind of business though. It sells memberships.
TechShop plays lots of games to keep themselves out of the red, this is probably one of them.
I currently have a one-year membership at the Arlington, Virginia TechShop, but it’s so annoying to deal with them that I recently bought a huge, powerful laser cutter (???????????????????????? better than any of theirs!) and now find no reason to go there anymore (I already had a small but good-enough CNC router, and am thinking about getting a TAZ 6). Theoretically I might miss the waterjet cutter, but really only for the wow factor. TS looks good at first glance, but horrible equipment maintenance (at least half of the many classes I’ve attended have been screwed up by machine failures), outrageously-overpriced (and poorly-taught) SBU classes, very inconvenient location, and laughably-incompetent “Dream Consultants” (if they were any good, why would they have such low-level jobs?) makes it a bad value proposition. Worst of all, I think their glitz may be damaging the prospects of real makerspaces.
Don’t buy a TAZ. Their designs are completely flawed and their printers are waaaaaaaaaaay over priced.
Thank you for writing this!
You’re welcome! If you have any tips of your own, please share them. Collecting them might make a good follow-up!
Seems basic and simple to me to have a sensor look behind/around the cut to see if there is glowing and have it stop the damn thing if it goes wrong..
It’s 2016 and it’s modern technology, is it really required to have an actual human do that?
Thank you for writing this!
My mind started turning its gears on the first sentence…
Has anyone build a device that listens to the sound profile and then activates an alarm if the ‘noise’ goes off profile?
I would imagine that cutting multiple identical parts in a grid would benefit production greatly if the machine halts at part #8 instead of continuing on and leaving you with 8 good cuts, prints, ect. and 92 bad ones.
.
Can’t search now. Phone has like 1g with no bars. ;)
Damn…
1G???
You mean AMPS?
That is a freaking time travelling signal if you are getting even one bar!
Look for the wormhole and get back to us!
Okay. Maybe it was 3g but Google images was so slow! Might as well have been dial up. :)
Or, for a joke…
The Doctor saved me! He said something about his ‘timey-wimey detector’ and said not to blink if I saw an angle made of stone. I asked him if he meant a statue and he said “living statues”! O_o
So I’ve just been scouring the web and haven’t found much yet. Looking up ‘sound, alarm, alert, noise, error, ect…’ with anything comes up with a lot of fluff, obviously. :\
I bet someone could play with Audacity and write some plug-in for it.
I don’t feel like trying it myself, I downloaded it 2 years ago and used it 3 times. I wouldn’t know what the hell to do anyway! I did find this
http://hackaday.com/2016/04/12/stealing-3d-prints-by-sound/
Not a dead end completely, but also not very helpful.
Somebody must have at least tried this! There is no way I thought of it first. ;)
If I DID think of it first than somebody better implement it before I do!
(Estimated time 5 years lol.)
P.S. I had to look up ‘then vs. than’. Still not sure which one is proper! F grammer.
I’ve been systematically automating everything with my hackerspace lasercutter for the past few months. Getting rid of all the UI issues and making sure it ‘just works’ is a mammoth task. And then a user brings in a job and it reveals a whole new set of problems (what the hell is with Illustrator and other SVG generators duplicating paths all the time!?!)
here’s some more:
Assuming the laser cut sides are straight. Depending on the material you are cutting, the kerf you are getting is more or less V-shaped. Seen from the side, your pieces will come out a littletrapezium-shaped. On top of that, depending on the setup of the laser path, the beam may be not perpendicular to the workpiece, resutling in a V-kerf that is tilted. And a tilted V-kerf will make some sides straight while skewing the other side even more.
Failure to follow the instructions: some lasers use color to designate paths for cutting, others use the stroke/width of the line. Forgetting to set these to hairline may give unintended results.
Double lines: there are way to many apps/tools/converters out there that assume it is ok to have lines or segments of lines on top of eachother. That may print ok, but it will not cut right. Usually it is indicative of a toolchain that is not fully mastered.
Editing down the line: if you have a long toolchain, for instance going from OpenSCAD (3D), exported to dxf, processed in inkscape and then on to lasercut5.3 (ouch!). Next you notice an error after cutting, so you correct it in lasercut instead of in OpenSCAD. Next version you will try to cut will have that same mistake.
Realtalk: I mostly cut 1/8″ thick(ish) material and I honestly would have never even known a cut wasn’t anything other than perfectly straight (as seen from the side) except for reading about it. I don’t think it has ever had a measurable effect on a single job for me. Then again, I rarely cut any thicker than 4mm and while I do friction-fit finger joints that’s about as precise as I ever need to get. I guess I just don’t really do the kinds of jobs where it’s a factor.
Nice that it has not been an issue for you. If you have been making press-fit joints in wood without compensating for the kerfwidth, then the slight skew may have used up that tolerance, leading to a nice press-fit.
As for realtalk: I’ve been working with lasercutters for 6 years and have always been responsible for their maintenance.
Oh no, I absolutely compensate for the kerf in any part that has to fit into another part (my first finger joints failed either too tight or too loose until I zeroed in on that.)
I’m saying that if it weren’t for reading about the fact that laser cut sides aren’t exactly straight lines, I’d have never even known it was a thing that happens. Some things you just have to learn by reading about them because they escape your personal experience.
be carefull with the masking on some plastics (PMMA and the sort). Some of those maskings also contain chlorine and release HCL when burned with a laser!
I’m surprised nobody replied to you. I just wanted to let you know that I didn’t know that. I’d rather not breath poison! Thanks for the safety tip. :)
Yeah, indeed it may be poisonous. Due to this fact you should always invest in good ventilation (at least).
CW3000 is only a radiator and a fanew, not a chiller. If ambient temperature is over 20c you’re going to have problems.
I hadn’t realized that, thanks for the tip. I have used the CW-5000 which is an active chiller, but apparently the CW-3000 (which is labeled a “chiller” on the unit) is actually just a passive cooler with – like you said – a radiator and a fan. Thanks for piping up!
Yeah it’s pretty misleading, if work area ambient is low enough it’s marginally better than a bucket of water I guess. I just set up am aquarium chiller which works awesome. Cheers
“Failure to apply masking when needed. Many plastics come with a protective film on one or both sides. Application Tape (sold at sign shops) is a good alternative for most materials.” I can attest to this. I have a 100w from http://www.bosslaser.com and they recommended HCL free masking at Laserbits. Got it cheap. Worked well.
There is only 1 failure with all of the above: failure to buy a high quality machine from a professional supplier who will give you a good installation/training in which case none of these things are likely to happen
Yeah, most problems can be solved by throwing a shitload of money at them. Nice if you have the means.
The purpose of buying these machines is generally for them to make you money, not cost you money
A big fail is to provide compressed air that is not dried and cleaned of oil, especially on systems with coaxial air assist (air travels through the same nozzle as the laser beam) as the water/oil can get onto the lens, which causes it to instantly fail. Cheap “oil/water separators” aren’t very effective if nothing cools the air first, vapor can still pass through. A chiller or desiccant dryer is required. Even with a chiller, you still need an oil separator if your compressor is not oilless (and frankly you want a compressor that uses oil as they’re less loud, I won’t say quieter.)
Another, is not cleaning out the tray under the material. You can cut paper all day and let the bits fall through and be fine. But if you then switch to cutting something requiring more power, there is a good chance you will catch it on fire. Corrugated cardboard scrap is especially bad. Your exhaust will fan the flames and depending on what the material is above, you may not be able to tell there is a fire underneath.
Other things to watch for are cut pieces tipping up and getting in the way of the laser head. This can cause a collision that shifts the material mid-cut or can even possibly damage the head. Materials that have curl to them, you can often lay them curl side down and have them be relatively flat, but as soon as it starts cutting pieces out of it, the pieces may have enough curl to lift up. Getting in the way of the unfocused beam can lead to fire. Another thing that can happen is as more and more is cut away, the vacuum holding the material flat will decrease and it could lift/move at some point.
I like that you talked about making sure you don’t leave the machine unattended, because you can’t predict when there will be problems. I have been wanting to work in machining, and I wanted to know how to do a good job. I can see how it would be smart to stay at the machine, so you can stop any problems before they get out of hand.
you do NOT need a chiller, and most people make the mistake of getting one, then causing condensation all over and HV arcing and blow the power supply.
you get radiators and fans, water from the laser is pumped through radiators, a cheap china 50Watt can use a pair of triple fan 240mm cheapie PC radiators to cool it then into the sealed lidded bucket. having your water at 20C is very safe. the guys that run at 10C are asking for failures.
All the laser forums are filled with fools that think they need to get the water as cold as possible. keep it below 30C and you are just fine and this can EASILY be done with cheap radiators and fans.
So how many for a 150W laser?
At some point you move up to a car radiator and fan.
Compact, full-size, semi truck size, your choice.
One compressed air cooler uses an air conditioning radiator designed for a truck. Not sure those are suitable for use with water, though.
I am completely new to laser cutters and I am looking to buy one. I have my eye on a Lasertech 6090 from a company called Mantech. Has anyone had experience with this laser or company before I part with my money please?
I’ve got some comments about using a galvo style (not ‘flatbed’ style) YAG marking laser for cutting thin metals with zero distortion (really- absolutely zero distortion) and crisp, clean edges.
If anyone is interested let me know the best place to comment and I’m happy to share. I’m not a regular on this site.
We run a 36”x55” Boss Laser at our shop, mostly for cutting acrylic and Rowmark engraving. We have a fume extractor hooked up, but it still tends to stink up the shop with burning plastic smell. There are pass-through bays on all sides of the machine that have visible gaps into the machine bed. What do you think about taping the openings of the bays to create negative pressure when the fume extractor is running? Good tips on this page, I’ve learned through a number of these already. Thanks!