If you’ve ever used a drill press, you too may be familiar with the dreaded airborne parts. Just a bit farther to drill and then–kachunk–a siezed drill bit sends your part spinning, or worse, hurling across the garage. We quickly learn to clamp down our parts in a vise. Unfortunately, even a vise wont prevent the drill bit from skipping around and drilling wherever it wants.
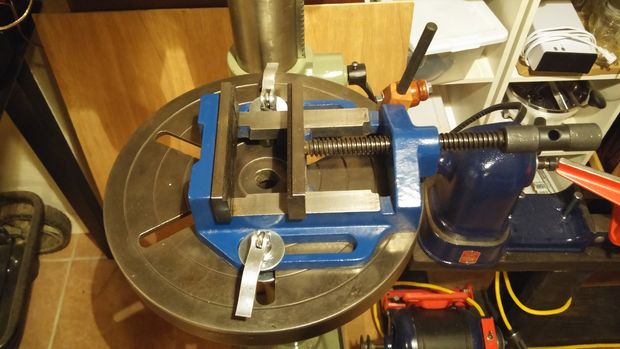
Fortunately [djpolymath] has a fix. From spare bicycle quick-releases, he’s cobbled together a vise clamp that’s both dead simple and dead clever. On a bicycle, the quick-release is a painless mechanism for taking off the wheels in a pinch without using fancy tools. [djpolymath] has simply relocated a few spares onto a vise. With a few washers for spacing them out correctly, he’s set–and so is the vise.
Now that things are getting a bit safer in the garage shop, why not try a few other tool modifications, like this jigsaw table.


Cut normal bolts to the right length so you don’t spend ages spinning the nut on and off then you can use a spanner on it to nip it up properly. shouldn’t take much longer than this plus you can still bike to the shop for drill bits without having to realign the part when you get back.
You often have to adjust slightly several times when drilling, so this really seems slightly more convenient.
Plus the underside is poorly accessible, and with bolts you need to hold both sides unless you find a way to not make them turn.
So all in all this idea is good for many of us.
Incidentally when you insist on using bolts you can also use wingnut type nuts for manual adjustment I guess. Assuming you can find the right size ones..
no wing nuts, use bolts.
usually tables have bits on the bottom that stop hex nuts/bolts from spinning freely.
Or use T-nuts/T-bolts, which rather strangely seem to fit t-slots in machine tables like theyre almost designed for the job :-)
That would be great if every damn place in my area didn’t only carry ‘standard’ items, and they don’t consider those standard items, even though they sell damn vices that require them.
I expect I’m not alone in this experience.
I’ve nearly lost a hand or two to parts deciding they didn’t want to be held in place by my feeble digits anymore when on the drill press. A drill press vise is a great thing to have, but I like c-clamps or v*-grip style ones better as you don’t have to remove bolts every time you don’t need (or don’t have room for) the vise.
I’ve also been hit square in the chest by a chuck key I forgot to remove before, it doesn’t tickle. We even have one of the keys that is spring loaded that will push itself free of the chuck when you let go, but I grabbed the usual style one, which for some reason my co-workers demand we have as well… Those will free themselves too…. when the chuck is spinning fast enough!
Ah.. so that’s what that damn spring is for! Mine doesn’t quite seem to be strong enough to reliably push the key out every time so I question how much safety it is giving me. On the other hand it does seem to be quite strong when I am trying to actually use the chuck key. I have to be careful or it is easy to not fully engage the teeth of the key with those of the chuck thus making the mangling of teeth likely. I really don’t like that spring.
A lathe chuck key can only ever be in 2 places. Either held in your hand or removed from the chuck and stored in the standard location (Some machines have a special holder, I tend to just keep it on top of the headstock)! Make it a habit to never let go of the key unless it’s removed from the chuck. Even if it’s just to turn around and grab a tool, even on springloaded ones, even if you are just chatting with a coworker. People are creatures of habit. If we are used to just leaving the key in place when doing something else, we’ll eventually forget to remove it before starting the lathe. And thats when things get ugly!
My solution: Two drill presses. One with flat bed and one with an x-y vise I picked up at a sale for under $50.00.
Neither drill press was expensive, around $100.00 each, but I don’t need anything professional in my little shop. The x-y vise is a wonderful bit of gear that I don’t know how I lived without before. No more repositioning of vise or shimming of parts in vise to get it to the right position.
absolutely, an XY vise is a requirement for anyone that owns a drill press and wants to do anything at all remotely precise.
I use a 1:1 template printed on paper, tape it on the work piece, then use a center punch to mark the holes, I put the work piece on the drill press, run the bit down (with the drill press off) until it aligns on the mark, give the chuck a single turn with my hand and then back off, turn the drill on and then drill. I can do 500 holes with precision to your 50 with the X-Y vise. The center punch mark will align the work piece with the bit, unless its something super heavy. And you want to use shorter bits, a long bit will bend to the punch mark. I find the X-Y vise to look nice on paper, but in practice they are super fidgety and slow. Marking your work piece with precision in the first place is the important part. If I need milling machine precision, I’d just use a real mill. And a lot of people will get the idea that the X-Y vise can be used for a mill. You’re just destroying your drill press bearings if you use it for that. Unless all you work in is wax, I guess.
I think you meant a jig borer. The bearings in a sensitive drill quill and the resultant flex don’t put it into the precision category. Theyre handy for making lots of quick holes in things to punch marks and starting taps off if you don’t have a tapping block or similar to hand though.
Most of the cheaper xy tables are far from precision too. You have to pay a few hundred dollars before you approach something not made from crap quality castings with slop/bad tolerances on the leadscrews and with parallel non adjustble gibs you just wind up a grub screw to preload. I had a spate of wasting my money on these, then one day bought a used mill instead and its night and day.
For the op, I just have my vice clamped to the table with quick release welding clamps. Then I can take it off when I don’t need it without having to unscrew things. Because I’m lazy like that.
Pretty clever [djpolymath], thanks for the idea and demonstration. (if you see this)
It’s one of those obvious things you don’t think of for the longest time, so it’s nice to have someone think of it for you.
Seems like it might be useful.
I like it! Thanks for sharing your idea. Think I’ll order some of these today and give it try.
Thanks. It’s a good idea if you have the bits lying around. Will probs work better for me than the my current drill vice solution.
In a similar vain, I copied the design of these for the cheap mole grips I used that are past their useful life on small objects:
http://www.ebay.com/itm/141955222324
Basically chop a jaw off (the correct one) weld a bolt to the underside and add a piece of bent/shaped metal to remaining jaw.
$2 for a cheap mole grip plus scraps.
Re the chuck, following on from an idea on HaD I added a HD magnet inside the pulley cover to hold the chuck key.
Only I went a little further and adding a junk micro switch as a pressure point for the chuck key to operate as a power on interlock. If the chuck (or suitable piece of metal, granted) isn’t in it’s location the drill wont turn on.
Looks like if you dispensed with the top washer it would still lock the vice down when oriented like the picture. Then you could release, turn 90˚ and slide the quick release straight through the slots for really swift removal.
using proper millers clamps or similar along with lockable table clamps will do much the same, that said this is an easy fix for those in a pinch.
I like it. Simple and effective. Nice work!