Squishy Miter Saw Shroud Spares You The Sneezy Bits

Let’s be honest. When it comes to operating miter saws, these tools kick dust out the back like a spray paint can. Most of us have accepted this quirk as-is, but not [Inspire Woodcraft] who’s on a mission to achieve near perfect dust collection. And he nearly has it. With a budget dust collection setup, he’s able to eliminate over 90% of the dust from his cuts, and others who’ve adopted his setup can vouch for his results.

The solution comes in two pieces. First, he focuses on creating a new dust shroud or “boot” for collecting dust through the vacuum hookup on the back of the saw. What’s key here is that this dust boot is made from squishy silicone, enabling it to flare outwards and spread out as the saw travels downward into the material. It’s clear that [Inspire Woodcraft] has gone through dozens of material and shape iterations, but the result is sturdy enough to stay open with the vacuum running through the back hose attachment.
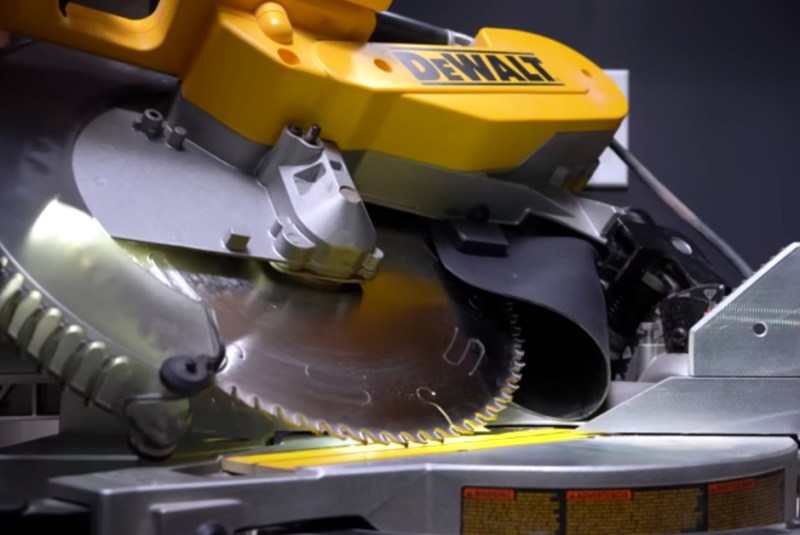
With the dust nearly perfectly funneled from the back, the second tweak focuses on rerouting stray dust away from the table and directly into this boot. [Inspire Woodcraft] later noticed that dust collection from the bottom of his miter saw simply didn’t exist, so dust would accumulate at his feet.

His solution? To create a second shroud that fits under the throat plate that takes sawdust once destined for the ground and ejects it backwards and straight into the dust collection boot.

Altogether, this setup solves a long-existing problem with a handful of commodity parts and a few 3D prints. [Inspire Woodcraft] has also chronicled his journey in such detail where you too could recreate his solution from the video. But if you’re feeling lazy, and you’re lucky enough to own the same Dewalt DW716 or DWS716 model miter saws, you can simply snag a kit from his website.

If all this talk of miter saws has your reaching for a screwdriver to see what modified mayhem you can unleash with yours, look no further than this LED hack that adds a shadow line to your cuts.

Continue reading “Squishy Miter Saw Shroud Spares You The Sneezy Bits”

Books You Should Read: Prototype Nation

Over the years, I’ve been curious to dig deeper into the world of the manufacturing in China. But what I’ve found is that Western anecdotes often felt surface-level, distanced, literally and figuratively from the people living there. Like many hackers in the west, the allure of low-volume custom PCBs and mechanical prototypes has me enchanted. But the appeal of these places for their low costs and quick turnarounds makes me wonder: how is this possible? So I’m left wondering: who are the people and the forces at play that, combined, make the gears turn?

Enter Prototype Nation: China and the Contested Promise of Innovation, by Silvia Lindtner. Published in 2020, this book is the hallmark of ten years of research, five of which the author spent in Shenzhen recording field notes, conducting interviews, and participating in the startup and prototyping scene that the city offers.

This book digs deep into the forces at play, unraveling threads between politics, culture, and ripe circumstances to position China as a rising figure in global manufacturing. This book is a must-read for the manufacturing history we just lived through in the last decade and the intermingling relationship of the maker movement between the west and east.

Continue reading “Books You Should Read: Prototype Nation

The BSides: More Curious Uses Of Off-the-shelf Parts

Off-the-shelf stock parts are the blocks from which we build mechanical projects. And while plenty of parts have dedicated uses, I enjoy reusing them in ways that challenge what they were originally meant for while respecting the constraints of their construction. Building off of my piece from last time, I’d like to add to your mechanical hacking palette with four more ways we can re-use some familiar off-the-shelf parts. Continue reading “The BSides: More Curious Uses Of Off-the-shelf Parts”

A Hacker’s Introduction To DIY Light Guide Plates

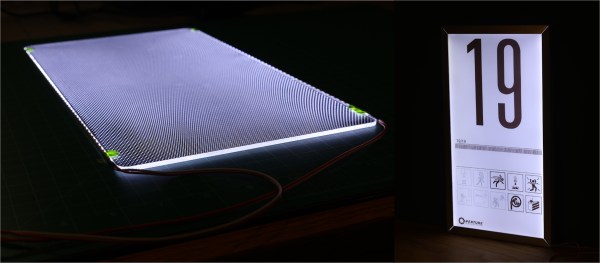
Last year, I found myself compelled to make a scaled-down replica of the iconic test chamber signs from the video game Portal. If you’ve played the game, you’ll remember these signs as the illuminated monoliths that postmarked the start of every test chamber. In hyperstylized video game fashion, they were also extremely thin.

Stay tuned for cake at the end of this article.

True to the original, my replica would need to be both slimmed down and backlit with a uniform, natural white glow. As fate would have it, the crux of this project was finding a way to do just that: to diffuse light coming in from the edges so that it would emit evenly from the front.

What I thought would be quick project ended up being a dive down the rabbit hole that yielded some satisfying results. Today, I’d like to share my findings and introduce you to light guide plates, one of the key building blocks inside of much of today’s backlit screen technology. I’ll dig into the some of the working principles, introduce you to my homebrew approach, and leave you with some inspirational source code to go forth and build your own. Continue reading “A Hacker’s Introduction To DIY Light Guide Plates”

Yesterday’s Drill Press Packed With Tomorrow’s Upgrades

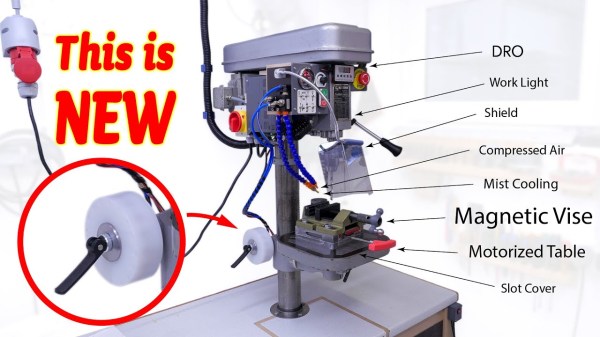
Those who hibernate in their workshops have a habit of re-imagining their relationship to tools. And [Marius Hornberger] is no exception, but the nine upgrades he’s added to his grandfather’s old drill press puts this machine on a whole other level.

In proper storytime fashion, [Marius] steps us through each upgrade, the rationale, and the time and effort that went into crafting the solution. Some of these upgrades, like a digital readout (DRO), add modern features to an old-school device. Others, like an oil mist cooling system and a compressed air chip blower, borrow from other machines with similar setups. Some, like the chip guard, are nice personal touches. And a few, like the motorized table with automatic clamp, transform the entire operator experience. On the whole, these upgrades follow a gentle theme of personalizing the machine to [Marius’] tastes, giving him a delightful, more personal operator experience that’s tuned through his everyday use. Amid the sheer volume of tweaks though, we’re convinced that you’ll find something that tickles your tinkering fancy.

It’s worth mentioning that the pneumatic table clamp alone (at 4:28) makes the entire video worth the watch. If you’ve ever had the mishap of pinching your finger or struggling to hold the table steady while clamping it in place, this little upgrade takes all of that away, replacing the swivel handle with a homebrew pneumatic cylinder made in the shop. With a single button press, a swoosh of compressed air either clamps or releases the table. Best of all, the setup still sports a hand clamp if [Marius] is operating without a compressed air source.

It’s also worth mentioning that a couple of [Marius’] upgrades completely skip the CAD step altogether. Instead, [Marius] creates templates directly off the drill press with tracing paper and then immediately transfers them onto stock materials. It’s a nice reminder that not every small project needs to start with a 3D model.

If all these upgrades are getting you ready to modify your machine, look no further than the video description where he’s courteously posted inks to key components behind these upgrades.

The story of many-a-workshop often involves reinventing your machine tools. If you’re looking for more tales of tool upgrades, have a look at resurrecting a machine from literal ashes or a machine that improves itself.

Continue reading “Yesterday’s Drill Press Packed With Tomorrow’s Upgrades”

DIYson Lamp Hides Cables Between The Seams

[Steven Bennett] is so fond of Dyson’s new Lightcycle lamp that he’s decided to clone his own version in the spirit of the original. Dyson, however, knows what makes their lamp so special — so much that they patented their technique for tucking away the power wiring. Undaunted, [Steven]’s latest challenge has been to create a cable management solution that captures the elegance of the original without making a flat-out duplicate.

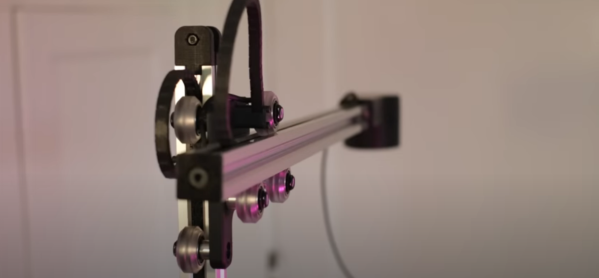
[Steven]’s latest update starts with the details of the original model’s patent. In a nutshell, Dyson’s elegance comes from both a flat cable (a flex PCB, perhaps?) and a magnetic interface that transfers power between the two primary structural beams. The latter half discusses [Steven]’s alternate solution: a miniature drag chain that can be 3D printed to arbitrary lengths. Like the flat flexible cable, this cable rides in the groove of the lamp’s two structural beams; but unlike the original, it spools outwards into a hoop on one end of its travel length. Overall [Steven] is quite happy with this result, and we think this solution gives the lamp a charm that’s distinctly original.

Capturing the design essence doesn’t just stop at wire management though. Have a look at some previous video logs in the series to get a sense of some of the other challenges faced in both heat dissipation and mechanical feel.

Wire management, when done well, scratches a design itch somewhere in the back of our heads. If you’re curious for more cable management solutions, have a look at some of these other tricks that use tape measure or involve a DIY coiling method.

Continue reading “DIYson Lamp Hides Cables Between The Seams”

An “unbusy” USB-C Port Doubles-up For JTAG Programming

Board space is a premium on small circuit board designs, and [Alvaro] knows it. So instead of adding a separate programming port, he’s found a niche USB-C feature that lets him use the port that he’s already added both for its primary application and for programming the target microcontroller over JTAG. The result is that he no longer needs to worry about spending precious board space for a tiny programming port; the USB-C port timeshares for both!

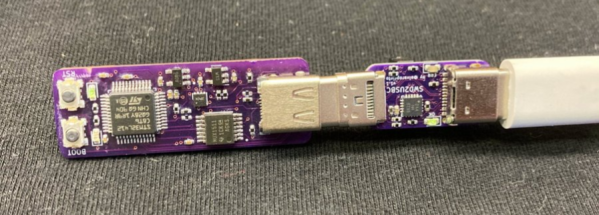
In a Twitter thread (Unrolled Link), [Alvaro] walks us through his discovery and progress towards an encapsulated solution. It turns out that the USB-C spec supports a “Debug-Accessory Mode” specification, where some pins are allowed to be repurposed if pins CC1 and CC2 are pulled up to Logic-1. Under these circumstances, the pin functions are released, and a JTAG programmer can step in to borrow them. To expose the port to a programmer, [Alvaro] cooked up a small breakout board with a USB-C plug and separate microcontroller populated on it.

This board also handles a small quirk. Since [Alvaro’s] choice of programming pins aren’t reversible, the USB-C plug will only work one of the two ways it can be plugged in. To keep the user informed, this breakout board sports a red LED for incorrect orientation and a green LED for correct orientation–nifty. While this design quirk sacrifices reversibility, it preserves the USB 2.0 D+ and D- pins while also handling some edge cases with regard to the negotiating for access to the port.

Stick through [Alvaro]’s Twitter thread for progress pics and more details on his rationale behind his pin choices. Who knows? With more eyes on the USB-C feature, maybe we’ll see this sort of programming interface become the norm?

[Alvaro] is no stranger to Hackaday. In fact, take a tour back to our very first Supercon to see him chat about shooting lasers at moving targets to score points on a DEFCON challenge in the past