A few years ago, FLIR unleashed a new line of handheld thermal imagers upon the world. In a manufacturing triumph, the cheapest of these thermal imaging cameras contained the same circuitry as the one that cost six times as much. Much hacking ensued. Once FLIR figured out the people who would be most likely to own a thermal imaging camera can figure out how to upload firmware, the party was over. That doesn’t mean we’re stuck with crippled thermal imaging cameras, though: we can build our own, with better specs than what the big boys are selling.
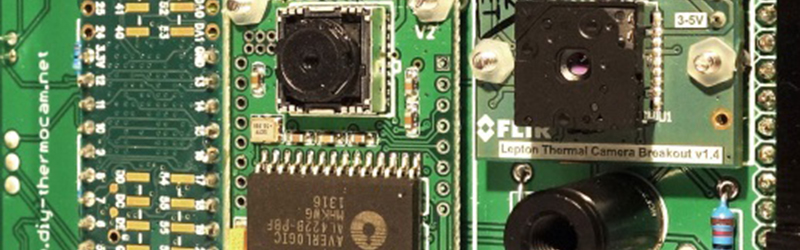
[Max] has been working on his DIY thermal imager for a while now. We first saw it about a year ago, and the results were impressive. This thermal camera is built around the FLIR Lepton sensor, providing thermal images with a resolution of 60 by 80 pixels. These thermal images were combined with a VGA resolution camera to produce the very cool enhanced imagery the commercial unit will get you. There’s also a 1/4-20 threaded insert on the bottom of [Max]’s version, making it far more useful in any experimental setup.
Now [Max] has unleashed his DIY Thermocam on the world of Open Hardware, and anyone can build their own for about €400 (about $425). The components required for this build include a FLIR Lepton sensor easily sourced from the Digikey or GroupGets, an Arducam Mini, a Teensy 3.6, and a mishmash of components that are probably kicking around your parts drawers.
If you want an overview of this project before digging in, [Max] has a project overview (PDF warning) going over the build. This is one of the better DIY projects we’ve seen recently, and the documentation is fantastic. If you’re thinking about buying one of those fancy thermal imaging cameras, here you go — this one is just as good and half off.


“BETTER AND CHEAPER THAN A FLIR” “The components required for this build include a FLIR Lepton sensor”
Riight …
*facepalm*
Clearly I wasn’t paying attention when I clicked on this, I started to read it it and thought the same as you, then realised oh it is a Brian Benchoff article no wonder it is just a load of hyperbole. I have managed to avoid any of Brian’s articles or a couple of months. Shame there isn’t an option to exclude posts by a particular author.
There is. You have the option everyday to scroll past whatever you don’t like.
Well the difference is that he is referring to a complete camera and you are referring to the sensor made by the same company, which can be programmed and used in different ways. Hope this clears the misunderstanding for you.
but he buys the complete camera to remove the sensor…
Exactly. As long as it’s still a hundreds-of-euros device (never mind the actual same sensor), please don’t bother waking me up – calling this “cheap” is like the eleventy billion 500-800 euro “cheap” 3D printers that make a big deal of comparing themselves to 1000-2000 euro overpriced tat conveniently pretending the other few billion 500-ish printers never existed.
I fully agree, cheaper got my attention, but then I quickly noticed that the word “cheaper” had nothing to do with cheap as in “it costs almost no money”. $#$#@% they fooled me again.
for me
cheap = not that good as an original item.
low cost = same or similar item for less money.
Considering the average FLIR is in the 3k+ range for cost. This just uses a Lepton 3.5 sensor you can buy for around £150 from digikey so yeah I’d say its considerably cheaper. Have to agree though the article presentation is horsesh$t.
Newer lepton has higher resolution and integrated in smartphone accessory is cheaper than 400
Yeah I have the cat s60 which can be had for 60 bucks now and a blackview bv9900 which cheaper than 400 and has a crazy good quality
How does it stand up against the FLIR One mobile phone attachment at about £200?
Although, reading his paper, he claims better specifications such as wider temperature range and greater temperature sensitivity, so the claim is justified (even though, yes, it’s still the same sensor, maybe FLIR are restricting the One for some reason – possibly business/market, possibly stability/accuracy).
Could be underspeced also for a number of reasons
Temp resolution might be powersaving
im not 100% sure how these thermal cameras work but i know NTCs when pushed too high for too long they can become less sensitive in the higher end
that might be a part of it
but more realistically its to prevent the FLIR One from being a direct competition of their higher models ..
The stock FLIR One app limits the resolution and throws in some fake noise. They’ve released an Android SDK though and you can get third party apps instead that don’t have these limitations so you get the full 160×120 resolution. There is a Linux driver as well somewhere on the eevblog forum.
The current Gen II model of the FLIR One is 160×120.
Most of the One’s limitations are in the app on the host device.
They disappear once you start processing the raw data with third-party Android apps or just a PC with libusb (I don’t have a link at the moment, but there’s a thread on eevblog where people have managed to get access to all of the raw data streams.)
This is a very nice project from the standpoint of being a true open hardware FOSS project which I applaud. Especially considering it is was homework assignment! Complete schematics, design files for the board, full firmware, etc.
But as far as making a product which is ‘better’ than FLIRs offerings, It seems like the solution to not liking a companies practices (FLIR) is not to buy more of their products–especially considering there is more profit in selling the bare lepton module than the fully packaged TG130.
Consider for example the first gen seek compact ($250) has an order of magnitude more pixels (206×156 vs 80×60) and can be directly be used with a computer (using python/libusb, so it will run on anything with a usb port) or cheap smartphone (android/ios). For sub $300 you could easily have a device which is much more powerful than anything based on the lepton, with much less work. For the cost of this project ($400 + assembly time) you could almost afford the gen 2 seek devices (320×240 pixels, $500) and really have a really solid imager.
Agreed. I have the Seek Thermal camera and got it when it was selling for $199.
I still want to do this… :D
Hey guys,
I am Max, the creator of the DIY-Thermocam.
The title of this article may be sensational and I agree that other solutions for a comparable (Seek Reveal XR) or lower (FLIR One) price exists. I am just a single student who made this project in his free time, so I can not compete with big companies like FLIR or Seek with hundreds of engineers and a big budget. I think the title comes from the comparison table on my page, where I contrast the specs to a FLIR E6, costing around 2000€.
The added value of this project is certainly the software part. The open-source firmware has a lot of nice features and you can control it over a touch interface. The memory is replaceable and the device can be connected to a PC or Pi for live thermal streaming. There is also a nice thermal editing software called “ThermoVision” from JoeC, that allows you to edit the raw images like the FLIR Tools do.
I put a lot of time and effort in this project and hope you do not only judge about it by reading the title. It may not be the cheapest solution in the meantime, but for that price, you can make your own nice thermal imager, and you can adapt it to your own needs at any time.
I think people only have an issue with the clickbait title of this HaD article rather than anything about your project.
Yes, I totally understand that.
I did not choose the title, but I am happy the project is at Hackaday at all, so interested people can find it. Then they can decide whether they prefer the FLIR/Seek solutions or the DIY-Thermocam by their own, which is always a tradeoff decision.
Max, I completed your build a couple months ago with a gen three Lepton module. I have to say, I love it! The only feature that Flir has your build beat on is their proprietary MXQ (or whatever) imaging, which outlines objects in the image. Aside from that, I am extremely impressed and express my gratitude that you took the time to detail building the project.
As much as I would like to be able to afford an Opgal camera and have the resolution to see the individual studs hidden in my walls, your camera suffices for my needs and is definitely a better alternative to the Flir One itself. Again, thanks for all the time you put into sharing this for us.
Thank you very much for your kind feedback, Greg :)
Hi, I also want to make an affordable compact thermal camera for home inspection, like detecting water damage in the wall ,see the studs hidden in the wall and other therma anomalies, did you try with lepton? I am wondering whether it fulfils my requirements. Thank you very much!
No worries. I saw many readers ranting about the sensational headlines of this website, But it probably has a direct financial impact on the website through traffic increase and ad revenue, so probably the administrators of this website keep their head buried in the mud…
HERE ARE 10 SECRETS FLIR DOESN’T WANT YOU TO KNOW!
Number 7 will give your Grandma a mild heart attack, but pneumonia will get her while she’s in the hospital.
No, Grammy, no…….
As you point out, it isn’t competitive on price since you need to buy a lot of extra modules but it is a very well implemented/documented project and good experience. If you’re interested in going into the electronics field for work then this would look great as an example of what you can do.
I did previously think about connecting a Lepton module to a RPi Zero + RPi camera and a SPI LCD but the price of the Lepton + breakout board was always too high. There are two SPI interfaces accessible on the expansion header and the I2C interface is unused as well so you’d be able to drive the LCD and Lepton together. Although if you really want to go the easy route then you might as well just plug in the FLIR One for Android module and skip the separate camera module as there is a reverse engineered Linux driver somewhere on eevblog. Most of the limitations like reduced thermal resolution and fake noise are added by the FLIR One app itself.
oh the project itself is completely OK, it is the title of the article that is the problem. Rest assure that this happens all the time and nobody will hold the creator of the project responsible for it (but the hackaday author). Please keep doing projects like this.
80×60 just seems not of this time, and it’s not a technical limitation but an artificial one.
No offense to the hacker who made this though, always good to tinker, but rather it is a critique on the US companies that make such modules.
And even the author says that to get a lepton3 module you should but the device for smartphones and rip it out from there, which shows you how artificial it all is.(not that that 160×120 is so thrilling either.)
VO2 bolometer cost scales with the area of the focal plane array, as you can imagine. The current generation of pixels are generally fixed at around 17 um in size, so more pixels = more cost. It’s not an artificial limitation at all.
You can get 4 times the resolution from Seek for around 400
And seek supports a wider range out of the box.
The prices mentioned in the PDF of the author are really odd incidentally, they are like references from 20 years ago that somehow slipped into 2017. So don’t blame HaD for that people.
I think you’re comparing apples and oranges. Yes, you can get a Seek Compact Pro with 320×240 resolution for $499: http://obtain.thermal.com/ProductDetails.asp?ProductCode=UQ-AAAX
But you can also get a FLIR C2 with the same resolution for the same price: http://www.flir.com/instruments/c2/
So I don’t understand your complaint about artificial limitations.
The c2 is based on the lepton and is only 80×60. The LCD screen on it is 320×240 but that is only for the visible camera. The seek pro is actually 320×240 thermal pixels. Cheapest products from flir that has actually qvga resolution are a few thousand dollars.
In general seek has been outperforming flir ever since they released the first gen seek just before the lepton was released. They started out as some disgruntled flir employees fed up with the crap that flir tries to pull.
TLDR after I scrolled to a point where they states:
“The Lepton3 is not available
on the market as a standalone sensor so far, so it has to be unassembled from purchased FLIR
One Smartphone thermal imaging camera attachments. The removal is easy and can be done in
under five minutes, the sensor has a shutter already attached.”
Hold up. You’re not supposed to actually *read* the article I linked to. You’re supposed to read the headline, quickly scroll down to the comments, and throw shit against the walls like a monkey.
what was the point of this post?
He was just following his recipe
These days it’s getting to be that you can’t even find an article where the editor isn’t shitposting all over the comments. The place is really going downhill.
@chagrinnish
Jokes: forbidden
True
I love this post. It is the most meaningful thing I have ever seen in the comments section at HaD.
+1 for Brian. Now who is going to clean the walls???
First comment, in a long time, that wasn’t dreadful. I guess you have to host the site, write the articles, and comment with substance too.
https://www.digikey.com/products/en/sensors-transducers/image-sensors-camera/532?k=lepton Here’s the cameras at digikey. $175.00 up to $199.00
No, he’s not using the exact same sensor as the FLIR One.
He’s using the exact same sensor as the *first generation* FLIR One
The currently available unit is the third-gen – although it appears to have the same sensor as the second-gen, which has is a 160×120 sensor as opposed to this unit’s 80×60 sensor.
OK – can’t edit comments.
He’s pulling sensors from FLIR One units.
By definition, can’t be “better and cheaper” than the FLIR One it was pulled from. (The FLIR One hardware does not limit the thermal sensor performance in any way I or anyone else have been able to identify – the app itself is where most of the unit’s limitations lie. But third-party apps like Thermal Camera+ only add a few dollars to the price and still come out WAY cheaper than this.)
Depends on your definition of “better”. For some people the fact that it’s open source makes it better.
Pulling the key component out of the commercial product does not make it open source.
And here I was hoping to find an alternative to FLIR’s ridiculously overpriced sensors.
I guess you’re aware of somewhere you can get military grade NETD uncooled imagers cheaper?
Nope, but I was hoping to find an alternative based on this article’s title.
The full title is “DIY THERMAL CAMERA THAT’S BETTER AND CHEAPER THAN A FLIR”. If it was only “BETTER AND CHEAPER THAN A FLIR”, as you stated, then you would be correct.
Resolution of Lepton is shit. That fact doesn’t change.
What this one what is now now for a few hundred dollars?
https://www.amazon.com/Seek-Thermal-CompactXR-Extended-Imager/dp/B00SSZ5KPY/ref=as_li_ss_tl?srs=12331072011&ie=UTF8&qid=1479451037&sr=8-1&linkCode=sl1&tag=aegisgecom-20&linkId=57c5a9330953001c030e93a90ba36559#productDescription_secondary_view_div_1486577174605
this looks like a fantastic deal … until you actually see pictures it produces :( for more info come to eevblog
Seek might be good with your own filtering/smoothing of raw data from the sensor, but as it is looks like chinese USB 1.1 200K pixels webcam interpolated to 1.2Mpix.
Just to make sure everyone is clear, this article talks about using FLIR sensors from FLIR One cameras. This means that by default it is more expensive than buying a FLIR unit. Also, the current Gen II model of the FLIR One provides a 160×120 resolution (19,200 detection points) and costs $250. That is 70% cheaper than this “upgrade.” If you want more functionality with the files there are plenty of 3rd party software makers in the Apple and Android app stores, or you can create your own as the hardware is not locked down to restrict independent software development.
Or you can do what the article states and look on Digikey where they have the 80×60 lepton sensor for $183. Several different
Has anyone tried the sensors from pulsar? Theyre based in russia so they dont have these silly 3-5Hz refresh rate export restrictions.
Have you got more details on these Pulsar sensors – maybe a link to a website or suchlike?
https://www.digikey.com/products/en/sensors-transducers/image-sensors-camera/532?k=lepton lets you buy the Lepton FLIR and use it on a GPIO device like a raspberry Pi. $199.00 each USD
if you calculate time which takes to build it is not cheaper lol
Was really hoping to see a room temp line array based sensor with a creative method for scanning such as physically moving the array & lens by waving the handheld thing and using onboard accellerometers to correllate the line scans to a image grid. Plus for using passive air-cooling due to waving the thing like a chinese fan…
Hi, I made a simple search on Lepton FLIR Cameras cheap ones and I arrived here today 11 March 2021
My problem is to make a very light thermal camera with FLIR Lepton or Boson cameras that are smallest, lightest, and least power-consuming, to be placed on top of a harmless drone. I know I need a video streaming output from the camera, an interface to bring video signal to a 5.8Ghz Chinese (Ali express, Banggod, Gearbest…) transmitter and need to receive the signal of the thermic camera to receiver video that is connected to my tablet or smartphone via OTG.
Somewhere I see that a Raspberry Pi Zero or Pi Pico is needed maybe to save data on a microSD or something else but I’m not sure if I need this if I Just want to receive an analogic video at the ground station.
Any suggestions? The entire kit with 3.7v battery and small antenna, must be not more than 60/100 grams weight
My other idea was to keep the lepton cameras from some smartphone that is integrated in, not sure if it will be a good idea.
THANKS FOR HELP.
Check out these links:
https://hackaday.com/2018/09/13/turning-a-tiny-flir-into-an-action-cam-with-fpgas/
https://hackaday.io/project/160928-boson-frame-grabber
https://store.groupgets.com/collections/flir-boson-accessories