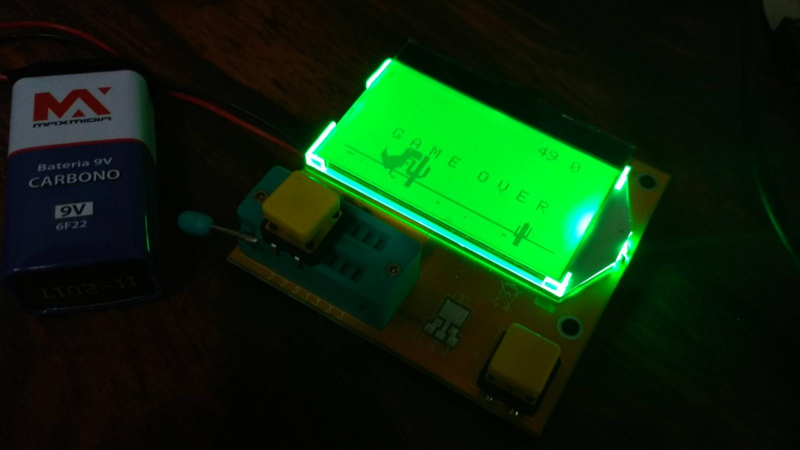
If you’ve ever spent time online buying electronic doodads — which would mean almost all of us — then sooner or later, the websites get wind of your buying sprees and start offering “suggested” advertisements for buying more useless stuff. One commonly offered popular product seems to be a universal component tester, often referred to as a “Mega328 Transistor Tester Diode Triode Capacitance ESR Meter”. These consist of an ATmega328, an SPI LCD display, a Button, a ZIF socket and a few other components. Almost all of them are cheap clones of the splendid AVR-TransistorTester project by [Markus Frejek]. [Robson Couto] got one of these clone component testers, and after playing with it for a while, decided to hack it and write a T-Rex runner game for it.
The T-Rex runner game is Chrome’s offering for you to while away your time when it can’t connect to the internet. It needs just one button to play. This is just the kind of simple game that can be easily ported to the Component Tester. The nice take away from [Robson]’s blog post is not that he wrote a simple game for an ATmega connected to an LCD display, but the detailed walk through he provides of the process which can be useful to anyone else wanting to dip their feet in the world of writing games.
After a bit of online sleuthing and some multimeter testing, he was able to figure out that the LCD controller chip was connected to Port D of the ATmega, which meant the use of software SPI via bit-banging. He then looked inside the disassembled firmware to find writes to Port D to figure out pin assignments. Of course not long after all this work he found a config.h file with the pin mappings.
Armed with this information he was able to use the Adafruit ST7565 library to drive the LCD, but not before having to flip the image. The modified fork of his ST7565 library is available on GitHub. His game code is also available, but reading through the development process is pretty interesting. Check out a video of the Runner game in action after the break.
In an earlier post, we did a product review of one of these cheap Transistor Testers, and if you have one of these lying around, give [Robson]’s game a spin — it could be handy while you wait for your reflow oven to finish its soldering cycle.


I feel sad for this post and the cute T-Rex not having a single comment. So. Fixed.
Thank you :)
And here is my all project Game control with ST7565 lcd, we have Flappy Birb, Tank WAR, Drop Egg, PONG, RACING CAR 3D.
https://www.youtube.com/watch?v=KB5q_dpCsF4&list=PLUPS92edbFApCRXum-77FqoM9hg_HY4G1
Technically trex runner requires 2 buttons. Once you get to a score of a couple hundred, it starts adding in Aerial obstacles that must be ducked under (Unless a double Press or something is coded in to duck…)
That’s pretty nifty! Would be good though, to have it support the game AND the component testing without reprogramming. Maybe use a serial EPROM chip to hold 2 sets of firmware that the chip can load into itself under it’s own software control? Or, ideally, manage to squeeze the whole thing into the AVR’s code flash.
Since it doesn’t have much in the way of inputs, maybe an easter egg for the game! Test a 56K resistor, then a .22uF capacitor (or something), then double-press, and up the game pops!
Quite impressed such a cheap little thing as that has a ZIF socket on board. If it’s a decent one it’s probably the most expensive part in the whole thing.
Robson’s site on this mentions the clouds should really be grey. This is possible on slow, mono LCDs. The Pokemon Mini micro-console, and I think Sega’s VMU as well, could do grey, just by flicking pixels between light and dark quickly enough. Do it at the right speed and the liquid crystals have just enough time to twist halfway between dark and light, if you get the timing right it can be pretty good.
The method I’ve seen used online actually did 4 shades, same as the original Gameboy. You have your display set into 2 bitplanes. You show one bitplane 1/3 of the time, the other 2/3. A pixel appearing in 1 bitplane spends 1/3 of the time darkness, in the other it gets 2/3. Putting it in both bitplanes gives 3/3, or full darkness, and neither gives 0/3, ie 0.
Might need tweaking for each particular display, finding out the response time of the LCD would be helpful, although a bit of experimenting might well be enough.
I still really fancy a tiny, handheld game console, to write my own stuff for. I got a VMU (no Dreamcast, just the VMU) but made a bit of an arse of trying to hand-solder to it’s tiny little 20-odd pin connector. I like Bateske’s Arduboy, and I loved Sprite_tm’s nano-Gameboy running on the ESP32. Teeny weeny displays are cheap now!
Love your comment!
First, I suppose it is possible to have both firmware in the flash at the same time, but the original firmware is still obscure to me and I don’t know much about it.
The idea of getting grey on monochrome displays is just genius, and I will try it in the future. Thanks for the tip! However, the way the display is connected to the board, and the clock speed of the board itself turn this impossible with this hardware.
Funny thing, I also got a tiny handheld console, the Pocketstation (No playstation, just the pocketstation). I actually wrote something about it here: http://dragaosemchama.com.br/2017/01/pocketsation_saves/#comments
I actually found a way to compile code for it by using Orion’s devkit.
Thanks for the info
Why does anybody do SPI bitbanging, when the ATMega 328 has an SPI interface?