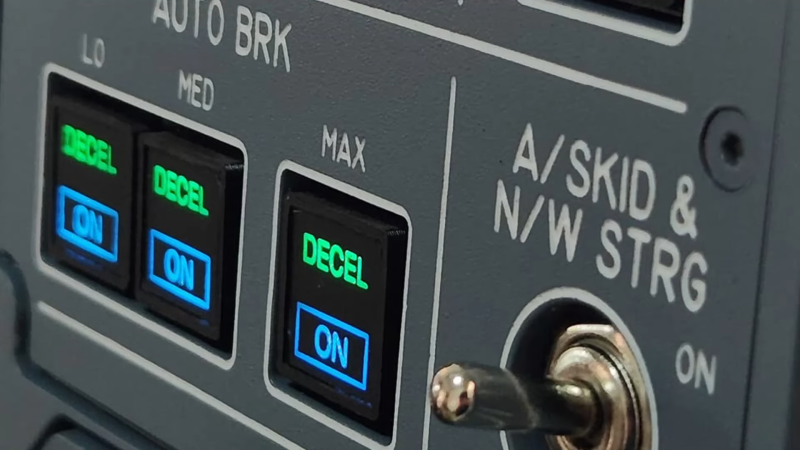
Never underestimate how far some flight simulator aficionados will go with their builds. No detail is too small, and every aspect of the look and feel has to accurately reflect the real cockpit. As a case in point, check out these very realistic Korry buttons that [Santi Luib III] built for an Airbus A320 simulator.
Now, you might never have heard of a “Korry button” before, but chances are you’ve seen them, at least in photos of commercial or military aircraft cockpits. Korry is a manufacturer of switches and annunciators for the avionics industry, and the name has become shorthand for similar switches. They’ve got a very particular look and feel and are built to extremely high standards, as one hopes that anything going into a plane would be. That makes the real switches very expensive, far more so than even the most dedicated homebrew sim builder would be comfortable with.
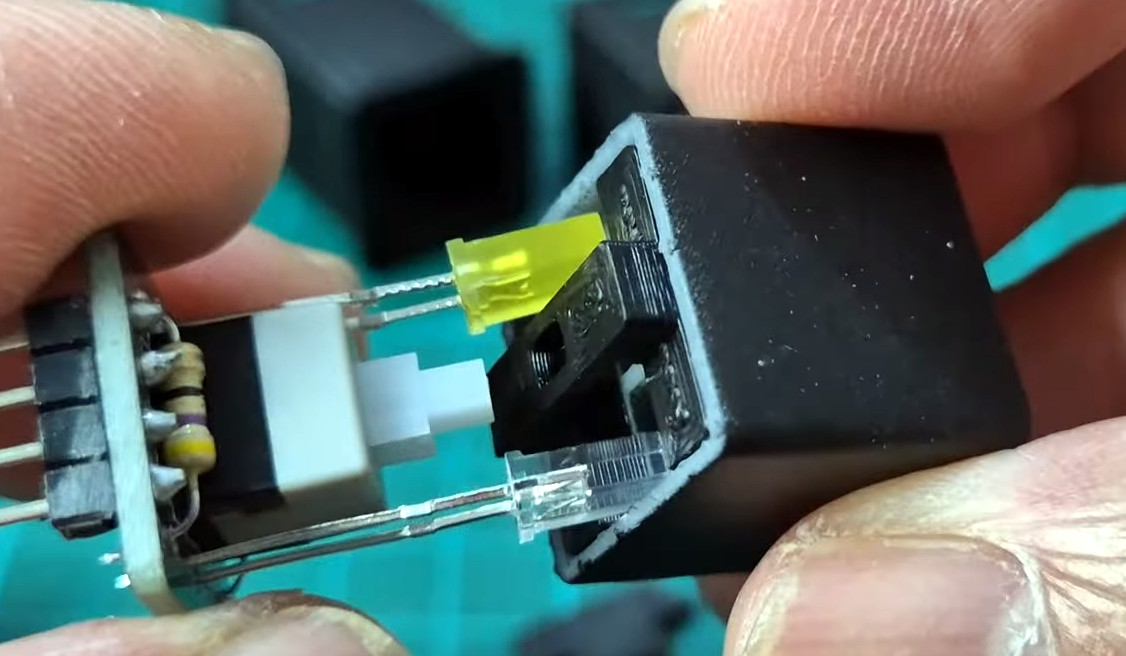 That’s where [Santi] comes in. His replica Korry buttons are built from off-the-shelf parts like LEDs and switches mounted to custom PCBs. The PCB was designed for either momentary or latching switches, and can support multiple LEDs in different colors. The assembled PCBs snap into 3D printed enclosures with dividers to keep light from bleeding through from one legend to the other.
The lenses are laser-cut translucent acrylic painted with urethane paint before the legends are engraved with a laser. The attention to detail on the labels is impressive. [Santi]’s process, which includes multiple coats of sealers, gets them looking just right. Even the LEDs are carefully selected: blue LEDs are too bright and aren’t quite the proper shade, so [Santi] uses white LEDs that are dimmed down with a bigger resistor and a light blue photographic gel to get the tint just right.
These buttons are just beautiful, and seeing a panel full of them with the proper back-lighting must be pretty thrilling. If civil aviation isn’t your thing, check out this A-10 “Warthog” cockpit sim, and the cool switches needed to make it just right.
Thanks to [mip] for the tip.


“No detail is too small, and every aspect of the look and feel has to accurately reflect the real cockpit.”
Bumpable controls.
https://uk.news.yahoo.com/boeing-787-nosedive-caused-flight-223200715.html
Still much safer than a touch screen, where a bump could have destroyed the entire panel. That’s the reason why SpaceX still keeps traditional controls, albeit out of sight, while showing the world how cool their touch screens are.
Now I want to make a set for my car.
My lay intuition of human factors
says
“on” “enable” “go” “engaged” “active” should be lit in GREEN
and things like
“off” “disabled” “disengaged” “inactive” should be lit in RED
But hey! what do I know!? I’m not an airplane engineer!
For safety critical things, red often means “not safe” or “not default.” While green means the opposite. It’s not uncommon to have a red light for something like a highvoltage supply while its output is active, while green is for the output being off.
MIL-STD-1472, Human Engineering, tends to agree. It’s a bit of a long read, but certainly worth a browse and text search works well in the latest revision. https://quicksearch.dla.mil/qsDocDetails.aspx?ident_number=36903
I don’t see it agreeing. “TABLE XV: Red, steady: Malfunction; action stopped; failure; stop action”
Same thing in gauges: “FIGURE 28: Red: out of tolerance, danger-warning” like something is faulty, not that something is on and active and could harm you just working normally.
(note your link didn’t work for me, so i dug up the H revision from somewhere else)
And that is what most people think and how most machines are made. I don’t agree with it, red is supposed to be ‘danger, stop, think idiot, do not stick your fingers in the grinder’.
Maybe the colors need to be reconsidered conserning ‘danger-operational’ and ‘faulty’
Good points. I was hasty in both my reading of the parent comment and the spec. A more careful reading does indicate a clear separation between uses of red and green. That’ll teach me to skim a spec that I’ve not used professionally in about a decade!
That link probably only works in the USA. I’m not sure where you’re from. Everpspec also has copies of it. The dla site (if you can get to it) is one of the best places to find active, public DoD specs.
Years ago I was in the Smithsonian Air & Space museum and they had the Enola Gay on exhibit.
Some of the artifacts in a display case were spare safing and arming plugs for the Little Boy bomb, apparently tossed into a drawer after use and rediscovered during restoration.
One was red and one was green, but they were otherwise unmarked. I remember standing there wondering does green mean “safe” and red mean “armed”… or does green mean “ready to go” and red mean “not ready”?
To me it was far from obvious, and I thought the fact that nobody had bothered to write “safe” and “armed” on them was an opportunity for biblical fubar.
> That makes the real switches very expensive, far more so than even the most dedicated homebrew sim builder would be comfortable with.
Sim builds are expensive, so I was expecting those switches to be kinda expensive, not “$500 each, used, on eBay” kind of expensive. Two of those buys my entire gaming rig!
I was pricing similar switches at one point, even looking at the LCD buttons, the price on them made sense when I realized they were used on Slot machines and VLTs.
No price is too high for something that prints money.
Step 1 Print switches
Step 2 Sell on Ebay
Step 3 Profit!
I work for a company that does validation testing for aircraft. I had to make up a simulator box (just resistors, nothing fancy) and got given an actual flight validated Honeywell 14 gang anti-bump toggle switch to mount in a box.
It was beautiful. You had to lift the toggle to get it to switch.
The craving to own didn’t take long. and a quick search put it at about 1K to buy…. and that wasn’t even a validated for flight version! I dread to think how much a proper one would cost.
You mean, like this?
https://www.aliexpress.com/item/1005001356175064.html
Probably more like this (12 pole switch shown)
https://www.newark.com/t-bar-olympic-controls/802-12c/switch-toggle-12pdt-5a/dp/59F726
This is an epically cool project.
Very nice, but I would have put the LEDs and switches each on their own pair of pins, thus allowing them to be used in a matrix.
For similar results with similar/more/less effort I like these square switches:
https://www.aliexpress.com/item/32800862649.html
Available from a number of vendors. There is a momentary or latched version. The cover pops off. The inside can be removed and replaced with an LED assembly similar to the video. Fits into a circular hole.
In a similar vein, I designed some 3d-printable facsimiles of Twist-Lite/Tellite switches (as seen in NASA’s mission control during the apollo missions) that rely on very cheap ~$0.05 tactile switches at their core. https://fosstodon.org/@CapnSpaceNerd/110885798174712998 https://www.youtube.com/watch?v=LaenrgPVCjc