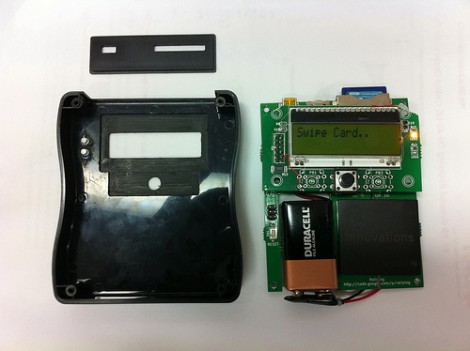
[Stephen Eaton] created an enclosure and shared his process in a pair of blog post. We thought is was amusing that he remarks on how rarely his projects get the to point that you’d want to make an enclosure for them. We’ve certainly got a lot of bare-PCB creations lying around. But when it does come time, we think his fabrication method is a good way to go.
First of all, he didn’t start from scratch. He already had a SparkFun project case sitting around. The problem is figuring how to make it work for your situation. We’ve used a drill, a Dremel, and a file in the past and that yields passable results but nothing that would be mistaken for anything other than a carefully mangled project box. [Stephen] decided to mill the openings he needed from the box, which yielded professional looking results. He started by emailing SparkFun and asking if they could give him a 3D model of the project box and the obliged. He then modeled the LCD screen, LED light pipes, button, USB port, and SD socket. From there it was off to the mill with a custom jig and a few tricks we think you’ll appreciate. The end result is just another reason to build the CNC mill you’ve had on your mind for so long.


[corrections]
Change
“project box and the obliged.”
add [y] to end of [the].
“project box and the obliged.”
(For some reason, it cleared the text of my previous post. Whoops.)
Nice. I’m going to have to learn to use Alibre one of these days.
Wish he showed how he was holding down the enclosures for milling – I always find that to be a pain.
what are the benefits to using a 9V battery?
Only thing it’s missing now is a graphic overlay, like something these guys make: http://www.nameplatesforindustry.com/Pages/faceplates.htm.
Usually shops like this don’t do low quantities (or if they do, it’s expensive), but there has to be some way to reproduce it using transparencies and a color printer, and maybe some sandpaper for the textured “velvet” finish. The professional shops usually print on the reverse side of the label so that the plastic itself protects the printing.
I haven’t yet posted any pics/vids of the machining of the sparkfun boxes, but the end was held down with x2 self-taper screws that stopped it from coming out of the fixture, as far as the front of the SF project box, well for my test I held it with my hands as it we nice and snug in the fixture and the feed and cuts were pretty small. I’ll be posting some more pics shortly showing the hold-downs.
I’m using a 9V as my design requires dual supply, 3.3v for logic/display and 9V for RFID, so it was easier than adding a Boost power supply.
@eric
I have been playing around with a graphic overlay using Overhead projection transparencies with inkjet and laser printer and a vinyl cutter, this all stuck together with some double-sided craft-ish stuff (can’t remember the name) but comes in A4 sheets and is transparent, double sided on both sides, and very thin. I thinks it’s used in scrap booking a lot.
I’m not swiping my cards in that thing
I didn’t find these for the US right now, but in germany we can get this:
http://www.elv.de/F%C3%BCr-HP-Drucker,-Basisfolie-silber/x.aspx/cid_74/detail_10/detail2_6067
It’s basically a transparency film with matte finish and a thin doublesided adhesive foil.
The film is printed on like normal inkjet film, but mirrored on the backside…
Interesting read, but seems like this post was a bit rushed – the grammar is terrible!
@Scott: He holds it steady, repeatedly, with his specially milled foam fixture. Pretty cool way to hold down the material to be milled.. :-)
I wish I had a CNC available for me to use when I wanted to .
For graphic overlays the best method is find a local vinyl printer, like the guys that do car wraps. They can easily do a one off and it is super cheap.