Retro Hackintosh Made From Retro Parts

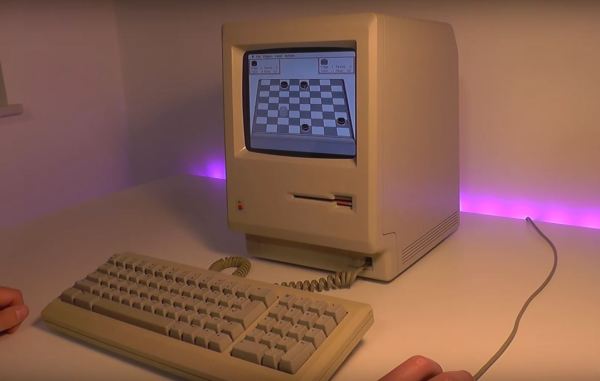
Apple as a company, has staked most of its future around being a “walled garden” where it controls everything from the hardware up through the user experience. In some ways this is good for users; the hardware is generally high quality and vetted by the company creating the software, making for a very uniform experience. This won’t stop some people from trying to get Apple’s operating systems and other software running on unapproved hardware though. These “Hackintosh” computers were much more common in the Intel era but this replica goes even further back to the Macintosh era.

Originally [Kevin] had ordered an authentic Macintosh with the intent of getting it working again, but a broken floppy disk drive and lack of replacement parts turned this project into a different beast. He used the Mac instead as a model for a new 3D-printed case, spending a ton of time sanding, filling, and finishing it to get it to look nearly indistinguishable from the original. The hardware going in this replica is an old Linux-based thin client machine running the Mini vMac operating system, with a modified floppy drive the computer uses to boot. A hidden SD card slot helps interface with modern computers. The display is a modern LCD, though a sheet of acrylic glued to the front panel replicates a bit of the CRT curve.

Click through to read on!

Continue reading “Retro Hackintosh Made From Retro Parts”

Thin Keyboard Fits In Steam Deck Case

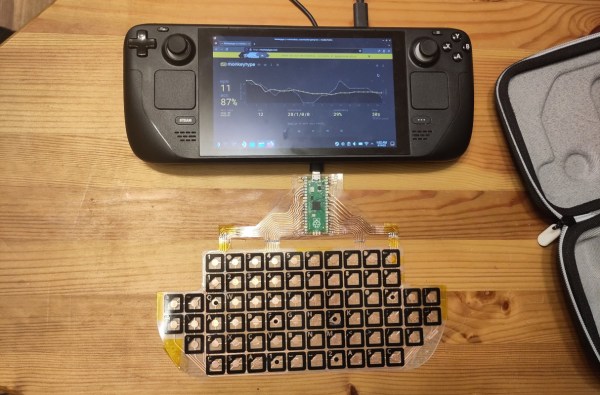
Although some of the first Android-powered smartphones had them and Blackberries were famous for them, physical keyboards on portable electronics like that quickly became a thing of the past. Presumably the cost to manufacture is too high and the margins too low regardless of consumer demand. Whatever the reason, if you want a small keyboard for your portable devices you’ll likely need to make one yourself like [Kārlis] did for the Steam Deck.

Unlike a more familiar mechanical keyboard build which prioritizes the feel and sound of the keyboard experience, this one sacrifices nearly every other design consideration in order to be thin enough to fit in the Steam Deck case. The PCB is designed to be flexible using copper tape cut to size with a vinyl cutter with all the traces running to a Raspberry Pi Pico which hosts the firmware and plugs into the Steam Deck’s USB port. The files for the PCB are available in KiCad and can be exported as SVG files for cutting.

In the end, [Kārlis] has a functioning keyboard that’s even a little more robust than was initially expected and which does fit alongside the Deck in its case. On the other hand, [Kārlis] describes the typing experience as “awful” due to its extreme thinness, but either way we applaud the amount of effort that went in to building a keyboard with this form factor. The Steam Deck itself is a platform which lends itself to all kinds of modifications as well, from the control sticks to the operating systems, and Valve will even show you how.

Retro-Inspired Computer Case Hosts Mechanical Keyboard

During the time in the 1980s when the personal computer was gaining steam as a household fixture, plenty of models shipped with the keyboard built in to the machine itself. This helped reduce costs, lower the physical footprint of the device, and arguably improved aesthetics. But as technology progressed, this type of design fell by the wayside as computers became more modular and configurable. That’s not to say there aren’t any benefits to building a computer like this, though. [jit] is here to show off this Amiga-inspired computer with its own modern built-in mechanical keyboard.

Like the Raspberry Pi 400 which is built into its own case, modern computers like this are extremely portable, relatively simple, and space-efficient. But [jit] did not like the uninspired design of the Pi so he was looking to make some improvements. Starting with the keyboard, it boasts a 60% size board with mechanical keys which are backlit by LEDs. Inside the machine is a Odroid XU4 which has a little bit more power (and is often easier to find) than a comparable Raspberry Pi. The case is 3D printed and includes ventilation and support for the addition of various cooling fans, I/O ports, status LEDs, and switches for the computer inside.

Additionally, some modification of the Odroid itself was needed in order to move the various switches to the case, and the build also includes a somewhat customized power supply internally as well. It’s a well-rounded build that captures the spirit of the old computer cases, but takes advantage of a lot of modern technology at the same time. If you want to go all-out with a build like this, though, take a look at this retro-inspired case (with keyboard included) that manages to get most of a Framework laptop inside.

Continue reading “Retro-Inspired Computer Case Hosts Mechanical Keyboard”

Classic Gaming With FPGA And ATX

Playing classic games, whether they are games from the golden age of arcades or simply games from consoles that are long out of production, tends to exist on a spectrum. At one end is grabbing a game’s ROM file, finding an emulator, and kludging together some controls on a keyboard and mouse with your average PC. At the other is meticulously restoring classic hardware for the “true” feel of what the game would have felt like when it was new. Towards the latter end is emulating the hardware with an FPGA which the open-source MiSTer project attempts to do. This build, though, adds ATX capabilities for the retrocomputing platform. Continue reading “Classic Gaming With FPGA And ATX”

Ultimate Game And Watch Has Support For NES

We’ve talked about feature creep plenty of times around here, and it’s generally regarded as something to be avoided when designing a prototype. It might sound good to have a lot of features in a build, but this often results in more complexity and more difficulty when actually bringing a project to fruition. [Brendan] has had the opposite experience with this custom handheld originally designed for Game and Watch games, though, and he eventually added NES and Game Boy functionality as well.

As this build was originally intended just for Game and Watch games, the screen is about the size of these old games, and while it can easily mimic the monochrome LCD-style video that would have been present on these 80s handhelds, it also has support for color which means that it’s the perfect candidate for emulating other consoles as well. It’s based around a Raspberry Pi Zero 2W and the enclosure is custom printed and painted. Some workarounds for audio had to be figured out, though, since native analog output isn’t supported, but it still has almost every feature for all of these systems.

While we’ve seen plenty of custom portable builds from everything from retro consoles to more modern ones, the Game and Watch catalog is often overlooked. There are a few out there, but in this case we appreciate the feature creep that allowed this build to support Game Boy and NES games as well.

90s PC With Modern Parts Throws Many Off Track

When building a desktop computer, usually the budget is the limiting factor. Making sacrifices on one part in order to improve another without breaking the bank is part of the delicate balance of putting together a capable PC. If you’re lucky enough to have the sponsors that [Shank] has though, caution can be thrown to the wind with regards to price for some blisteringly fast parts. Putting them in a ’90s Hot Wheels case to build the ultimate sleeper PC, though, is just icing on the top.

This isn’t quite as simple as replacing a motherboard in a modern PC case, though. The Hot Wheels PC used a mini-ITX standard and is quite a bit smaller than most modern computers outside of something like a Mac Mini. To get the RTX 3060 GPU into the computer the shrouds needed to be removed to save space, plus an unusual 92mm form factor liquid CPU cooler needed to be installed. An equally obscure power supply was included to round out the Ryzen 9 build and after a lot of tinkering eventually all the parts were fitted into this retro case including the original, working floppy disk drive. After that some additional case modding was installed such as RGB lighting, wheels with spinning rims, a spoiler, and an exhaust pipe.

The main issue with this build was temperatures, and both the CPU and GPU were topping out at dangerously high temperatures until [Shank] installed a terrifying 11,000 RPM case fan. With a series of original CRT monitors to go along with this sleeper PC he can have up to 9 displays with surprisingly high video quality thanks to the fundamental properties of CRTs. The video is definitely worth a watch and falls right in line with some of [Shank]’s other console mods that he is famous for such as this handheld Virtual Boy.

Thanks to [Fast Rock Productions] for the tip!

Continue reading “90s PC With Modern Parts Throws Many Off Track”

Extensive Modification Of DSLR Includes High Quality Audio

Modern DSLR cameras are incredible pieces of technology that can take excellent high-quality photos as well as record video and audio. However, as they become jacks of all trades they risk being masters of none, and the audio quality in modern DSLRs certainly reflects that old cliche. To get true high-quality audio while recording with a camera like this Canon 80d, you’ll either need a secondary audio recording device or you’ll need to interface one directly into the camera itself.

This build from [Tony] aka [Carnivore] goes into the inner workings of the camera to add an audio mixer to the camera’s audio input, allowing for multiple audio streams to be recorded at once. First, he removed the plastic around the microphone port and attached a wire to it that extends out of the camera to a 1/8″ plug. While he had the case open he also wired a second shutter, added a record button to a custom location on the front of the camera, and bypassed a switch which prevents the camera from operating if the battery door isn’t closed.

With those modifications in place, he removed the internal flash from the camera before closing the body. A custom 3D printed mount was placed in the vacant space which now houses the audio mixer, a SR-AX100 from Saramonic. This plugs in to the new microphone wire from earlier in the build, allowing the camera to have an expanded capacity for recording audio.

While [Tony] has a fairly unique use case for all of these modifications to an already $1000 camera, getting into the inner workings of DSLRs isn’t something to shy away from if you need something similar done. We’ve even seen modifications to cameras like these to allow for watercooling during video recording.

Continue reading “Extensive Modification Of DSLR Includes High Quality Audio”