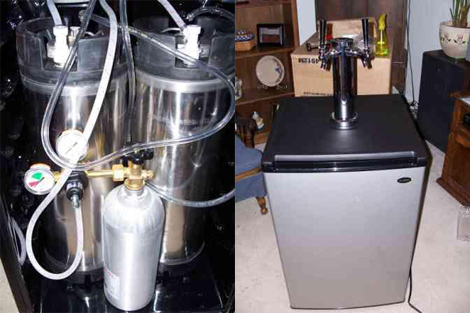
I think we can all agree, there are few things that go better with hacking everything than beer. [Tom] has taken his love for beer and building things, fusing them together in a DIY kegerator. Using an off the shelf mini fridge and some easy to find beer serving components, he walks us through the conversion step by step. When everything is said and done, the kegerator should hold two 5-gallon kegs along with the CO2 tank required to serve the beer.
The process is admittedly pretty easy, but it’s probably the quickest way to go from zero to kegerator. [Tom] has this down to a science, knowing exactly what needs to be altered and removed, so following his tutorial should save you time and headaches, should you attempt this conversion yourself.
It would be great to see this project expanded to include precision temperature controls, a method of determining how much beer remains in the kegs.


You know, for $249 you can buy a decent 7 cu. ft chest freezer and achieve the same results with room for more than 2 kegs.
if the kegs were on a scale it could weigh the contents for the levels.
hmm
This is a very old hack, just updated earlier this month.
By all accounts, the Sanyo is one of the least troubling 1/2 fridges to hack into a kegerator.
There -are- cons to a chest freezer kegerator: they don’t look as nice, and it’s a little more work on the back, lifting kegs into it. Plus a freezer usually requires you to run lines out the FRONT, rather than having a tower. You can manage a tower on a freezer, but it’s a big pain in the rear to open the lid all the way (taps hitting the wall, weight, leaks etc).
Freezers are usually insulated a lot better than dorm fridges however. Freezer’s just don’t look as good in the kitchen, home bar, or game room.
I built my own kegerator out of a (free!) very small GE dorm fridge. I got the tower for $10
off eBay. The tower was drilled for a second tap. With all the money I saved, I got 2 very nice Perlick taps. When I lay new counters in the kitchen, the leftover will go on top of the kegerator, and I’ll add a real drip tray and rails…
If you get a free dorm fridge, folks, don’t give up if the kegerator will not fit. In some fridges you can “bend” the freezer for clearance. This let me fit 1 20L keg, one 12L keg, and a 10 pound CO2 bottle.
I homebrew a lot, but I don’t need more than 2 taps. The strong beers all get bottled anyways.
Making your own kegerator doesn’t usually save you that much money over buying one pre-assembled, unless you already have a fridge, in which case this HOWTO won’t necessarily apply.
@medix: Chest freezers require a temp controller costing >$65 raising your $249 to $315. Add the time/expense of building a collar for the faucets…
Oh, and Sparkfun has a kegerator that uses force sensors to approximate the weight of the keg. This works well.
You can also use tilt sensors with a timer to count how many full pours you made. This isn’t so accurate for measuring how many pours are left, but it is ballpark-range. I’m working on this mod, actually.
@hexmoneky: I’m aware of this, however I happen to have a box of Omega CNi32 PID temp controllers (which can also be found on ebay on the cheap). ;)
I’m still working on the tower, but that’s a ways off. I may build one out of brass / copper (helps when you know the guys in the machine shop for material).
AFA taps on top of a chest freezer – you just take off the hinges and move the whole top so that you don’t have to worry about taps hitting the wall.
@hexmonkey – the preassembled kegerators use cheap parts, so even if it cost the same, you would have better quality. Plus the collar only costs a few bucks in wood and nearly eliminates the first pour foam problem.
@hexmonkey – I mean no offense but you do not know what you are talking about wrt kegerator DIY vs commercial. Your blanket statement is completely wrong.
Commercial kegerators use “Sankey” taps. Sankey kegs are typically HUGE (1/2 barrel is 15 gallons) and are intended for mass-produced generic beer like Bud. These kegs require special tools to clean. The point is, you’ll have to rip out the Sankey hardware are replace it with homebrew standard (Pepsi) type.
Homebrew kegerators are set up to use Cornelius kegs, which are 5 gallons. These kegs are very easily disassembled and cleaned using just a wrench. Their size is perfect for homebrew, which often is a recipe for some niche beer style being brewed up. Being vertical kegs, you can fit not just one keg but sometimes up to FOUR in a larger 1/2 height fridge.
So a commercial kegerator is only worth using if you got the commercial kegerator for free. :-)
Otherwise, you build your own (or have one built). There are a few commercial kegerators setup for corny kegs, but they are rare.
kegs.com and other sites will help you kit together what’s needed. Nice thing is you can customize. I’ve never seen a commercial kegerator with classy stainless Perlick faucets (they never stick, and are cleaned more easily than chrome-plated brass junk faucets).
My kegerator works great with the built-in temp dial. I calibrated it once, marked up the knob, and I can dial in temps for stout to an altbier (just not both at the same time, -grin-). No foamy pours either, if you line the inside of towers with pipe-wrap foam.
Look around the http://www.kegkits.com site and you will also find instructions for converting a freezer into a homebrew kegerator and for converting a full size fridge into a full size keg draft kegerator. There are also instructions for building your oen beer tower cooler.
The way I see it, you can use a scale or force gauge, a resistive force sensor (not as accurate), a flow sensor or possibly some kind of capacitive sensor or float sensor? Not sure on the last two because it has to be in a metal container and because the fluid is pressurized. Any other ideas on how to accurately determine (or even generally determine) fluid levels in the keg(s)
what’s a ‘kegegerator’? proofread much?
@CutThroughStuffGuy
By 2 accounts I have read, the force sensor is reasonably accurate and is the best approach. You’ll need to know the tawny weight of your kegs, and make sure the kegs are not influenced by anything else (like another keg leaning on the first keg).
Float sensors require modifying your kegs. Temp sensors would only work if the beer is chilling or cooling. Capacitive sensor might work; don’t know. Flow meters involve obstructions in the beer delivery which could induce foaming.
Since the weight of a gallon or 12 ounce glass of beer is a constant, I believe the best solution is some sort of scale that the keg sits on. But you need to know the weight of the keg & weights vary depending on who manufactured the soda keg & when. You also need an estimate of how much yeast will settled on the bottom.
You would take the gross weight – the tare – the estimated yeast on the bottom = net weight.
Then the rest is simple math. Beer is served in 12 ounce glasses & the rest would be the net weight / the weight of 12 ounces of beer = the number of servings left in the keg.
This seems to be a good controller project to me!
Hmm nice work.
Just to weigh in on the beer remaining conversation… I would use a load cell, probably from a human scale. I would weigh the whole refrigerator not subjecting the load cell to the temperature inside the refrigerator. Put a new keg in and tare to the nominal volume of the beer in the keg and count down in whatever increment you desire.
Beer line length is something else that can use some attention when making a kegerator. You want to match the CO2 pressure to the pressure drop of the line you are using so that the beer doesn’t come blasting out of the tap. The height from the keg to the beer tap also has a role to play in the line length/pressure.
I guess I am more interested in those kinds of things than how to use a dremel to cut a jagged “drinking glass sized” hole in the top of a refrigerator.
this is a well put together build. No extra’s and no bullshit… I will say, however, that as a hobby brewer myself i can guarantee that not all beer has a constant weight. The specific gravity of the beer will change as it continues to ferment and carbonate. There is one constant that can be measured though, and that is the amount of CO2 that is used. Im not sure how to rationalize the measurement of CO2 and volume of liqiud and container though. As far as temperature control HAD has provided a link that shows you how to turn a household thermostat into a temp. control unit for a standard refrigerator, and I must say that it works very well except that the actual thermostat only goes to 45* while lagering often needs to drop down to around 36*. Any suggestions?
Beer counter scale:
Remember, you are counting 12 ounce glasses of beer. In other words the scale only needs to be as accurate as 1/4 glass of beer at the most! This gives you a +/- 3 ounce leeway per glass & 3 ounces is at least 100X greater than the weight difference between beers with more or less carbonation or more or less alcohol content. In other words, small specific gravity changes from ongoing fermentation should not matter.
Lagering:
Lagers are my favorite beers and I ferment at 55 degrees & lager at 45 degrees.