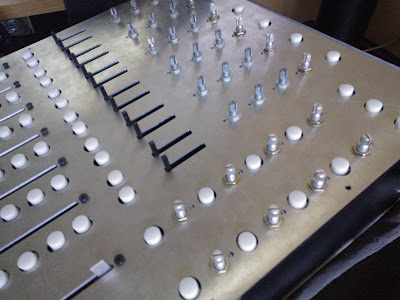
So like many followers of Hackaday, maybe you’re into electronic music. We’d dare to say though that few of you have the dedication of [adamdzak] as he decided to replicate [Sasha]‘s custom controller for the [Abelton Live] software package. Apparently it’s more difficult than taking apart your DJ Hero controller and hacking it to interface songs on your computer.
The “new” controller is named Apollo, and is meant to be a replica of Sasha’s Maven controller. The build process is well laid out in his post, and the results so far look quite incredible. What’s particularly interesting is the effort taken to reverse engineer this device without ever having been able to use it. Both from a mechanical standpoint and trying to figure out how the buttons are used to control the software must have been quite a challenge. Check out the video after the break to see this new controller in action.


Should of anodized the face. You now have a partial mirror faceplate.
I can’t help put mention this as well. http://youtu.be/uqs59UrA11c
and a link to the opensource project around it… http://blog.60works.com/mojo
Looks great but could use some pimping knobs! And an either brushed or anodised face
Agreed, next time you might want to wait until there were knobs on the controller to push this public. It adds a professional touch to an otherwise big hack. Then again, it might have been trickier for the hackaday editors to pick this up as a story because of the too professional of a look.
The authors viewpoint:
“They are purely aesthetic (but really good looking none the less) and as a result I didn’t feel the need to put them into this build. The highest concern was function (which I’ve achieved). Second, which I hope to achieve relatively soon is some labeling and the side thingys. Maybe another month, I’m just in a mad rush to say “IT WORKS!” I’ll leave it at this – I shot for the moon and fell short.”
Fair enough, you fell short. But do you care to explain why? Was it budgetary concerns or time to move on to another project?
I sure can Jose,
It’s a mix of budgetary and just my time in general. I really do want to do them, but like I said was just eager to say “hey it works!” Also, somewhat in line with what you said – it is intentionally shown off as a noncomplete project. Besides, I truthfully don’t know how how I could ever say “It’s done” or “This is it” There is always going to be room for improvement, so if a version 2 ever arises like I said a response on this page I’ve learned a lot in this project alone and there are things I would certainly do differently.
Finally, I’d like to think this project appeals to a lot of audiences and right now the first post I wanted just the right mix of technical/nontechnical verbiage. Future posts will be much more detailed I promise.
Awesome. I can’t wait to see what else you come up with in the future. Thanks for getting back to me. I did see your update photo with the knobs. It would be kind of Hack A Day to update the project photo with your permission. If that’s what you are looking for then I look forward to more information in the future.
Jose,
Just so you know you can always follow updates at adamdzak.blogspot.com – the most recent post was made last night. http://adamdzak.blogspot.com/2012/07/apollo-13-first-things-first.html
Parts list – http://adamdzak.blogspot.com/2012/07/apollo-13-faceplate-design-and.html
The most interesting info is missing, namely what’s going on behind the faceplate.
As it is, it’s faders and pushbuttons mounted into a custom-made faceplate. Big whoop, electronic musicians (especially those who are into modular analogue synths) have been doing that for ages. It would be really much more interesting to know what he used as MIDI interface and how exactly he interfaced it with Ableton to get his pushbuttons to light up accordingly.
(Personally, I opted for the flexible off-the-shelf option: Two or three inexpensive Korg Nanokontrols and a Novation Launchpad. That’s not even a backpack full of equipment, complete with notebook and cables. I shudder at the thought of having to lug around a custom-built briefcase-size controller. I’ve seen far too much–and often hard or not at all replaceable–equipment go kaput in clubs.)
Showing schematics would be great. I mean, everybody can take some pots and buttons and fix them to a plate. The interesting part is how everything is wired.
I will certainly be doing that.
Thanks, that’s great news! I’m looking forward for it.
You can always continue to follow at adamdzak.blogspot.com, for example. Last night was an update in case you missed it! http://adamdzak.blogspot.com/2012/07/apollo-13-first-things-first.html
Parts list has been posted! http://adamdzak.blogspot.com/2012/07/apollo-13-faceplate-design-and.html
It’s painfull to watch those sharp shafts being touched. Knobs! And they won’t be cheap.
Clips! So that is how music is made now. Other artists clips plus Live makes it yours. Yeah right!
Folks/comments thus far,
You’ve all made fantastic points and I’d like to address all of them either here or in upcoming blog posts.
Point #1.
Anodized faceplate – I personally go back n forth on this. It certainly is shiny/reflective, but I eventually decided that I wanted something in stark contrast to the original. Just a little something to make it my own. If a version 2 were ever to be created, like any project I think we all learn from our mistakes and I’d do several things (such as an anodized faceplate) differently. I hear ya folks. I hear ya.
Point #2.
The opensource project – that is pretty awesome. I’m not saying that to just pander, I really mean it. Like any MIDI project, they all serve their various purposes for some specific musical task. Mine was just to replicate the the maven just to see if I could.
Point #3.
Pimping knobs! – Yeah, there are a lot of options in this arena. I actually got black knob caps and while they work part of me thinks “There has to be some way to one up even this portion of it.”
Point #4.
What’s going on behind the faceplate! – Surprisingly is the question I’m getting asked the least and unfortunately I am going to reserving the answer to my blog in upcoming posts. Again, I want to emphasize that I plan on detailing much more thoroughly in upcoming posts exactly how to go step-by-step in replicating this thing. Additionally it’ll be detailed enough that the makers amongst us would be able to improve and alter certain portions. Again, I will share it all! I have no intention of keeping any of this a secret! CAD files, my notebooks, it’s coming folks I promise.
Point #5. Just as a point of correction, the lights are always lit, they don’t correspond to anything going on in the computer. So no programming or anything special here.
Point #6.
Fader caps! – I know, it’s even painful for me to watch. I’m working on it! I swear!
Point #7.
Clips! – I agree, it’s a bit sad. I don’t show up to people’s house’s, put on Pulp Fiction and then when it’s over yell “I’M QUENTIN TARANTINO!” Joel Zimmerman/Deadmau5 recently wrote an article on how dj’s now are just “glorified button pushers,” and I really couldn’t agree more. Playing other people’s music, doesn’t make you a musician – it makes you a dj. I’d never claim to be a producer and I certainly am not trying to. If that is conveyed in the blog it certainly wasn’t my intention. Here’s a link to the article (http://www.gizmodo.com.au/2012/06/rant-all-djs-are-glorified-button-pushers/)
Also thanks Jeremy for writing this! I only just discovered this article.
Again everybody – I’ll be releasing all the information on this. The CAD files, my notes, where to obtain the parts, the exact parts used, everything. Just gimme some time to write the post!
-adam
One comment regarding point #4.
You just missed an opportunity to hook a few hundred thousand return viewers by not having any actual substance to your submission.
I’d be more interested in using a controller like this as a mixing-desk in Ardour.
The most difficult part for me on builds like this (rich “UI”) is finding decent components. just impossible! you have to adapt your vision 100% of the time.
Phatboy, much like the Simpsons, already did it. A majority of the mixing board consoles out there are digitally wired for that impressive automation look of flying faders and some have generic NRPN interfaces that can do this as well. Kudos to the guy for building an interface I guess.
At first I was expecting it to actually look like an Apollo capsule control panel with the rows of switched and vertical bumper rails around each button to prevent accidental switching. That and the classic gray paint scheme of NASA control panels. Oh well.
Everyone, parts list has been posted! http://adamdzak.blogspot.com/2012/07/apollo-13-faceplate-design-and.html