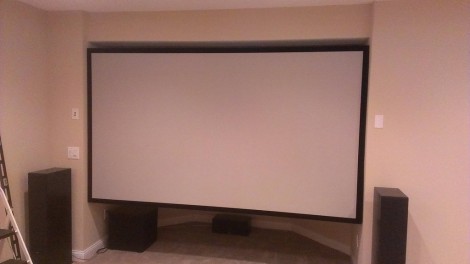
This huge projection screen fills an odd alcove in [Dodge Boy’s] screening room. He built it himself for under $200. The materials, tools, and techniques make this a possibility for anyone who wants their own projection setup.
The frame is made of pine 1×3 dimensional lumber. To keep the fabric from touching the supports in the center of the frame he added quarter-round trim to around the perimeter. From there he painted it black and went for a test-fit. The bad news is that the drywall is neither perfectly flat, nor parallel/square. He ended up taking the trim off and ripping down one side of the frame. That did the trick and he went on to stretch spandex over the whole thing. The frame hangs from a french cleat on either side of the opening. From what we can tell, the surface is just fabric and not painted as we usually see with these setups.
[Dodge Boy’s] utility room shares the back wall of the screening room. That’s where he stores the HTPC which feeds he project, with an RF remote to control it through the wall.
[via Reddit]


Is the screen really silver? A silver screen is required to preserve polarization for 3D projection.
Somehow I doubt the host of Kubrick flung itself from its resting place and screamed we have to make The Shining again in 3D, even if kids do like it.
Who knew that spandex actually served a useful purpose. I never thought about it before but thats an excellent finish and texture to project onto.
I guess that’s pretty cool…
Mine’s better:
http://www.youtube.com/watch?v=aYPe_7y-YkE&feature=share&list=UU4friL3dSN8wRSNcDXYsGPQ
Wrote an app to control lights, AC, and climate control.
Also used Blackout screens instead. My whole screen build, including curtains, motors, rail, and all is under $100.
I do not see anything “better” with your screen.
Not that it is bad in any way.
Why put his project down? show some respect for his ability to document his project and share it with us?
Why not, instead of just showing off your stuff, show how you did it and how you reasoned to accomplish the project.
Yeah….. linked to the wrong video…….
http://youtu.be/aYPe_7y-YkE?t=1m24s
Can someone fix it for me. I dont see a edit comment button.
It’s cool but whenever I see something like this, I have to ask how practical it is. Seems like a hassle having to carry out a tablet which has the right app loaded and ready to go, just to switch on or off a light in the room. But it’s definitely cool and I like that you can control the AC and stuff.
Do those curtains not get in the way of the picture? It looks like they obscure the edges of the screen…
No, I planned for the projection to be 120″, the screen is slightly larger, so there’s room for the curtain to overlap the screen. I was still adjusting the limit switch in the video. Basically just moving the magnet on the rope to the correct point so it would stop outside the picture.
I use the tablet to select movies and control the computer anyway, so it’s not too much of a hassle. Just like picking up a harmony remote. But the all manual switch for lights and AC and screen still work, so you can do without the tablet.
Do you think you could adapt this to rear projection, since he has the alcove he could stuff all his gear into it and go rear projection.
Wide rear projection ??
..was thinking that was it’s primary usage.
http://4.bp.blogspot.com/-GHUtIgiUtjE/TozDy64XNZI/AAAAAAAABvc/gW9GsKzN1a0/s1600/big_ol_booty_by_thatdude34-d41rnep.jpg
Measuring is an excersize in futility, for error is certain. Fitting is oh so fitting! Did this with a friend,just frame and stretch canvas and gesso over.
Wow! That speaker placement is terrible!
I can just imagine all the annoying left channel reflections (and resonance with the wall) and loose bass!
That was my first thought, as well.
Having the center channel sitting on the floor is going to make a mess of things also.
But sometimes you gotta make do with what you’ve got and, given the effort he’s put into the screen itself, chances are excellent that things just are where they are.
Dunno the decor of the room or the tastes of the submitter, but it’s possible to fix reflections to some extent with sound-absorbing materials. A well-placed soft chair might help. Properly placed foam (Studiofoam or Sonex, not mattress foam, simply for reasons of flame spread) will help, too.
Or a frame with fiberglass batting inside of it, covered with a tapestry or perhaps a cloth print from a favorite movie.
Putting a bunch of sound-absorbing stuff (old pillows and couch cushions are monetarily-free to experiment with) in the cavity -behind- the screen will do wonders to smooth out the bottom end, and do so invisibly.
Again, it all depends on the room, and the user. But if he does nothing, he’s surely missing out on a lot of potential with his audio system, no matter what the gear itself consists of.
I did something similar. I made a timber frame and then lined it with blackout cloth. It’s 112″ diagonal.
It’s really hard to take a picture of a projected image that does any justice but here’s some – http://imgur.com/a/47GQe#Cft2E
Some differences are that I used black felt around my frame (absorbs leaked light really well) and I don’t have any middle support beams. I placed a support beam there while stapling the blackout cloth but once finished I removed it and its still very sturdy.
Some pics of the frame being made – http://imgur.com/a/fCYiK
Nice build pics, and final movie shots look sweet.
That is my woot for the month, or year….