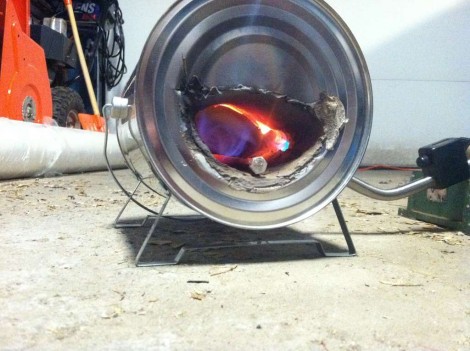
If you’d like to try your hand with the art of Blacksmithing but don’t want to go all-in on your first project this may be for you. It’s a forge which you can build for under $100. [Mike O’s] creation has some great features, like the option of using the forge as a pass through, and he finds it’s possible to heat metal up to 4″ wide.
He bought an empty paint can at the home store (we guess you don’t want fumes from any paint residue). The business end of the forge is actually the bottom of the paint can. He cut a small opening, then lined the inside of the can with Insulwool, a fabric used as heat shielding. From there the inside was lined with several layers of Satanite Refractory Cement. The same applications were made to the paint can’s original lid, which serves as the back of the forge. This way it can be removed for that pass-through we mentioned earlier.
A propane torch brings the heat for this project. [Mike] mentions that you’re going to want to do the first few firings outside as the cement really stinks until it’s been through a few heating cycles. This creation should get him started but we bet he’ll upgrade to something like this coal forge before long.
[via Reddit]


You can spend way less than a hundred bucks if your willing to use charcoal(real stuff, not briquettes) or build your own propane burner. The savings come from mixing our own refractory out of bentonite and/or locally gathered clay and sand. all you need is a shallow container(5 gallon wash tubs are ideal) and a way to get semi-uniform airflow feeding underneath your fire pan. wood can also be used but expect smokier results. Leaf blowers/shop vacs/centrifugal blowers can be scrounged or pressed into service. you can also make a hand operated air pump either like a round bellows or easier to construct Japanese box bellows.
popular brake drum forge
http://www.anvilfire.com/21centbs/forges/brkdrum1.htm
DIY refractory
http://www.backyardmetalcasting.com/refractories.html
Actually, the best refractory I found for cheap was an old pottery kiln with the feather-weight bricks. The next best mix was watered down fireclay, some sawdust, and vermiculite/perlite from the garden center. The fireclay I bought from a pottery shop, but you can use any fine screened red clay that can stand high temps.
Check around some of the creeks for clay banks,
grab a sample,
screen out the organics,
water it down and homogenize it,
mix in your other refractory components,
form it into a puck,
KILL IT WITH FIRE! …erm, I mean, heat test it.
wash, rinse, repeat.
Sawdust? That would turn into carbon right away would it not? So why not use carbon from the outset then? Is there some reason to it? shrinkage/absorption during the mixing?
Coal forges are neat to see, but they’re messy! Propane works much better. My old forge was a 1/4″ thick 6″ square steel pipe about a foot long. Had a fire brick on the bottom, and at the back, so I could pass longer stock through. The sides and top were lined with kaowool with a stainless shield on the inside. Had a home made venturi burner welded to the top.
I always enjoy it when you feature smithing hacks. My first forge was a coffee can miniforge burning charcoal.
I like that name of that cement ‘satanite’, amusing.
Beware – a lot of new paint cans have an epoxy coating on the inside.
Not for long :-)
Indeed. You shouldn’t be breathing whatever’s coming out of the forge anyway, epoxy or not.
Has anybody considered making a forge out of an induction furnace? I’d like to know a little more about electronics-based furnaces.
There are a handful of builds on HaD and other electronics sites that document how people went about building an induction heater. I’m not sure what differences you see between induction vs fuel air furnaces. A heat source is a heat sources as far as the metal’s concerned.Once you learn the idiosyncracies of your forge(electronic or otherwise) operations such as welding, annealing, and heat treating are all pretty much the same.
Induction elements are commonly used in commercial settings due to the greater efficiency in heating the workpiece. The hardest part is sizing the induction coil and related circuitry to the size of work you will typically do. Most circuits are fairly involved affairs that your average weekend warrior doesn’t have the know-how or patience to construct. But any idiot can attach a fan to a grill and have a workable forge.
as with anything google is your freind.
relevant results for ‘induction forge’
http://www.richieburnett.co.uk/indheat.html
http://www.anvilfire.com/news4/NEWS4002.shtml
http://www.knifenetwork.com/forum/showthread.php?t=54160
http://www.youtube.com/watch?v=k4xsqw463Hs
Respect to the author for his dedication to my project.
why you want the gmod 11 in steam?
The forge-version that is linked to in the post is for minecraft 1.5, not minecraft 1.5.1 (I say this because the link you have written before has always got to the right forge-version