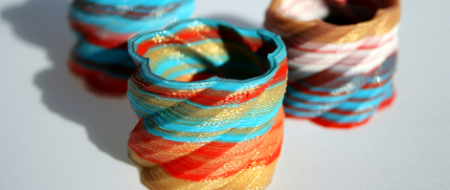
Multicolor 3D printers have been around for a while, but most of these machines – like the Makerbot Replicator – suffer from alignment problems and the inability to mix colors on the fly. [RichRap] came up with an interesting solution to this problem by having three filament extruders feed into a single hot end, allowing him to change and mix colors on the fly.
To print in multiple colors, [RichRap] developed a three-extruder x carriage that sends colored filament to a single hot end. Unlike the Makerbot Replicator, [Rich]’s extruder can mix and blend different colors into each layer of a print.
The electronics portion of the build, [RichRap] controlled the X, Y, and Z axes of his printer with a RAMPS board, but used a slightly modified Sanguinololu board for the extruder motors. A single motor driver for the extruders is connected to a trio of toggle switches, allowing [RichRap] to switch between filaments on the fly.
[Rich] has a very cool build on his hands, but it’s far from a perfect solution. Right now, any one of the three colors can be used to print, but printing with two or three colors simultaneously requires a change in the firmware. We expect someone to solve this problem in the near future, allowing the holy grail of a CMYK print head to come to fruition.
You can see a demo video of [RichRap]’s tri-color print head after the break.
[youtube=http://www.youtube.com/watch?v=nkkbjpHVNZQ&w=470]


That is awesome!
Not awesome – now we just have crappy 3D prints in colors.
nicely made hardware, inspiring
excellent, I am especially impressed with the gradient style colour mixing, and the ranges achieved. 3D printing software packages have a little catching up to do to support this advance.
Yes I agree. This is a big hurdle. The next set is the software to support it, and how to mix properly at the nozzle to get the transitions right.
also, how about 2 more inputs, black and white plastic, to control the brightness of the colour?
That is not how it works. Melt plastic is too viscous to fully mix there.
Colours are just squeezed together like in a toothpaste tube.
Dynamic mixer time!
@Hack Man: Good idea, no doubt that worth experimenting.
May be a coaxial micro eggbeater could be used if the process doesn’t mixes in air or alter the plastic properties.
Have you ever seen those 2-parts epoxy syringes that have the auto-mix nozzles? That might be something to look into. http://www.woodcraft.com/PRODUCT/2000342/9037/MIXING-TIPS-FOR-EPOXY-SYRINGE-APPLICATORS.ASPX?refcode=10INGOPB&gclid=CPqmmumviLICFSZxQgodtSoAEw
Cool, but higher res would make much more sense for me. I can still spraypaint these things.
Makerbot Replicator you just got BURNED!
I would rather see two materials for support
I’ll fess up right away and admit I know very little, read next to nothing, about the extruder heads on these 3D printers.
With that in mind, would it be possible to have the “toothpaste” mix feeding into a heated chamber with some rotating paddles then out the hole. Providing the plastic is relatively incompressible your flow rate should remain constant, you’d just have to space your z-axis further up.
Cleaning might be an issue, but an intelligent chamber design would probably prove self purging.
Instead of toothpaste, think glue gun, a “stick” (filament) of plastic goes in, gets melted, and is forced out the nozzle by fresh plastic coming in. Mixing various colors inside with tiny eggbeaters or screws could work, but when it is done “printing”, the cooling plastic will jam the mechanism, and the next print may need to purge the mixing/heating chamber with fresh plastic until the mixers can run again and residual colors are forced out.
Yeah, I was thinking along the lines of the glue gun, I was just using the toothpaste analogy others were ;-)
I never even thought of the plastic setting in the nozzle! You’d be royally screwed with a thermoset. What about if you sealed off the three feed lines and then flush the nozzle with acetone (or the solvent of your choice). Again I have no idea how introducing huge air pockets into the line would affect things but I’d guess that’d come down to your nozzle design. I love this 3D printing malarky, genuinely exciting.
Awesome! Now we can easily print multi colored hand guns.
This is pretty awesome. It will make multi-color printers cheaper and more accurate but at slightly greater material costs (if you don’t want the gradient effect). Inkjet printers with a single printhead have a similar problem in that many of them have to purge when they change colors.
2 different material printheads would be awesome, one material that can be dissolved in a solvent (leaving the other material intact) could make for some very nice scaffolding/rafts/ overhang buttreses and the like!
We were also earler discussing the idea of printing with white, but injecting a small amount of pigment like via motorized syringe into the heated cavity in the print head.
Fantastic!
My 2 cents’ worth: Instead of just shoving the three filaments into the hot head and hoping they mix (or not, as the case may be), would it be possible to make a miniature screw extruder, a bit like what’s used in commercial injection moulding machines. Depending on the screw profile, you can have lots of different effects – compression, de-airing, mixing etc. In injection moulding, they just chuck in different coloured granules in and they get mixed inside the extruder.
One problem with that is you’d still need filament feeders to shove the filament in to the extruder head before it’s actually expelled. Need to get the feeds and speeds just right.
This project just got about 20% cooler . . .
Nice work! I hope this project grows into something threatening to Z-corp’s printers (read: a lot less money) :D
2 things:
one: mixing thick paste like molten plastic does not work similar to water. the 2-epoxy mixing syringe may work. how do you control the temperature in such a situation?
second: i think one of the best things here is that the calibration problem and speed problem (2 extruders together are very slow) may be solved, which makes it a very interesting option to develop compared to single extruders that work after each other
CMYK+S 3D printing. Cyan, Magenta, Yellow, blacK and Support.
As mentioned by others, getting the plastic to mix will be the hard part.
What could provide additional mixing is a nozzle with a sideways step having two 90 degree or almost 90 degree bends for the plastic to have to go around. That would cause some additional ‘tumble’ in the flow.
Easy to make by drilling two offset vertical blind holes and one horizontal hole joining them, plugging the horizontal hole with a bolt.
A problem with that or any other extended mixing nozzle is lag time between the commanded color and when it comes out the nozzle.
I think it is possible to offset this with software. Calculate the time which is needed for the new color to reach the tip and kick in the extruders with the other colors at the right time(a little bit in advance).
Another option would be to make a “scrap pile” of plastic to get the old color out, so you are certain you are beginning with a clean new color.
I’m glad you like the extruder, software and firmware is the next big challenge with many extruder’s. Slic3r.org – is supporting many extruders in version 0.9.1 so it won’t be long…
Instead of a scrap pile of plastic, this change-over blended material would be used for the object’s infill, then print features in the new colour on the perimeter, and change colour again in the next layer of infill.
& thanks for the post Hackaday!
I really like that idea of using the extra mixed plastic as infill. It still needs to be able to properly mix the colours somehow to print in detail. I’m sure your mind is running a million miles an hour with all the possibilities of your project :)
Thanks Richard for your awesome work.
Concept: Replacement key tops for my calculator. The print is rubbing off some keys. If only the key labels were a few layers of white plastic, embedded in a black plastic key…
Remember the old HP calculator keys? Diagonal lower face, with the extra functions written on there? You could do that, too.
Very cool, I have some technical questions though.
How did you minimize the melt chamber? (Possible Volume spec)
I am not interested in mix, but rather just three different colors, and possibly three different materials. On the lines of three different materials, have you tried three different materials with different melt temps?
If so where there any problems with the cooler melt temps material boiling off? (Generating gas)
Sorry, i am interested in building one with Boa din tub feeds