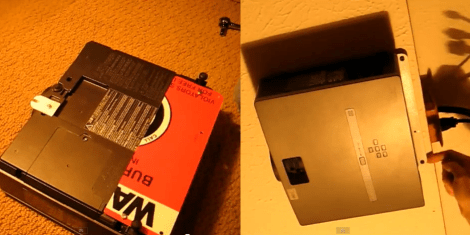
[Lou] needed to mount his projector to finish up his home theater. But he was rather put off by the cost of commercial solutions. He ended up building his own projector mount for about ten bucks. The technique reuses some scrap metal and sources connectors from the hardware store. If your projector will be mounted flat to the ceiling we think this will work just as well for you as it did for him.
To the left we get a good look at the two parts which make up the mounting bracket. [Lou] is reusing a metal warning sign. One large piece is attached to the back portion of the projector and hangs over the end about a half-inch. On the front there is a tab with a slot in it made out the same sign. The slot accepts the head of a three-inch drywall screw. There are two holes in the rear piece which also receive screws. Once the projector is in place the screws can be adjusted to achieve the proper projection angle. [Lou] does a full walk through of the project in the video after the break.
This goes perfectly with the $50 projection screen that he built.


are they drywall screws good enough to hold it up? I know projectors arent that heavy, but my exp with drywall screws, is as soon as you put it in and take it out a couple times, its just going to be a hole and no grip for the screws.
Three drywall screws are strong enough to hold up a person, let alone a projector. Lag bolts are an overkill. The key is what you screw them into. You either need to hit a joist under the drywall or put in a good drywall anchor first.
Yes, it is very adjustable. Small turns to the screws result in huge movements on the screen, so you don’t need to turn them that much.
I’d just buy a prebuilt mount. Here’s one that I buy for work all the time from Monoprice for $12
http://www.monoprice.com/products/product.asp?c_id=109&cp_id=10911&cs_id=1091102&p_id=3010&seq=1&format=2
I have this one too, its good, not super good but once it’s setup correctly, you just forget about it :)
Not hanging a $5k projector from a $12 mount. I got the mount from infocus when I ordered the projector and it was well worth the price. Well built with worm drive adjustments for tilt and pitch.
My mount came with 1/4″ lag bolts to hold it to the ceiling.
Ha! I almost spit up my coffee on my $6,300 suit.
http://www.youtube.com/watch?v=81Nl7VYFEaI
Ive made all sorts of pj mounts out of 9mm ply wood.
Step 1 take a piece of paper lay it on the bottom of the pj
Step 2 make a rubbing of the mounting holes
Step 3 place the marked paper on a suitable sheet of ply
Step 4 drill holes through the marks.
Simples!
His doesn’t look like it allows much adjustment. I like my selfmade projector mount better:
https://dl.dropbox.com/u/28467113/projector_mount.jpg