Water Purification Uses Home-built Electrolysis Rig

If you plan ahead a little bit you could have your own system of water purification to use in emergencies. Everyone needs clean drinking water and this gadget will let your produce your own purification drops quite easily.

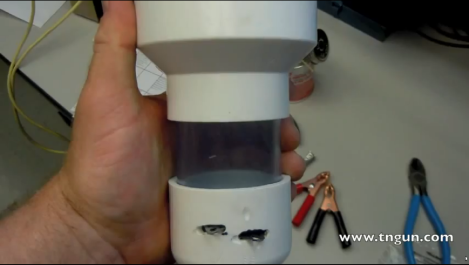
The solution contains chlorine, which is created through electrolysis. The PVC cap seen near the bottom of the image has two electrodes sticking out of it. These are titanium plated mesh plates separated by a rubber ring. The cap has a small hole in it to keep the flow rate low and the fitting at the top acts as a funnel. When you pour in a salt water mixture it passes through the energized plates and a chemical reaction splits the sodium from the chlorine.

A twelve volt power source is necessary for this to work. But since the electrolytic process takes just a minute or two you could easily source the power from batteries charged with solar cells. Check out a full build walk through and demonstration video after the break.

Continue reading “Water Purification Uses Home-built Electrolysis Rig”

Fancy Beer Pong Table Cleans Your Balls

Beer Pong seems to have been around for some time but it only recently exploded in to a universally known game. But one thing has always bothered us. Who wants to drink the beer into which that grimy little ball has fallen? Leave it to the frat boys at MIT to come up with a solution. Their beer pong table automatically cleans your balls.

Of course the table looks great. It’s outfitted with laser cut felt lettering on the apron, and the top features EL wire highlights. But the two features that really set it apart aren’t hard to spot either. First, there are rain gutters along either side to help catch the spillage. Secondly, that blue ring is actually the input nozzle for the ball cleaner. By pushing the ball through the vinyl sleeve it enters a recirculating liquid cleanser, popping out of the portal on the left a second later. That’s about all the details we have on the system, but you can get a closer look at the inner workings in the clip after the break.

The thing to remember is that these guys NEVER run out of ping-pong balls. They’ve got thousands on hand ever since they built this launcher.

Continue reading “Fancy Beer Pong Table Cleans Your Balls”

How To Build A Foam Machine For Your Next Party

Your neighbors are going to love you if you start filling up the back yard with foam at your next party. It’s an easy enough build, but depending on your ability to source the major components it could cost a pretty penny to use it at your next rager.

[Species287] used a big fan and water pump which he already had on hand. All together that saved him about $200 (he’s pricing in Australian Dollars but they’re almost even right now with USD). The soap solution is super cheap, just a bottle of dish washing liquid mixed to the correct proportions with water, but you’ll need a way to apply it to the fan. Some irrigation supplies connected to the fan grate with zip ties did the trick. The pump is submerged in the bubble liquid, causing it to spray from the nozzles near the fan. But this won’t actually create bubbles. The last piece is a bag-shaped hunk of shade cloth from the garden store. Each pore of the cloth acts as a bubble ring. The cloth gets sprayed with soap by the sprinklers and the air from the fan then blows the bubbles.

There’s no video of this project so if you want to see it in action this other diy foam cannon will have to do.

How A Quarter Shrinker Works

This machine is capable of shrinking coins. What you’re looking at is actually a 3D model of the Geek Groups impulse generator, which is called Project Stomper. The model is used to explain how induction shrinks a quarter to the size of a dime.

The grey chamber to the left is a reinforced containment device. It’s a safety feature to keep people in the same room as the Stomper safe from flying particles which may result from the forces this thing can put out. You see, it uses a mountain of magnetic energy to compress the edges of a coin in on itself.

As the video after the break illustrates, the main part of the machine on the right starts off by boosting mains voltage using a microwave oven transformer. This gets the AC to 2000V, which is then rectified and boosted further to get to 6000V DC. This charges three huge parallel capacitors which are then able to source 100,000A at 6 kV. When it comes time to fire, the charge is dumped into a coil which has the coin at its center. The result is the crushing magnetic field we mentioned earlier.

This isn’t a new concept, we featured a different coin crusher build in the early years of Hackaday’s existence.

Continue reading “How A Quarter Shrinker Works”

Never Pay More Than $10 For A Projector Mount

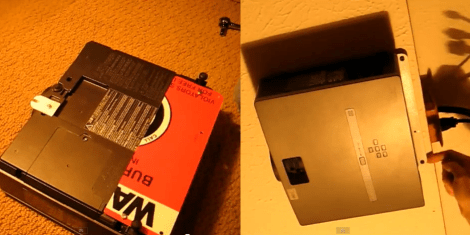
[Lou] needed to mount his projector to finish up his home theater. But he was rather put off by the cost of commercial solutions. He ended up building his own projector mount for about ten bucks. The technique reuses some scrap metal and sources connectors from the hardware store. If your projector will be mounted flat to the ceiling we think this will work just as well for you as it did for him.

To the left we get a good look at the two parts which make up the mounting bracket. [Lou] is reusing a metal warning sign. One large piece is attached to the back portion of the projector and hangs over the end about a half-inch. On the front there is a tab with a slot in it made out the same sign. The slot accepts the head of a three-inch drywall screw. There are two holes in the rear piece which also receive screws. Once the projector is in place the screws can be adjusted to achieve the proper projection angle. [Lou] does a full walk through of the project in the video after the break.

This goes perfectly with the $50 projection screen that he built.

Continue reading “Never Pay More Than $10 For A Projector Mount”

Hand Cranked Electric Toy Has No Batteries Or Power Supply

We think this hand cranked robot design is nothing short of absolute brilliance. The toy is remote-controlled through a short section of wire. It can drive forward and turn, but not at the same time. Still that’s impressive considering it uses no battery or power supply and, of the two servo motors, only one is actually in the robot itself.

The second servo, which is visible to the right, acts as a dynamo. When you crank it electricity is generated. The inputs of that servo are connected to the inputs of the one in the robot to power it. If you crank in one direction the colorful toy will drive forward. But there is a one-way catch on one of the side wheels so when the servo is cranked backward the little guy actually executes a reverse turn. The magic of building a project like this is perfect for a weekend activity with the kids. Don’t miss the demo embedded after the jump.

Continue reading “Hand Cranked Electric Toy Has No Batteries Or Power Supply”

Wearable Raspberry Pi Turns You Into The Borg

The Hoboken hackerspace, MakerBar, recently hosted a very special guest – [Rob Bishop] from the Raspberry Pi Foundation. Wanting to impress [Rob], [Zach] and a few others from MakerBar put together a wearable computer based on the Raspberry Pi in just a few hours.

Putting a Raspi, small Bluetooth keyboard and mouse combo, and a USB charger equipped with lithium-ion battery wasn’t that hard. The tricky part was finding a wearable display. Luckily, [Zach] had a pair of MyVu Crystal video glasses lying around and after a tricky bit of dissassembly, the folks at MakerBar had a completely wearable computer.

Apart from the RCA cable connecting the Raspi to the glasses, the project is completely wireless; with a small webcam also mounted to the display, the Pi in the Face could easily be a platform for figuring out what to do with Google Glass.

[Zach] said the entire setup could be reconstructed for about $100, a fair price for being turned in to [Locutus] of Borg