Comic Boxes Reflect Owner’s Skills

We are the culmination of our experiences. We build with the tools we’re familiar. We design with the decorations we like. Sometimes this thinking leads to a project that looks like a kindergartener who has dressed in a pink tutu and a camo shirt. Sometimes our experience leads us to make something functional and elegant. [jordanlund] combined his work experience in a library, 3D modeling skills, and love of comic books to turn a hodgepodge pile of scribbled-upon boxes into an orderly collection of comic books in boxes adorned with brass drawer pulls.

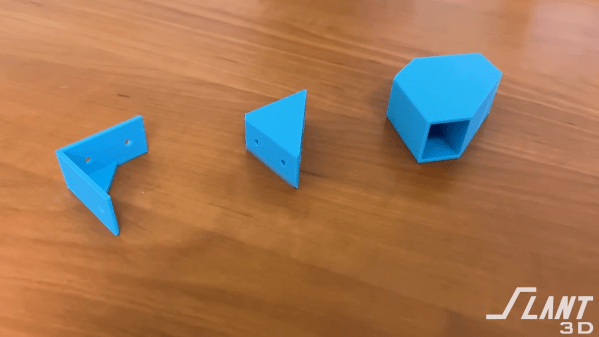
3D printing bridged the gap between the brass card catalog drawer pulls he knew well from the library and the crates of comics he kept at home. Custom brackets allowed the drawer pulls, which were meant to be screwed into wooden drawer faces, to work with cardboard boxes. The drawer pulls have a slot for labels so there will be no need to rip off sticky labels later or scrawl with a permanent marker. Perhaps [jordanlund] is merely a bibliophile with a 3D printer but if we didn’t know better, we might think those boxes were meant to have the drawer pulls installed.

Engage your own love of literature with this wordplay riddled appeal for libraries. or make your home library a little more fantasical with a secret door.

10-drive Microserver Is The Clown Car Of The Computer Case World

ten-drive-itx-clown-car

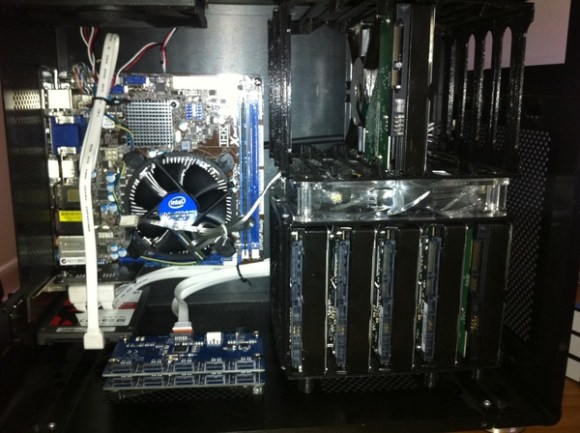
[Coke Effekt] wanted to push his server’s storage limits to a higher level by combining ten 3 TB drives. But he’s not interested in transitioning to a larger case in order to facilitate the extra hardware. It only took a bit of hacking to fit all the storage in a mini-ITX case.

His first step was to make a digital model of his custom drive mount. This uses two 3D printed cages which will each hold five drives mounted vertically. To keep things cool the two cages are bolted to a 140mm fan. The connections to the motherboard also present some issues. He uses a two-port SATA card which plays nicely with port multipliers. Those multiplier boards can be seen on the bottom of the image above. The boards are mounted using another 3D printed bracket. Each breaks out one of the SATA ports into five connections for the drives.

[Thanks Pat]

Repairing Broken Injection Molded Parts With A 3D Printer

injection-molded-part-repair

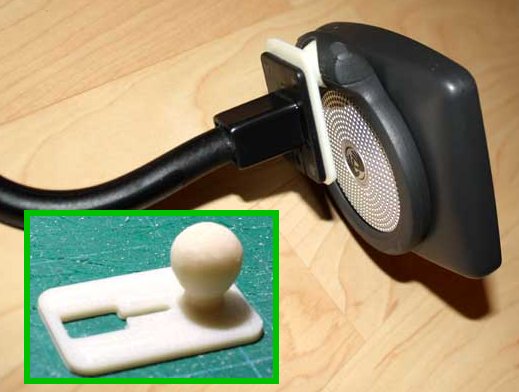
The value of a 3D printer is obvious for people who hack hardware as a hobby. But this repair project should drive home their usefulness for the commoner. [James Bruton] used a 3D printer to recreate a hopelessly broken injection molded plastic part. This is a suction cup mounting bracket for a Tom Tom GPS module. The sphere which makes it adjustable had broken off of the column holding it. For 100% of non-hacking consumers that’s the end of this item. We can’t see a fix that would restore the strength of the original part.

The replacement starts by measuring the broken part with precision calipers. [James] then grabbed a copy of 123D, which is free software. He starts by modeling the sphere, then builds up the support column and the base with a cut-out. It’s obvious he’s already very familiar with the software, but even the uninitiated should be able to get this done pretty quickly. After slicing the design for the 3D printer he finds the part will be ready in about 11 minutes. The first prototype is a bit too small (the ball requires close tolerances to work well). He spins up a second version which is a bit large and uneven. A few minutes of filing leaves him with a smooth sphere which replaces the original part beautifully!

You can see the entire design, print, and assembly process in the clip after the break.

Continue reading “Repairing Broken Injection Molded Parts With A 3D Printer”

Simple IPhone Telescope Mount

This cheap and easy hack will let you use your old smart phone to take pictures and videos of the view through a telescope. [Xobmo] built the connector for just 55 cents. Apart from our concerns about scratching the lens when inserting the phone in the bracket we love the idea.

He was given the Celestron Powerseeker 70AZ as a gift from his wife last Christmas. He looked around the Internet and saw that there are already some solutions for recording video using an iPhone 3GS. This design on Thingiverse would be perfect, but he doesn’t have access to a 3D printer and ordering it form a service would cost almost $50. But when he got to thinking about it, all he needed was a ring to fit on the telescope and a way to connected the iPhone to it. He headed down to the hardware store and picked up a PVC coupler. After working with a hack saw and drill he ended up with a slot with two wings on it. Just slip the phone in and slide the ring on the eyepiece. You can see some action shots, and get a look at the mount itself, in the clip after the break.

Continue reading “Simple IPhone Telescope Mount”

Never Pay More Than $10 For A Projector Mount

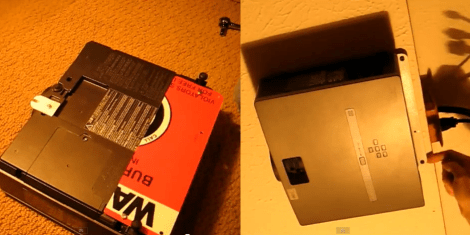
[Lou] needed to mount his projector to finish up his home theater. But he was rather put off by the cost of commercial solutions. He ended up building his own projector mount for about ten bucks. The technique reuses some scrap metal and sources connectors from the hardware store. If your projector will be mounted flat to the ceiling we think this will work just as well for you as it did for him.

To the left we get a good look at the two parts which make up the mounting bracket. [Lou] is reusing a metal warning sign. One large piece is attached to the back portion of the projector and hangs over the end about a half-inch. On the front there is a tab with a slot in it made out the same sign. The slot accepts the head of a three-inch drywall screw. There are two holes in the rear piece which also receive screws. Once the projector is in place the screws can be adjusted to achieve the proper projection angle. [Lou] does a full walk through of the project in the video after the break.

This goes perfectly with the $50 projection screen that he built.

Continue reading “Never Pay More Than $10 For A Projector Mount”

Tri-mounted Monitors Using Strut Channeling (no Welding)

[Optec] want his own triple monitor setup built to his specifications. It turns out to have been a pretty easy project thanks to his mastery of stock materials. The image above is just a bit dim, but if you look closely you can see the strut channel which makes up the monitor frame.

When it comes to this type of metal strut material there’s a lot to choose from. [Optec] went with the half-slot format which provides a little bit of left and right wiggle room. This is important to get the edges of those monitors to butt up to one another. After making a pair of relief cuts he bent the channel in two places, using 45 degree brackets as reinforcement. The monitor mounts are made of MDF with countersunk holes to hide the bolt heads which connect it to the channel.

He figures the total cost of the mount was around $40. Seeing how easy it was makes us think we may never buy a commercial TV mounting bracket again. Of course if you’re more into woodworking there’s a tri-monitor project for you too.

[via reddit]

CNC Milled Docking System For Droid

[Steve] wanted a dock for his Droid phone but couldn’t bear to put cheap-looking parts in his nice BMW. He decided to build his own in order to satisfy his functional and stylistic needs. His main goal was to have a dock with no wires showing, but it also needed to be removable and have the ability to work with different devices (GPS, Droid, etc.).

The hardest part of a build like this is matching the bracket system to the car’s interior. [Steve] sidestepped the problem by starting with a commercial mounting bracket made specifically for the BMW E90 series. From there he added the female half of a mounting bracket he milled himself. The male half connects to this part using an edge connector, passing signals and power between the car and whichever device is currently installed. This way he can design brackets for different devices and not change what’s in the car.

To get a closer look, check out the video after the break. The system he came up with looks wonderful and works great.

Continue reading “CNC Milled Docking System For Droid”