We like this project for its sheer simplicity. After all, recreating the hardware in the controller for a modern gaming system is next to impossible. [Guillermo A. Amaral B.] had a bunch of parts sitting around and decided to try his hand at recreating an original Nintendo Entertainment System controller.
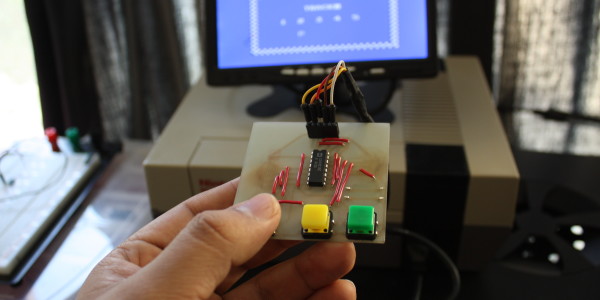
If you’re not familiar with the electronics inside this brand of retro gaming hardware you might be surprised to find that there’s barely any logic hardware at all. The chip in the middle of the board is a 4021 parallel to serial shift register. It connects to the buttons and uses the clock signal coming through the cable to pulse out the button states over a serial wire. So all that [Guillermo] did was lay out the chip with connects for each button.
In the image above his thumb is obscuring the 5-way switch used for directional control and select (center click). The yellow and green buttons serve as A and B, with the start button on the opposite side of the board due to a mistake in his board layout. He does have some future plans for this. He’s working on a Raspberry Pi project that will monitor and record the controller serial data so that you can play it back. It sounds like a player piano for video games.
Want to see a really small version of this? The same hardware in a smaller package was put together a couple of months ago to build the world’s smallest NES controller.
[via Adafruit]


Love it :)
Doesn’t look very ergonomic… He should go back and redo this so it fits into real peoples hands more easily… And where is the start button?!?!
:-)
Hehehe, totally un-ergonomic. Just had a bunch of 10×10 boards laying around. BTW, the start button is on the bottom side.
I use NES and SNES controllers for so many projects. Had to build a few myself. They are just SO simple to work with. My remote controll lawnmower and a few other projects rely on them.
While I like custom controllers, the lack of grounding plane makes me cringe! Not necessarily for heat/rf noise but for the amount of copper wasted in etching!
The board is semi-transparent, I thought it would look prettier without the copper. :)
Fair enough! Not going to argue if that’s what you wanted in the first place :) Think I must be reluctant to buy any more ferric chloride :P
The simplicity is the wonderfull thing about the NES controller. Not only is it easy to recreate, but it’s also possible to do all sorts of other hacks with it. All you need is a latch signal, and then you just synchronously clock out the 8 key states.
For example, once I made an adapter that connected the NES controller to the Keyboard port of the PC/XT. All I had to do was to find a way to generate a startbit and the latch signal.
I’m trying to build something almost alike. Arduino->4021->NES.
I’m just look at NES video’s and time every buttonpress and then program it. It’s a lot of work considering the recorded footage can lose miliseconds after a while and there’s a difference between PAL and NTSC. His way, record buttonpresses and finetune them later, sounds a lot better. Great stuff.