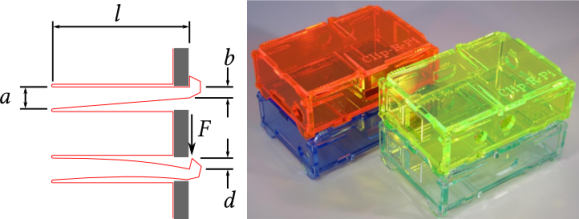
Here’s a design that lets you make acrylic enclosures without using fasteners. The red outline in the diagram above is a bit hard to make out. But look closely and you’ll realize that there is very little material which has been removed to form the clip. This uses the rigidity/flexibility of the material to form a spring that will hold a couple of pieces tightly together.
In a links post last year we looked at [Patrick Fenner’s] fantastic analysis of the strength of using kerf-bending to form several sides of a case out of one piece of material. He’s used that same analytic expertise to take a look into this design. He even suggests that making the cut on the hook-side a bit deeper will help improve the resilience of the part. If you have a laser cutter on hand and want to give this a try he’s posted the plans on Thingiverse.


Dangit! I was just visiting a friendly laser cutter last weekend. Would have loved to try this.
I made one of these containers for a lunch box. Soup leaked all over my bag. NOT IMPRESSED. Am I the only one that thinks there seems to be too much gratuitous math here?
NO SOUP FOR YOU!
But as an additional effect, the soup was well ventilated…
I think that the maths is there for those people who may wish to have an insight on how to properly design their own.
it’s not really a post for the people who just download things from the thingiverse and press print/cut whatever.
but no. I don’t think that three formulas in a blog post that is titled with an aim to give an insight on how to actually design something is too much maths…
This is excellent, I have made a bunch of acrylic project enclosures. Most of them I have fastened with zip ties. This is genius.
Thank you
i think ADAFruit did this for a long time
called them dragon claws or something like that
Yep, here it is: http://www.thingiverse.com/thing:26922
I printed this derivate here http://www.thingiverse.com/thing:26922 for my pi.
The Adafruit box was one of the influences for the clip analysis. They mentioned somewhere in the build guides that their clips could be delicate and shouldn’t be forced, so I started looking at the structural analysis of it to see if it could be made more reliable.
Where their clip gets thinner towards the base, this gets thicker to reduce the maximum bending stress and increase the robustness in use.
You know you were not allowed to remove their license from the box when making your derivate right?
I remember the kerf-bending post, I even remember posting this:
It’s not as useful as you might think – he never actually gets around to do much testing, more theory than practical.
Still, the blog is called ‘Deferred Procrastination’, so, y’know, anyway.
I wonder if the clips post is the same…
Deferred Procrastination should work something like a double negative — something like “doing the interesting things instead of leaving them till later” (but it’s not a strict definition!)
Having practical applications is something that I wanted to have ready when I released details of the elastic clips, so there is the box example ready to cut and the Raspberry Pi box (pictured in the post) that I’m manufacturing in small volumes.
I’ve used the lattice hinges a few times since the last hack-a-day post, including providing sample sizes and using it in a pair to make a book hinge that I produced some laser etched booklets for, for a couple of clients.
It’s all here: http://www.deferredprocrastination.co.uk/blog/category/def-proc/lattice-hinges/
Patent it, before someone else does it !
Yup, original and non-obvious. It’s amazing no one has even done anything like this before.
http://adafruit.com/products/859 and click on the “greyish” photo of the box and/or watch the video and skip to 1:13…
I see I forgot the tags. Maybe HaD doesn’t recognise them.
Lol, filter pwned.
HaD definitely does not like ‘sarcasm’ tags.
I found that this fastening technique requires tighter than typical tolerances (ie: consistent focus, consistent beam power across the bed, consistent kerf width, consistent material thickness) to produce non-wobbly boxes. That said, It’s satisfying to get the fabrication right and build structures with no ‘vitamin’ parts.
You could try using something like a Laser Friction Fitting Gauge: http://www.thingiverse.com/thing:41956 for calibration tolerances for junctions. Cut 2 in your working material to find the size of the cutout to use for the type of fit that you want.
It’s definitely worth checking actual material thickness though, I regularly see variations around ±0.2mm across a single piece of 3mm cast acrylic, but I’ve also seen “3mm cast acrylic” vary from 2.65mm to 4.12mm(!) depending on manufacturer/supplier.
Considering this technique has been used in injection-molded parts for over 50 years, perhaps these folks could learn by taking things apart…?
Good idea to try it with a laser-cutter, but acrylic is likely too brittle to handle this well.
Well that’s where I got the idea from; I certainly suffer from “taking things apart”-itis, but that’s just a precursor to hacking!
Acrylic is quite brittle, which is why it’s a good material to show that the stress calculations I’ve done are accurate — because if I get it wrong, it breaks straight away. The clip profile is sized to keep the stress due to bending well below the breaking stress of the acrylic.
Interesting, I’m skeptical on the strength of acrylic, in my experience smaller pieces like this snap like nothing, but well see tomorrow when I’m at my desk.
It’s the thicker root at the base of the clip that keeps the stress low enough. Give the box a try, you’ll be pleasantly surprised.
yeah i noticed that, i assumed it was to allow the clip end room to move up and down when your inserting the piece into the other. Im really interested in this because one of the main pain in the butts when designing 3 dimensional objects like boxes is dealing with how to assemble them, and this will be a good option to have when glue would be too weak by itself and fasteners too heavy or cumbersome.
So i tried it out, it works pretty well, the files you had were SVG i believe which i cant really do much with in CorelDraw, so i just traced the paths and recreated them in vector using the measurements mentioned on your webpage, it came out a little stiff, it was tricky to insert the pieces in the sides but once they snapped in they are in there pretty tight. I will definitly be using this in the future, most likley not with 3mm acrylic however, it would probably be a bit sketchy with perpendicular connections without gussets. or cross structures.
I find this guide really useful -> http://www2.basf.us//PLASTICSWEB/displayanyfile?id=0901a5e1801499d5
Its more for injection-moulded plastics, but has some interesting clip designs
No, this isn’t new. I bought a case for my Pi months ago from an ebay seller which was a copy of the adafruit design. It was clearly acryllic cut by laser cutter.
I dislike clips in general, they are very cheap but do not stand up well to repeated operations.
I would prefer metal thread inserts and proper screws.
Glue works wonders too. (Actually welding in this case by anyway.)
I’m not entirely sure of the fascination with flat-pack self-assembly boxes (aside from cheaper postage…). Sure it makes getting the board in there a little bit tricky, but a few design changes can solve that.
i somewhat prefer proper fasteners as well however when dealing with smaller cases and the such like this which look to be in the 3mm thickness area it would add a variety of factors to the design:
1st is the most annoying for my uses is protruding fasteners, you can thread acrylic but its not good for vibrations and only lasts a few screws in and out, and in these sizes embedding the nuts into the plastic is a bit tricky, on thicker pieces you can laser out the nut shape and recess it, but on thinner pieces its not as feasible which means your stuck with metal fasteners sticking out that can possibly scratch other stuff
2. on thicknesses as thin as the boxes like he has there metal fasteners tend to be the point where it ends up cracking the boxes, they can take very little torque and end up splitting the acrylic quickly
3. weight, if weight is an option the weight of the fasteners can exponentially multiply the weight of the acrylic
I bought a raspberry pi case from eBay about a month ago that looks identical to these, infact i think it is EXACTLY the same, was about £8 or so
There are a few manufacturers of derivatives of the Adafruit box. My Clip-R-Pi box has a few other features, like: a removable top for port access without disassembly, board supports for any version of the Raspberry Pi so it doesn’t rattle, and an improved clip profile.
However, I’m not set up to make Pi boxes at larger numbers, so I can only get down as far a £12 (including delivery). But it does come in its own laser cut box that is also clipped together!
I got a Pi case built like this from ebay for about £3. It felt pretty brittle going together, but seems robust. The bit of the clips which protrude are rounded, which makes them less annoying.
I posted a quick write up on my experience with the clips, turned out pretty sweet, im definitely gonna use this!
Link Here : http://www.daewootech.net/new/archives/309
Photo here : http://www.daewootech.net/new/wp-content/uploads/2013/03/20130305-164006.jpg
They look really nice. You mentioned about SVG being no good for you, so I’ve added EPS and DXF too.
I am an active blogger and I am often to blogging. I really appreciate your content. It seems to be unique and interactive. The article has really peaks my interest alot. I am going to bookmark your site and keep checking for new information. Keep up the good work.
“pique”, not “peak”