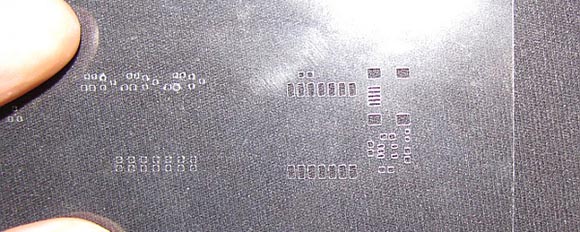
There’s some really cool stuff to find if you wander around a Michaels craft shop or Hobby Lobby long enough. Recently, [Ben] picked up a craft cutter – a small vinyl cutter-like device meant for scrapbooking and other crafty endevours. He’s using this machine to create solder paste stencils that are better than any laser cut stencil he’s used before.
Like a build we’ve seen before, [Ben] is using a desktop-sized vinyl cutter, the Sihouette Portrait, with 4 mil Mylar. After converting the relevent layers of a Gerber file into .SVG files, [Ben] loaded up Robocut to cut very, very small holes in his solder stencil. The results are great; much better than a laser would cut Mylar, and good enough to apply paste to a few hundred boards at least.
While [Ben] is using his stencils to apply solder paste, we’re wondering if a similar process could be used to apply a UV-curing solder mask to home-fabbed boards. That would allow for some very professional-looking boards to be produced with a turnaround time of just a few hours.


The “Silhouette studio” software is what comes packaged with the Silhouette line of cutters from Graphtec. It’s actually pretty good on it’s own, and it imports .dxf extensions natively. I’ve been using it to make vinyl sticker based masks for glass etching, and while I draw in another CAD drawing program, it’s dead-simple to import a .dxf and cut away. Also, these hobby cutters, particularly from Graphtec, are being used for a lot of other uses. Google “Xurography” for starters. Have fun and go get a cutting plotter!
Could you use such a thing to lay down an etchant mask instead of the toner-transfer method?
I was wondering the same thing
UV Soldermask is not applied in that way – how exactly would you suspend the blanks for pads out in the middle of no where.
Either you use a silk screen technique, or more simply, just expose to UV using a soldermask artwork (pads black) then wipe off the unexposed areas.
The key is to spread the ink quite thin, otherwise the top will cure but the bottom will still be wet, causing it to chip and flake off. If it’s cured properly a thin coat is very very strong.
Well, you could try adhesive-backed vinyl on a clear backer, then see if the cutouts would stay as you peeled most of it off.
But printing the negative onto a transparency would clearly be better.
I have a couple questions. First: Do people make these by hand? I do some lock stuff. Lockpicking and modifying pins to be more challenging and so on. Cutting one of these by hand may be no more difficult.
Second: Has anyone tried making a pcb with raised pads (just add some solder) and just heating the thing up to burn/melt holes in thin plastics? It would be a way to use your current skills to make a tool like this for cost of materials.
I was thinking it might be possible with a hammer and some various-size punches.
That is a really good idea. It is trivial to make custom punches.
This idea sounded terrible to me for some reason at first, but actually I’m starting to think it might be amazing. As long as you can see what you’re punching you can just tape a printout over some sheet and punch as needed. The holes don’t even have to be exactly the right size or shape really, since paste will kind of find its way. You could even just drill it. It’s really nice when the stencil is perfect, but even if it was just general holes of roughly the same area as the cutouts, it would probably make applying paste faster than trying to manually squirt it (which was my pre-stencil technique). If you had like 20 boards to do and didn’t want to wait and/or pay a service to do it, this might just save time.
the raised pads idea has a problem, you would need REALLY thick copper for that, adding solder to make it thicker after etching isn’t really doable since the solder will form dome shapes, and adding it before etching will cause the usual problems of undermining the pads.
It would be possible to cut these by hand yes, but for the finer pitched QFN or TSSOP pads you would need a very sharp pointy knife and a very steady hand. A single mistake and you throw it out and start over.
So etching a plate of copper a little, remasking – not forgetting the sides, then etching again (n) number of times could be possible?
Tried thin copper sheet etching for a stencil, it sort of works, but it’s precariously easy to damage them when you’re washing them back down, not to mention cutting yourself on a moderately regular basis.
I’m glad you shared. Though I am taking a mechanical approach. I mean to make a raised copper surface to burn or melt through a piece of plastic to make a mask, not use the copper itself.
Yes, directly etching a sheet of metal works fine, i etched a few QFN stensils in 0.1mm brass sheet.
I was saying that etching a PCB and heating it into plastic would require very thick copper to get a result, you would pretty much be making a copper mold for a plastic mask.
How would you measure everything? Just print onto transparency and cut on the lines?
I think making stencils by hand would be an excruciatingly tedious & frustrating task that would leave you with a sub-par stencil. We’re talking +/-.1mm tolerances, over and over and over again.
Is this just a “I could do it but I don’t want to” brag?
I feel that I must defend myself. I have no stake in making paste stencils. I have no use for them. Just curious. Anyway, on to the defending bit:
Personally if I am going for precision I no longer use transparency or toner transfer. It is way too smudgy. My weapon of choice is gauge material as it is cheap and does not need to be adjusted or polished like block or key stock needs to. Scribing often throws things off so it is often easier to just work with the gauge in place even if it means sacrificing it (in this case it would not be).
“I think making stencils by hand would be an excruciatingly tedious & frustrating task”
So you have never picked a lock then?
“We’re talking +/-.1mm tolerances, over and over and over again.”
The tolerance on nicer locks are around .18 and it must be hit over and over again by hand without the support of a gauge and in the correct order. In truly high security locks the tolerances are even tighter. It does not matter though as a $200 plotter wont be sub mm anyway.
“We’re talking +/-.1mm tolerances, over and over and over again.”
Are we? I use (real) stencils now and I love them, but I used to squirt the paste onto the pads by hand with a plunger and that still worked, so it don’t know if “we’re talking +/-.1mm tolerances” here really. 0.1 millimeters is really really small. It might not be as good as a professionally made stencil, you might have some bridges, but cleaning that up is still better than squirting the paste by hand on a bunch of boards for plenty of people.
Been doing this for about 5 years now, and while it’s all very convenient to do stencils using vinyl cutters they are not better than what a laser cutter will give you. Beyond 0603 pads the vinyl cutter blade’s lag/offset prevents you from being able to do any sane or reliable cutting. There’s also the perpetual adjusting you need to do with the pressure and speed to compensate for the blade dulling and even different sheets of mylar/poly.
I do love being able to do this, but it’s no replacement for good laser cut stencils when you’re dealing with the small stuff.
A good trick I found was to generate HPGL files that repeat the same polygon cut 3~4 times without lifing the blade at a lower pressure, avoiding dragging/tearing of the mylar.
Readers might want to look at the projects hpgl-distiller, hpgl-dxf and dxf-hpgl on the http://pldaniels.com/opensource-projects.php page for further tools to let them work with stencils.
I have an inexpensive vinyl cutter and doing really fine work yields similar results to what’s seen in the post. It’s better than nothing, but I wouldn’t suggest getting one of these machines if you’re just going to use it for stencils. They’re really designed for cutting signs and large graphics, not precision work.
The problem is that proper SMT stencils have a trapezoidal finish to the aperture to give proper stencil separation and stop the solder paste from slumping. They are also micro-polished in those same apetures for the same reason. At my work, we pay $250 US + shipping (to Aust) for a full sized fixed frame stainless stencil (to suit speedline printer) and it takes only 5 days from order until it’s in our hands.
you’re also not a hobbyist making 1 off or 10 off boards with a smaller budget.
At my apartment I pay $2 for a sheet of brass and a sheet of glossy printer paper and in two hours I have a stencil that works for me.
I’m not a factory. You’re not a little guy. What’s your point?
Mylar! I tried this ~2 years ago with my Silhouette SD using laser transparencies… Didn’t work so well.
Also, what Frank Cohen said above is correct; it doesn’t do so well on tiny details anyway…at least not in anything the blade has to actually cut into. You get better results with something like rubylith, though.
Which reminds me, I need to take another shot at making a rubylith mask for exposing a PCB, now that I have sharp blades again… It seemed like it could’ve done an okay job, but the dragging of the dulled blade was distorting things.
If you go to my blog (Such as it is…) you can see the process of me using the Silhouette SD to make rubylith film positives for silkscreens.
If you want to use a technique like this for anything UV related, I would suggest using Kapton. Kapton is opaque in the UV, so you could use it to mask various areas if you needed to.
Source: me, I measured it myself for work.
I’m using a hobby FSLaser laser cutter and Mylar transparencies for making solder stencils. I put a wet piece of paper under the stencil. I get very good detail. Seems comparable to the ones in the picture. But a laser cutter is quite expensive :-) even for the hobby version.
This is why my girlfriend won’t let me go near her Cameo.