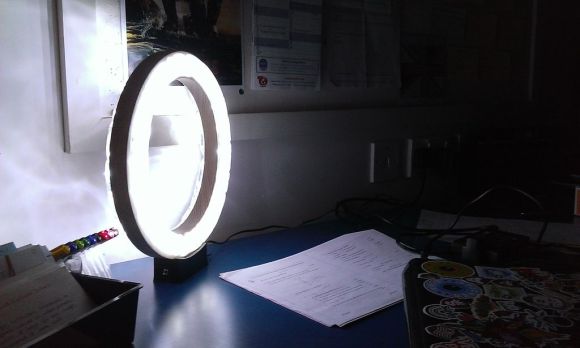
The design for this LED ring lamp started off as a cross-section sketch. [Alex Jalland] envisioned a core that holds the parts and hides the circuitry, with two halves of a clear doughnut diffusing the light and covering everything up.
For the core itself he headed over to the lathe and turned a piece out of ash. He tooled the profile into one side, flipped it around to form the other, and finally cut the center out to form a ring. This may sound like a lot of work, but it pales in comparison to what went into the diffusers.
He cast the parts out of polyurethane resin. This required a mold which he made from scratch. The process used many materials, including a vacuum forming machine, a latex slug, and plaster to keep the thin mold from deforming when filled with resin.
The lamp provides a lot of light. But with this much work put into the enclosure we’d suggest going the extra mile to make it an Equinox Clock clone.


I do a lot of crazy LED stuff. This is really cool. Good Job!
Thanks!
Mike, your frequent comments at the end of your posts about how the subject “should” have done things start to get a little annoying. It comes across as pompous.
They just want to sneak in an extra link to some other article that is remotely connected to the topic.
I totally agree. Instead of should, he should take -his own- time and do what -he- thinks should be done. Then have someone else go, eh this -should- have had x y z
I dont see the issue with reminding us of other cool articles on HAD (which incidentally must take a bit of time to remember and look up).
I personally like these links a lot. Please keep it up
I really like the idea of relating one project to another since I can’t possibly keep track of everything that’s going on out there. Not to mention, it’s likely to spark someones interest and lead to more interesting hacks. That said, there’s no reason not to use more positive phrasing. I come to HaD for inspiration, not assessment.
That is what i had meant, I am fine with linking to others, just not with use of such derogatory language that has been used in the past posts on here
Is it cast acrylic or urethane? They aren’t even close in chemistry.
This is HaD, where trivial matters such as accuracy count for little. For that they’d need to RTFA, and who’s got time for all that jive.
At least they got the spelling right and noted that it’s plastic of some sort (very unlikely to be acrylic though).
Having spent three years of a PhD working with cast acrylic, errors like this really piss me off! Not to even have the same name in the title and body text, even.
Polyurethanes and epoxies are “two-part” chemistries, where you mix roughly equal quantities of _resin_ and _hardener_.
Acrylics and polyesters are essentially “one-part” chemistries, since you add a very small (1% or so) amount of _catalyst_ to the monomer to start it polymerising.
Acrylic is a real pain to cast – in any thickness, you need an autoclave to keep the pressure high and prevent the monomer from boiling. And the shrinkage is something terrible – 10 to 15%, which makes it very difficult to cast objects that are close to the final shape and size. There’s ways around this (e.g. lots of dental work uses acrylic resins, bu they’re heavily modified to reduce shrinkage and also so they cure at room temperature).
Side tip: sheet acrylic, unless it’s extruded from melt, is actually cast in a _mould_, which consists of two tempered glass plates separated by a squashy PVC gasket around the edge. Once filled, the whole lot goes into a water tank at 90°C or so to cure. The PVC gasket allows the acrylic to shrink, whilst keeping the surfaces in contact with the glass plates. You then have the fun job of levering the glass plates off, which can be quite dramatic!
Can’t wait for the ‘new & improved HaD’: More hacks! Crappier editing! Less accuracy!
You forgot about “more shitty comments”.
Thanks for providing an example.
Do they actually have curved glass to make motorcycle and aircraft windshiels out of cast acrylic?
Uh, no. The acrylic (or more probably polycarbonate since it’s more impact-resistant) is heat-formed over a mould – you start with a flat sheet of stock material and then form it.
Formed from sheet stock – more-or-less the same way the bloke in TFA makes one to cast the resin in.
He said wood.
Yeah, that really was a hardener for me.
Polyurethane resin with its hardener
That’s really nice =)
If I were you, I would think of fitting in a coil for wireless power, making it perfect
I’d go for a PWM dimming circuit and fit a touch sensor stripe into outer circumference of the lamp. Stroke the lamp clockwise and it gets brighter, stroke it counter-clockwise and it gets darker. Tap it to switch on and of :)
Are Atmel XSense touch films already available? :)
Then do it.
I did think of doing that, but was on a time scale. Plus my electrical skills are quite minimal(I would have to do a bit of practice and some research before attempting it). Thanks for all the great feedbackl though everyone!!
I must think of Tron while looking at this thing – looks like an id disc. ^^