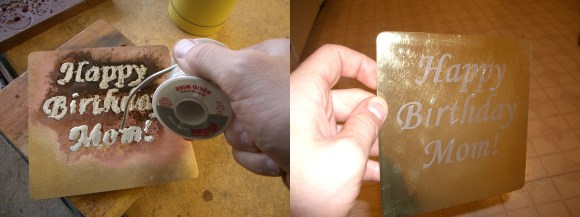
Looking for a unique way to add a nice metal inlay to finish off your project? [Ben Krasnow] shows us how using a CNC router, a bit of solder, and a lot of sand paper!
It’s actually a pretty simple job — Of course, that’s only if you have a CNC machine. [Ben] started by engraving his inlay using his handy CNC mill, and then sanding off any rough spots. He then filled the engraving with acid flux paste, got out his MAPP gas torch and started dripping solder into the piece. Once everything was covered, he started sanding it, from 60 grit all the way to 600 grit for a nice polished finish. The results speak for themselves.
An easier method of this could also be achieved using plastic and epoxy, instead of brass and solder. One of the biggest problems with the solder is bubbling, which can cause voids which will appear when you are sanding — so you might have to do a second pass with the solder.
[Ben Krasnow] is an interesting character. He’s sought out the perfect cookie, made his own CT scanner at home, explained the various heat treatments of steel — and even installed LEDs into his contact lenses just for kicks!
[Thanks Fabien!]


Nice idea. Another way to do something similar is to use some epoxy (the stuff sold for use on fiberglass works fine), mix in some pigment to color it (toner carts usually have a bit of stuff left in them, black and color ones), and maybe some glitter or crushed turquoise or something like that, then sand it down. It helps to spray some shellac on the piece before milling it, then the colored epoxy won’t penetrate the wood and will come off more easily where it overflows the milled areas.
Whew, lead free solder.
Isn’t saying it’s easy if you have a CNC machine kind of like saying it’s easy to fly if you happen to own an aircraft?
You could also probably do it with a dremel tool, which i expect everyone that visits this site has.
A drill press would also work decently.
I think that etching the metal chemically or electrically would be achievable to just about anyone, without a CNC set up. Quicker and more detailed, too!
The same can be done with steel and a brazing alloy. They come in choice of colors, from copper to brass to silver. The temperature needed is higher (so when handling e.g. a sword or a knife handle beware of wrecking the steel properties, or follow with the proper heat treatment to restore them).
Another alternative is electrodeposition. Chemical or electrolytic etching, followed by electrodeposition using the same mask, should give an even surface with a metal inlay.
Even chemical deposition of a thin layer can do nice effecs. Etched copper, with selectively silvering of only the etched parts (do not remove the mask before dunking in the silver-plating solution), ends up nice. Similarly, blackening or other chemical processing baths can be used this way.
I’ve made a couple of different items using the technique in your last paragraph. Toner transfer onto brass, etch with ferric chloride, then apply electroless tin plate with the resist still present. Rubbing with a paper towel gave the tin a little shine. Turned out great!
Synth module faceplate:
http://reboots.g-cipher.net/drums/balmod/balmod.jpg
Telephone dial:
http://reboots.g-cipher.net/btoxdial.jpg
I do this with aluminum plate and wax to make custom front panels. I use my DIY CNC to carve out the letters. The products look professionally made.
I remember an old PopSci article written by a guy named Theodore Grey. He used a router and a pot of molten sulfur to create imitation wood inlays.
I remember that, too. A quick search turned the article up: http://www.popsci.com/diy/article/2005-01/worst-way-inlay
Looks like it wasn’t to imitate wood though it was easier provided the sulfur didn’t catch fire. The sulfur’s appearance was attractive in its own right.
Yay! Lead dust!