You youngins probably don’t remember this, but a few years ago there was an arms race on Kickstarter to create the smallest Arduino-compatible microcontroller board. Since then, a few people have realized they can make more money on Kickstarter through fraud or potato salad, and the race to create the smallest ‘duino board petered out.
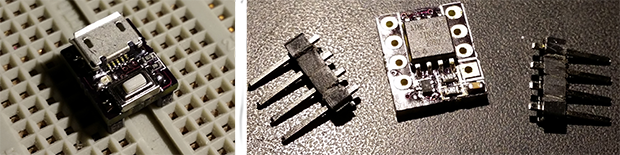
It’s a shame [Meizhu] wasn’t part of the great miniature Arduinofication of Kickstarter, because this project would have won. It’s an Atmel ATtiny85, with USB port, resistors, diodes, reset button, LED, and pin headers, that is just 72 mils larger than the PDIP package of the ‘tiny85. Outside of getting a bare die of ‘tiny85s, there isn’t much of a chance of this board becoming any smaller.
[Meizhu] was inspired to create this board from [Tim]’s Nanite 85, which up until a few days ago was the current champion of micro microcontroller boards. With a bit of work in KiCAD, the new board layout was created that is just a hair larger than the 0.4″ x 0.4″ footprint of the PDIP ATtiny85. There were a few challenges in getting a working board this small; you’d be surprised how large the plastic bits around pin headers are, but with some very crafty soldering, [Meizhu] was able to get it to work.


Thanks, ants. Thants.
Simmons?
Look around you!
+3.14159265359
Water, water, what hast thou donest?
He should put some of the bare PCB’s on Ebay. I would click that order button in no time.
I’d even be in the market for some assembled ones.
On a sidenote, I always felt that the contempt of using Arduinos in finished projects at least in part comes from their size overhead. I wonder if it would be “more socially acceptable” to use and leave one of those in a finished project.
I leave my ProMicro and Nano often in the project and just use another for the next project, The size of a ProMicro is decent enough to not care about further optimization.
And yes, I would pay for assebled ones as well.
I use atmega328s with the arduino bootloader in dip packaging permanently in my projects. I don’t know if that counts as an arduino but I use the libraries and ide.
My problem with them in permanent projects stems from people leaving the jumper wiring in place rather properly soldering a ribbon cable or some such, or at least using a shield to properly plug into the sockets. It’s messy, and leaves things open to issues later. I guess it’s more of a laziness factor. Some people seem to be in a rush to do something rather than taking a little bit of extra time to make sure it’s completely okay.
Perfection is the enemy of good enough! B^)
Damn! Good job. I have been trying to micro size my arduino boards mainly out of cost. But you have set a new chalange.
Only way to get a few mills smaller would be a uDFN package.
Uh, if he wants small, why PDIP?! Err, edit – that’s actually not PDIP but a SOIC package. PDIP is a much larger through-hole one.
This is for development. It is meant to run with a USB bootloader and use the Arduino platform. Yes, the chip is not PDIP, but the overall profile is, which makes it easier to breadboard with, as shown in the photo. This also includes USB header and reset button in this small profile.
I’m with you though on not understanding what the fascination with it is, at least to the Arduino crowd. For such a simple platform as attiny one could just as easily write standard AVR C and program / debug with the proper tool. I guess time fighting with a poor dev environment for a very low spec micro isn’t worth anything? If wanting to do a VUSB target project though, this seems like it could have use.
However, with how prices for other more powerful or energy efficient micros have been going down recently, I am finding less reason to consider such relatively high priced, low spec micro. So the only reason this seems to exist is for Arduino use. Shame.
The advantage is being able to use arduino libraries but on a micro that comes in a small package.
The point is that the board is close to the same size as the actual PDIP throughhole package
The ATTiny5 is a lot smaller than the 85. Although I don’t know if you can cram the arduino libraries into such a small micro.
Better not drop it!
Oh yeah, another arduino board, that’s what the world needs.
Just a small AVR with minimalist external parts count, wonderful.
I rather eat a good potato salad
Then why are you bothering to post about it?
Maybe he Just really likes potato salad.
Maybe he should make a kickstarter about potato sa…. ohhhhh…
The pin header trick is quite neat where the holes are partially drilled so the back of the PCB has some extra space. It is way too fiddly if you’re trying to mass produce this but if you’re just making a handful of devices then it wouldn’t be too bad.
Maybe he just needs to use 1.3 mm screws B^)
Arduinos really are wasteful garbage. All because you can’t really “program” and have to use crappy, buggy libraries written by somebody else that a lot of the time have no idea what the hell they are doing either. Learn to code for real, people. It isn’t that hard and it is a skill you will always have. Or just keep half-assing your way through life with silly crutches and pretend to be something you are not. And if you really are that infatuated with wasting your money on extra un-needed support hardware, just burn your credit cards. You just got that much closer to the instant gratification you desire.
Or perhaps use it as a stepping stone in your quest to learn programming, or perhaps you just want to get something working and get on with the rest of the project so you can actually enjoy the fruits of your labor.
Arduino libs may not be the most cleverly written, or even that good in all cases, but for the most part they do work, and they’re all open sourced and easy to modify.
There’s nothing stopping anyone using the arduino platform from rewriting any part of it to suit their needs as time goes on, or from using any of the low level constructs of C and the AVRLIBC library directly. Arduino is an onion, peel away as much of it as you want when you’re ready.
Never understood the hate for Ardunio here.. it’s a tool, use it or don’t.
A bit harsh. Arduinos have their place. For example, I use arduinos as proof of concept, as it’s a triviality to breadboard something, grab some libraries and show a demo. If anything goes further than that, then it all gets written from scratch in C, probably on a CC430 or smaller AVR, in code that no way resembles the arduino or library code.
@Duwogg
ABLOO BLOO BLOO PEOPLE HAVE DIFFERENT PREFERENCES FROM ME WAAAAAA
Right. Because your own early attempts at programming were always flawless, impeccable and very, very manly.
God, I wish there was a like button. :-)
Can’t say it was flawless and impeccable, but in the 80’s programming was certainly very manly.
Don’t forget, he never uses any libraries provided by anyone else…
Back in my day, we brought up micros by hand with assembler, backwards, in the rain, and we liked it!
Wow what arrogance.
Actually we have a bunch of Duinos floating around the office as well as a few Beagle boards and even a P1 or two.
We also have a staff of c programmers writing code for Arm M0 and the 8051. Guess what? When we are prototyping a new asic using an FPGA a Duino is a great tool for testing. It is easy to set it up to talk to the SPI and dump data to a console. If you want to test NFC or do a demo then it is a fast way to get it done.
It is so much faster than to spin a board, populate it, and then write the code for it.
Wow. The only thing you have proven is how much of an arrogant moron you are.
Arduinos are versatile, useful, educational, fun, and inexpensive. They are not perfect, but they are very, very good at doing what they are supposed to.
I’m with you bro. I don’t understand why people insist on being lzy by riding in cars, pushing on pedals and turning wheels rather than learning to properly ride a real horse. REAL travelers don’t burn their credit on car loans, insurance and gas. Get a horse and some hay and do it RIGHT!
Hah i see im not the only one tired of Arduinos, but to be honest i could make this board smaller. I should in fact even tho i hate arduinos. It seems like people are obsessed with the tiny versions.
By all means, go ahead. I look forward to seeing what you come up with.
Already did. . Check my blog.
It’s kinda cheating because you toss out the breadboarding compatibility. :P
That said, I’d totally use that, as I don’t use breadboards… I just need to acquire some 1.27mm connectors.
heh no one ever said it had to be breadboard-able :) I posted a link to OSHPark stuff. as for the 1.27mm connectors be sure to get them LONG and this does need to stack :)
Burn! :-)
:)
Designing something is not the same as building it. However, I’ll give you kudos for a good, compact design.
Thanks. I can build it trust me. I just don’t have the parts or money… to much going into other projects.
Its arduino COMPATIBLE. No one is saying its an arduino or that it MUST run the arduino bootloader. It’s an option. So can we please just move on from the butthurt. I think its a pretty cool design. Kuddos for making something THAT small.
It is based on a ARDUINO board so they are saying it was MEANT to run the ARDUINO BOOTLOADER. Just because it doesnt have to doesnt mean its not an ARDUINO. If i buy a arduino in RadioShack and program it in WINAVR and not the Arduino IDE does that not make it an ARDUINO anymore?
Technically it is soley because it is ‘Arduino’ branded. However, if you made your own minimalist design based on an Arduino design (Which I feel like Arduino just built a bootstrapped microcontroller based on the same methods people would have used before), then technically no, its is not an Arduino. It is especially not so, if you code it in C instead of the Processing. What it is however, is a micro that is Arduino IDE compatible.
What the hell kind of measurement is “72 mil”? It sure as hell isn’t millimetres. Otherwise this would be closer to a normal Arduino board in size. Come on America get with the times and join the rest of the world in using a real measuring system.
We’re trying… Some of us, at least.
The Mil (1 thousandth of an inch) is still an industry standard unit in electronics. It’s use is absolutely valid here.
Dont mind those NOOBs They obviously dont understand the terms. Im in the USA (NYC) and USE MIL and MM more than INCH…
For the NOOB “The Unknown”
1 MIL = 0.001 inches
1 MIL = 0.0254 millimeters
What size is this? I just designed one 0.41″ x 0.24″
http://atomsoft.wordpress.com/2014/10/21/my-atiny85-smallest-pcb/
Then go ahead and build it.
Would take 3 weeks from oshpark. If you want to fund me then ill build it no problem.
They’re not quite the same in terms of design constraints. The PCB design in this article fits the normal layout for a 8 pin DIP AVR apart from overhanging slightly at the ends. Your one is quite a bit wider. Can you get sockets that fit it or do you need to chop a large DIP socket?
The goal of the entire competition was to make a SMALLER PCB not have it fit a DIP socket lol
While it’s not square, it is smaller.
These are 1.27mm or 0.05in headers not the normal 2.54mm or 0.1in …
So it will not fit on a DIP socket. TOO SMALL…
“not have it fit a DIP socket lol”
That’s trying too hard to play dumb.
Um. JRDM… is the goal to fit in a dip8 socket? Nanite85 which was the origin idea didn’t b attempt it. ..
Nice design! But where is the 1.27mm breadboard to go with it? :)
That isn’t the goal lol the goal was tiniest pcb
Nice Blog cpldcpu
If you want it here: https://oshpark.com/shared_projects/M7wpaVN7
HTTP 404
New link on my blog… https://oshpark.com/shared_projects/U1MFR6hJ
This is a good effort, but more processing power is available in even smaller packages. It’s pretty easy to go smaller with an appropriate stencil. Most AVRs are available in MLF/QFN 10-32 pins, such as the ATTiny1634, ATTiny24/44/84 etc…even ATMEGA48P/88P/168P/328P are available in MMH and MU variants. I’ve even soldered them without a stencil, but I’d highly recommend one.
Nice work.
That looks like a 6mm button with a 9mm footprint. The button on the trinket has a 5mm, which would free up a bit more PCB space.
Oh noez! Where are the rules?
Great idea with the headers! You also shrinkified the components to 0402. Now we just need to find a smaller button…
FOR ALL THOSE WHO WANT A DIP8 TYPE BOARD… SOON!
http://atomsoft.wordpress.com/2014/10/21/atiny85-attempt-2/
First of all thanks for featuring this on Hackaday. This was certainly unexpected.
Thanks for all the comments too. Perhaps I should clarify the purpose of the project. First and foremost it is a tribute to Tim’s original project. It is also my first attempt at using the push and shove router in KiCAD. My design goals (which I failed) were:
* The board should be 0.4″ x 0.4″ so that all adjacent holes in my breadboard are accessible.
* The design should use the same components as the real Nanite85.
Although the project title might suggest it designing the smallest Arduino compatible development board possible. I think http://jaanus.tech-thing.org/small-projects/tinydino-the-smallest-arduino-clone-possible/ gets much closer to that anyway.
The size constraint could probably be met by bending the pins of the ‘tiny inwards. That would be a hack though. Using a smaller switch is a great idea but that would fail the second goal.
It is not Arduino compatible although it is rumored to work with a hacked version of the Arduino IDE.
I shared the board https://oshpark.com/shared_projects/lDLzOlSt for those interested.
that Jaanus has no connectors :( If that was the case i can make it even smaller. But its ok i guess. Mines is less than 0.4″ x 0.4″ … 0.3″ x 0.4″ It was a fun build i guess :)
Here ya go… DIP 8 can fit in a socket… Probably a little smaller. its 0.3in x 0.4in
http://atomsoft.wordpress.com/2014/10/21/atomnanite85-atiny85-attempt-2-complete/
Thanks… I just ordered a batch of your boards from OSH Park. Can’t wait to try and build it :)
I really like your design. The vertical USB connector is a very nice touch. In reality it saves much more breadboard space than reducing the PCB width a little bit. Even if someone could build it smaller I don’t think there would be any point in doing so.
Thanks
I just came here to say that the Zoolander reference was much appreciated, Brian.
YES! This is why I came here too!
I made one of my own using different components i had around. It is not as small as yours but it works. For the pads, I just soldered them like normal smd. I think you wouldnt need to make holes on the pads. Instead just find some space to put couple of vias in each pad. You would sacrifice space for security that way. Either way, you are making something nice, keep it going!
my board it’s called “tiny board” in oshpark, check it out.