laser cut acrylic coaster with rgb leds inside

Your Mug Will Like This Glowy Coaster

[Charlyn] wanted to highlight their friends beautiful mug collection, so the Glowy Coaster was born.

The coaster is made up of six layers of laser cut acrylic. The top and bottom layer are cut out of clear acrylic, providing a flat surface for the coaster. A top pattern layer made of pearl acrylic has a thin piece of vellum put underneath it to provide diffusion for the LED strip sandwiched inside. The middle layers are made of peach acrylic and have their centers hollowed out to provide room for the electronics inside. The top pearl acrylic layer gives the coaster, as [Charlyn] writes, a “subtle touch of elegance”. The coaster itself is screwed together by an M3 screw at each point of the hexagon that feed through to heat-set inserts.

inside of glowy coaster with electronics exposed

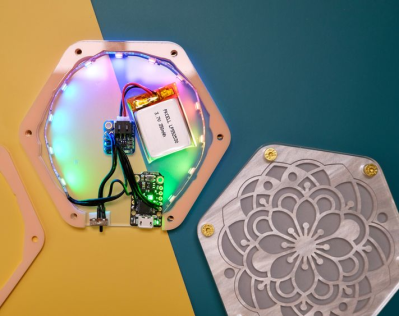
The electronics consist of a short NeoPixel strip, cut to include 12 LEDs pointed in towards the center of the coaster. The LEDs are driven by a Trinket M0 microcontroller with a LiPo “backpack” to provide power, attachment points for the exposed power switch and recharging capability to the 110 mAh 3.7 V battery. The code is a slightly modified NeoPixel “rainbow” wheel loop (source available as a gist). The design files are available through Thingiverse.

Creations like these highlight how much care and work goes into a project with minimal beauty, where decisions, like the opacity and thickness of the acrylic or countersinking the M3 screws, can have huge consequences for the overall aesthetic. [Charlyn] has an attention to detail that brings an extra touch of professionalism and polish to the project.

Coasters are a favorite for laser cutting and we’ve covered many different types, including
coaster bots, coaster engravers and even a color changing, drink sensing coasters.

Continue reading “Your Mug Will Like This Glowy Coaster”

Understanding Custom Signal Protocols With Old Nintendos

For retro gaming, there’s really no substitute for original hardware. As it ages, though, a lot of us need to find something passable since antique hardware won’t last forever. If a console isn’t working properly an emulator can get us some of the way there, but using an original controller is still preferred even when using emulators. To that end, [All Parts Combined] shows us how to build custom interfaces between original Nintendo controllers and a PC.

The build starts by mapping out the controller behavior. Buttons on a SNES controller don’t correspond directly to pins, rather a clock latches all of the button presses at a particular moment all at once during each timing event and sends that information to the console. To implement this protocol an Adafruit Trinket is used, and a thorough explanation of the code is given in the video linked below. From there it was a simple matter of building the device itself, for which [All Parts Combined] scavenged controller ports from broken Super Nintendos and housed everything into a tidy box where it can be attached via USB to his PC.

While it might seem like a lot of work to get a custom Nintendo controller interface running just because he had lost his Mega Man cartridge, this build goes a long way to understanding a custom controller protocol. Plus, there’s a lot more utility here than just playing Mega Man; a method like this could easily be used to interface other controllers as well. We’ve even seen the reverse process where USB devices were made to work on a Nintendo 64.

Continue reading “Understanding Custom Signal Protocols With Old Nintendos”

Raspberry Pi 4 Brings Cloud Gaming To Nintendo Switch

Companies like Google and Microsoft have been investing heavily in the concept of cloud gaming, where a player uses their computer or a mobile device to stream the video feed of a game that’s running on powerful machine tucked away in a data center somewhere. With this technology you can play the latest and greatest titles, even if the device you’re using doesn’t have the processing power to run it locally.

Considering the Switch is already a portable system, it’s not too surprising Nintendo doesn’t seem interested in the technology. But that didn’t stop [Stan Dmitriev] from doing a bit of experimentation on his own. With little more than a Raspberry Pi 4 and Trinket M0, he’s demonstrated that users can remotely interact with the Switch well enough to play games in real time.

The setup is fairly straightforward. A cheap HDMI capture device is used to grab the video from the Nintendo Switch dock, which is then streamed out to web with the help of the Pi’s hardware video encoder. Input from the user is sent over the Pi’s UART to the Trinket, which itself is running a firmware specifically developed for mimicking Nintendo Switch controllers. With so many elements involved, naturally some latency comes into play. The roughly 100 millisecond delay [Stan] is reporting isn’t exactly ideal for fast-paced gaming, but is certainly adequate for more relaxed titles.

On the software side of things, the project is using a SDK developed by [Stan]’s employer SurrogateTV. Right now you need to apply if you want to get your game or other interactive gadget up on the service, though he says it will be opened up to the public next year. But even without all the details, we’ve got a clear idea of how both the video capture and user input sides of the equation are being handled. For personal use, all you’d really need to do is put together a simple web interface to tie it all together.

This isn’t the first time we’ve seen a microcontroller used to interface with the Switch. Other consoles are a bit more selective about what kind of hardware they will talk to, but the Microsoft Adaptive Controller could potentially allow you to do something similar on the Xbox.

Begin Your Day On An Uplifting Note With A Daily Affirmation Mirror

We’ve seen dozens of “Magic Mirror” builds around here, most of which display all sorts of information — calendar, weather, news. They’re great builds, but they tend to be a bit busy and don’t really inspire a calm start to the day. But if you’re good enough and smart enough, you can build this electronic affirmation mirror, and doggone it, people will like you.

[Becky Stern] stripped the magic mirror concept down to a minimum with this build and uses only an array of 14-segment alphanumeric displays to scroll uplifting messages. The glass she used is partially reflective, and when covered with black tape on the backside, with a small portal for the display, it makes a decent mirror. The displays are driven by a Trinket using static affirmations stored in the sketch; a microcontroller with a WiFi connection could also be used to source affirmations on the fly. Or, you know, stock prices and traffic updates, if you’re not into the whole [Stuart Smalley] thing.

So what about those aforementioned magic mirror builds? We’ve got large ones, small ones, retro ones, and even kid-centric ones. Take your pick!

Continue reading “Begin Your Day On An Uplifting Note With A Daily Affirmation Mirror”

Repairs You Can Print: Fixing A Chewed Up Remote

What is it about remote controls? They’re like some vortex of household chaos, burrowing into couch cushions while accusations fly about who used it last. Or they land in just the right spot on the floor to be stepped on during a trip to the bathroom. And don’t get us started about the fragility of their battery case covers; it’s a rare remote in a house with kids whose batteries aren’t held in by strips of packing tape.

But [Alex Rich]’s Bose radio remote discovered another failure mode: imitating a dog chew toy. Rather than fork out $90 for a replacement, [Alex] undertook a 3D-printed case to repair the chewed remote. He put an impressive amount of reverse engineering into the replacement case, probably expending much more than $90 worth of effort. But it’s the principle of the thing, plus he wanted to support some special modifications to the stock remote. One was a hardware power switch to disconnect the batteries entirely, hidden in the bottom shell of the case. The second was the addition of a link to his thermostat to adjust the volume automatically when the AC comes on. That required a Trinket inside the remote and a few mods to make room for it.

Yes, this project dates from a few years back, but [Alex] only just brought it to our attention for the Repairs You Can Print contest. Got some special unobtanium part that you were able to print to get out of a jam? Enter and win prizes to add to the glory of fixing something yourself.

Test your speed

Modern Strongman Games Test Your Speed Instead

Step right up! What would a Makerfaire be without some carnival games? And being a Makerfaire, they could of course be modernized versions. In [avishorp]’s case, he made a series of games that test your speed and look very much like the old strongman game, aka high striker or strength tester.

In the strongman game, you smash a lever with all your might using a hammer. A puck on the other end of the lever then shoots up a tower, hopefully high enough to hit a bell, winning you a prize. In [avishorp]’s games the puck, tower and bell are all replaced with an LED strip. In the swipe game, the faster you swipe your hand sideways over two optical proximity sensors, the higher the LEDs light up. In the drum game, the speed with which you drum on a rubber disk with embedded accelerometer, the higher the LEDs light up. The chase and response games both involve buttons that you have to rapidly hit, to similar effect.

For the brains, each game is controlled by an Adafruit Trinket board. [Avishorp] chose to use the PlatformIO IDE instead of the Arduino IDE to write them, preferring its modern editor, but he didn’t like that it doesn’t print and that it doesn’t tell you the final file size. The latter issue caused him to overwrite the bootloader, something that he understandably considered a major inconvenience.

Check out his page for more details, Fritzing diagrams, links to code, and all game videos. Meanwhile we’ve included clips of the drum and swipe games below.

And if it’s more carnival games you’re looking for, how about this adult-sized Sit ‘n Spin made using a rear differential and axle assembly out of an old car or truck. Or maybe you prefer something less likely to make you woozy, in which case you can try fishing with the Bass Master 3000.

Continue reading “Modern Strongman Games Test Your Speed Instead”

Building This TARDIS Is Anything But A Snap

As an avid fan of the show Dr Who, [Adam Sifounakis] saw a model for a laser-cut TARDIS that piqued his curiosity that eventually grew into a multi-week project involving multiple setbacks, missteps, revamps and — finally — gratification. Behold, his sound activated TARDIS.

First and foremost, assembling and painting the model was a fun puzzle — despite a few trips to the store — with a little backtracking on the painting due to impatience. Next, the creation of a pulsing soft white LED circuit timed with an audio clip to really sell the image of a mini-TARDIS proved to be a tedious ordeal, paying off in the end with a satisfying glow through the vellum-diffused windows on the model.

How to trigger the lights? [Sifounakis] initially wanted a capacitive sensor to trigger the sound effects, but that way lay dragons — and madness — so he went with snap-activated effect to activate the TARDIS like the Doctor himself. After struggling with building his own microphone setup, he switched to an electret mic with adjustable gain which worked like a charm. Setting up this TARDIS’ Adafruit Pro Trinket brain involved a snag or two, and after that it was smooth sailing!

Until he hit another hitch with the power circuit too, that is. Luckily enough, adding a capacitor to give the circuit a bit more juice on boot solved the issue. All that was left to do was dismantle and rebuild his circuit after all this troubleshooting and substitutions, and — finally — install it in his model.

With much satisfaction and a final rework of the LED pulsing effect, it was done. Check it out!

Continue reading “Building This TARDIS Is Anything But A Snap”