Ceci N’est Pas Une Clock

[Justin] tipped us about his slick custom OBD-II gauge that could easily pass for an OEM module. He was able to use the clock area of his Subaru BRZ to display a bunch of information including the oil and coolant temperatures and the battery voltage.

The forum post linked above has a good FAQ-based explanation of what he did, but so many people have told him to shut up and take their money that he created an Instructable for it. Basically, he’s got a Sparkfun OBD-II UART board communicating with a pro Trinket. The display is an Adafruit OLED, which he found to be an ideal choice for all the various and sundry light conditions inside the average car.

[Justin] was able to reuse the (H)our and (M)inute buttons and reassigned them to (H)igh to show the peak reading and (M)ode to, well, switch between modes. The (:00) now resets the peak readings. He offers suggestions for acquiring the specific CAN codes for your car to make the data more meaningful. [Justin]’s code is safe in the many tentacles of Octocat, and you can check out his demo video below.

Continue reading “Ceci N’est Pas Une Clock”

Cheap Power Meter

Digital Data From A Cheap Power Meter

Power meters like the Kill-A-Watt are great for keeping track of energy usage, and are also very hackable. The Kill-a-Watt in particular puts out analog signals proportional to current and voltage, which makes it easy to interface with a microcontroller.

Although reading analog voltages is easy enough, [Kalle] found a cheap Chinese power meter that is even more hackable. These inexpensive power meters cost about the same as a first-generation Kill-a-Watt, but they directly stream out digital data. The power meter [Kalle] hacked has a non-US plug, but the meter is available from the usual suppliers (eBay, Aliexpress, etc) with a 3-prong US plug and 120v rating.

After breaking out a logic analyzer, [Kalle] discovered that the meter constantly streams voltage, current, and power data from the measurement board to the display board on a SPI-like bus. The ribbon cable inside the meter even has the clock and data bus lines clearly labelled. [Kalle] went on to reverse-engineer the protocol and write an Arduino sketch that parses the stream, making it even easier to integrate this meter into your next power monitoring project.

RWXBioFuge collage v0.1

Take Your Samples For A Spin With The RWXBioFuge

We have a confession to make: we love centrifuges. We’ve used all shapes and sizes, for spinning bags of whole blood into separate components to extracting DNA, and everything in between. Unfortunately, these lab staples are too expensive for many DIY-biologists unless they buy them used or build them themselves. [Pieter van Boheemen] was inspired by other DIY centrifuges and decided to make his own, which he named the RWXBioFuge.

[Pieter] designed the RWXBioFuge using Sketchup, OpenSCAD, and InkScape. It features a Thermaltake SMART M850W ATX power supply, an R/C helicopter Electronic Speed Controller (ESC), and brushless outrunner motor. For user output it utilizes a 16×2 LCD character display with an I2C interface.The frame is laser-cut from 3mm MDF while the 3D-printed PLA rotor was designed with OpenSCAD.

An Arduino handles the processing side of things. [Pieter] used an Arduino Ethernet – allowing a web interface to control the centrifuge’s settings and operation from a distance. We can see this being useful in testing out the centrifuge for any rotor/motor balance issues, especially since [Pieter] states that it can be configured to run >10,000 rpm. We wouldn’t want to be in the room if pieces start flying off any centrifuge at that speed!  However, we feel that when everything’s said and done, you should have a centrifuge you can trust by your side when you’re at your lab bench.

While there are similarities to the Openfuge, the larger RWXBioFuge has rotor capacities of eight to twenty 1.5-2.0ml microcentrifuge tubes. Due to the power supply, it is not portable and a bit more expensive, but not incredibly so. There are some small touches about this centrifuge that we really like. The open lid detector is always a welcome safety feature. The “Short” button is very handy for quick 5-10 second spins.

A current version of the RWXBioFuge is being used at the Waag Society’s Open Wetlab. [Pieter’s] planned upgrades for the next version include a magnetic lid lock, different rotor sizes, an accelerometer to detect an improperly balanced rotor, and optimizing the power supply, ESC, and motor setup. You can never have enough centrifuges in a lab, and we are looking forward to seeing this project’s progress!

Check out a few more pictures of the RWXBioFuge after the break.

Continue reading “Take Your Samples For A Spin With The RWXBioFuge”

Retrotechtacular: Blue Collar, Red Nightmare

This week’s presentation is a well-cast piece of anti-Communist propaganda perpetrated by a division of the DoD that you’ve probably never heard of: the Directorate for Armed Forces Information and Education.

It’s narrated by Jack Webb of Dragnet and Adam-12 fame. He tells us of a fake American town located somewhere behind the Iron Curtain. It’s full of young comrades who sock hop and bebop while studying and playacting the bourgeoisie activities of the American economy and way of life. After introducing this, Webb pulls back the cushy, velvet curtain to profile a typical American household led by one [Jerry Donavan].

[Jerry] has it all: a wise-cracking wife played by Jeanne Cooper (most notably of The Young and the Restless), a son with a healthy interest in war games, a young daughter with pretty blond hair, and a beautiful older daughter who would go on to fame up the road at Petticoat Junction. After some unsettling news from this daughter at the dinner table, Jerry heads up to bed early to catch a few Zs.

Jack Webb denies [Jerry] any visions of sugar plums and instead drops him in the middle of Fakesville, USSR for a vivid nightmare of an America reconstructed by Communism. Watch as he figures out what’s going on and what the new regime means for him and his good-looking family.

Continue reading “Retrotechtacular: Blue Collar, Red Nightmare”

The Hoverboard You Can Build At Home

Press embargoes lifted today, heralding the announcement of the world’s first hoverboard. Yes, the hovering skateboard from Back to the Future. It’s called the Hendo hoverboard, it’s apparently real, and you can buy one for $10,000. If that’s too rich for your blood, you can spend $900 for a ‘technology demonstrator’ – a remote-controlled hovering box powered by the same technology.

Of course the world’s first hoverboard is announced to the world as a crowd funding campaign, so before we get to how this thing is supposed to work, we’ll have to do our due diligence. The company behind this campaign, Arx Pax Labs, Inc, exists, as does the founder. All the relevant business registration, biographical information, and experience of the founder and employees of Arx Pax check out to my satisfaction. In fact, at least one employee has work experience with the innards of electric motors. At first glance, the company itself is actually legit.

The campaign is for a BttF-style hoverboard, but this is really only a marketing strategy for Arx Pax; the hoverboards themselves are admittedly loss leaders even at $10,000 – the main goal of this Kickstarter is simply to get media attention to the magnetic levitation technology found in the hoverboard. All of this was carefully orchestrated, with a ‘huge event’ to be held exactly one year from today demonstrating a real, working hoverboard. What’s so special about demoing a hoverboard on October 21, 2015?

next year

I defy anyone to come up with a better marketing campaign than this.

The meat of the story comes from what has until now been a scientific curiosity. Everyone reading this has no doubt seen superconductors levitated off a bed of magnets, and demonstrations of eddy currents are really just something cool you can do with a rare earth magnet and a copper pipe. What [Greg Henderson] and Arx Pax have done is take these phenomena and turned them into a platform for magnetic levitation.

According to the patent, the magnetic levitation system found in the Hendo hoverboard works like this:

  • One or more electric motors spin a series of rotors consisting of an arrangement of strong permanent magnets.
  • The magnets are arranged in a Halbach array that enhances the magnetic field on one side of the array, and cancels it on the other.
  • By placing the rotors over a conductive, non-ferrous surface – a sheet of copper or aluminum, for example – eddy currents are induced in the conductive surface.
  • These eddy currents create a magnetic field that opposes the magnetic field that created it, causing the entire device to levitate.

hoverboard

That’s it. That’s how you create a real, working hoverboard. Arx Pax has also developed a method to control a vehicle equipped with a few of these hover disks; the $900 ‘Whitebox’ technology demonstrator includes a smart phone app as a remote control.

If you’re still sitting in a steaming pile of incredulity concerning this invention, you’re in good company. It’s a fine line between being blinded by brilliance and baffled by bullshit, so we’re leaving this one up to you: build one of these devices, put it up on hackaday.io, and we’ll make it worth your while. We’re giving away some gift cards to the Hackaday store for the first person to build one of these hoverboards, preferably with a cool body kit. The Star Wars landspeeder has already been done, but the snowspeeder hasn’t. Surprise us.

Carvey, The CNC Machine For Everyone

Over the past few years, [Bart Dring] has contributed immensely to the homebrew CNC machine scene, with the creation of MakerSlide linear rail, the buildlog.net open source laser cutters and CNC machines, and a host of other builds that have brought the power of digital fabrication to garages and workshops the world over. After a year of work, he, along with Inventables, is releasing Carvey, the CNC machine for everyone else.

Carvey is heavily inspired by Inventables other CNC machine, the Shapeoko, but built to be the Makerbot to the Shapeoko’s RepRap, without all the baggage that goes along with that analogy, of course. The machine has a 300W spindle capable of cutting wood, plastic, foam, carbon fiber, and linoleum, as well as aluminum and brass. There are a few interesting features like a color-coded bit system, and this time the machine has an enclosure for containing MDF dust.

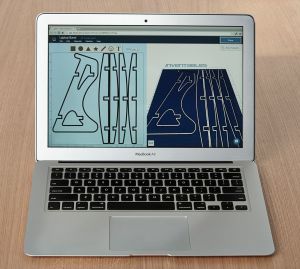
CiebwEA13yxYp576g_7HRNUx06KmzO3QEqGCLfs4kRoCAD programs might be a little too foreboding for someone just getting into the world of CNC, so Inventables has created their own design program called Easel. It’s a web app that allows you to design all your parts for the Carvey and send them all to the machine without worrying about speeds, feeds and all the other intimidating machinist terminology. You can, of course, output GCode from Easel, so those of us with slightly more complex toolchains can still use the Carvey.

Inventables is Kickstarting their production, with the non-early bird Carveys going for $2400. That’s a bit cheaper than some extremely similar machines we’ve seen on Kickstarter before.

Thinkpad 701c: Reverse Engineering A Retro Processor Upgrade

[Noq2] has given his butterfly new wings with a CPU upgrade. Few laptops are as iconic as the IBM Thinkpad 701 series and its “butterfly” TrackWrite keyboard. So iconic in fact, that a 701c is part of the permanent collection of the Museum of Modern Art in New York.

Being a 1995 vintage laptop, [Noq2’s] 701c understandably was no speed demon by today’s standards. The fastest factory configuration was an Intel 486-DX4 running at 75 MHz. However, there have long been rumors and online auctions referring to a custom model modified to run an AMD AM-5×86 at 133 MHz. The mods were performed by shops like Hantz + Partner in Germany. With this in mind, [Noq2] set about reverse engineering the modification, and equipping his 701c with a new processor.

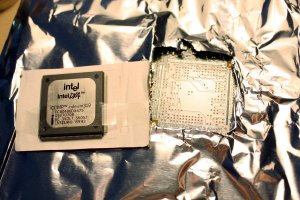
thinkpad-brainsurgeryThe first step was determining which AMD processor variant to use. It turns out that only a few models of AMD’s chips were pin compatible with the 208 pin Small Quad Flat Pack (SQFP) footprint on the 701c’s motherboard. [Noq2] was able to get one from an old Evergreen 486 upgrade module on everyone’s favorite auction site. He carefully de-soldered the AM-5×86 from the module, and the Intel DX4 from the 701c. A bit of soldering later, and the brain transplant was complete.

Some detailed datasheet research helped [noq2] find the how to increase the bus clock on his 5×86 chip, and enable the write-back cache. All he had to do was move a couple of passive components and short a couple pins on the processor.

The final result is a tricked out IBM 701c Thinkpad running an AMD 5×86 at 133 MHz. Still way too slow for today’s software – but absolutely the coolest retro mod we’ve seen in a long time.