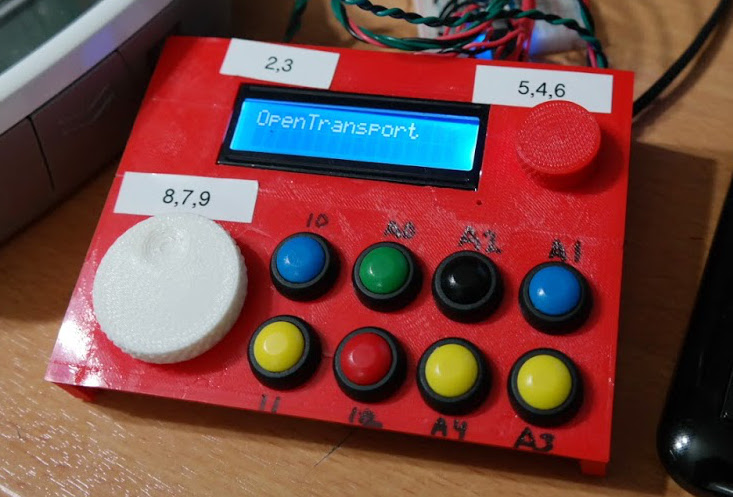
Control surfaces (input devices with sliders, encoders, buttons, etc) are often used in audio and video editing, where they provide an easy way to control editing software. Unfortunately even small control surfaces are fairly expensive. To avoid shelling out for a commercial control surface, [Victor] developed his own custom control surface that sends standard MIDI commands which can be interpreted by nearly any DAW software.
[Victor]’s control surface includes several buttons, a display, and a rotary encoder. His firmware sends MIDI commands whenever a button is pressed or the rotary encoder is turned. [Victor] plans on adding menu functionality to the currently unused LCD display which will allow the user to change the scrubbing speed and other various settings.
One advantage of making your own control surface is that you can customize it to your own needs. [Victor] has posted a model of his 3d-printed enclosure and his source code on the project page so you can easily modify his design with any button configuration you might want.


I’ll be amazed if you get this fully working with AVID software (pro tools, media composer) – Their protocol isn’t documented anywhere. Rats – why the HAD projects don’t show all your work??? – do you have detials elsewhere? Would love to follow it!
Forgive me if I am incorrect, as audio/video editing/mixing/production isn’t anything I’m very skilled in, but the CM Labs MotorMix control surface seems to be compatible with Pro Tools using HUI MIDI. Here’s the guide on setting it up in PT: http://www.cmlabs.net/motormixProtools.html and here is the Developer Guide that details the messages used for each button/encoder (warning: PDF): http://www.cmlabs.net/MotorMix%20V%201.2%20Developer%20pkg3.pdf
Ah, thanks for the link. I’m having it use the mackie protocol but I haven’t been able to find much by way of documentation. That’ll be a big help!
Here’s a pdf of the Mackie HUI protocol:
http://stash.reaper.fm/12332/HUI.pdf
Well, it currently works with Adobe Audition and Sony Vegas Pro out of the box. If you look on the links portion of the HAD project page, you’ll see links to the mackie controller midi map I used as my starting point. It has a list of all the buttons and pots and on a standard Mackie HUI as well as their corresponding Midi values.
I get it, but… why 3d print a box?
When all you have is a 3D printer…
Because I needed something to hold all the components together while I worked on the software. Eventually I’ll make a nice wooden enclosure for it.
I’ve just built a similar control surface (buttons, faders, pots, rotary encoders, rgb leds), all scalable, currently runs on a mega2560 but with small adjustments will run on any other arduino.
Good for you! Is it documented anywhere?
https://github.com/Reggi3/megafighter Mostly :-) You could fairly easily adapt it to suit any arduino/teensy board, I also have a loose collection of undocumented .ino files with various extra functions added to them. once you’ve got the basics for creating multiple and handling multiple controls, it all gets a bit easier.
I originally built my controller for dj software but I’ve been working on making my controller(s) work with presonus studio one, I’ve currently got a behringer cmd-pl1 acting as a presonus faderport, basically, everyone seems to use the mackie control/mackie hui as the basis for their mappings, it was a very good choice by the project owner!!
I would suggest anyone thinking of making their own controller or adapting their existing kit to take a look at ‘bomes midi translator’ it’s a fantastic piece of translation software that will allow you to do all sorts of midi magic. 2 buttons as an endless rotary encoder? No problem, want that as an absolute value that can be tracked? no problem, would you like that in 7 or 14 bit? Bomes handles it all :-)
Goes to all the trouble of making a custom box and controllers, then labels it like a drunken monkey – Bah.
The labels are the arduino pins each component is plugged into.
Use raised text, then coloured in carefully. I use permanent markers on the raised letters/symbols on molded cables e.g. the PS/2 keyboard/mouse cables for KVM switch for marking them.
If you have good hand control, only the raised part is tall enough to make contact with the marker.
The 3d printed case is only temporary; just a place to mount all the components while I sorted out the programming. I’m planning on making a nice wooden case that more closely resembles the original design mockup.
Nice project, and i am sure your custom wooden enclosure will look great when you are done.
Any chance this would work with Premiere Pro CC?
I think Premier supports mackie controls so, yeah, probably.
This is great. I’m building something similar inspired from your work so far. One thing I’ve been looking at for a bit is that when I rotate my encoder while using premiere pro, I’m not hearing the audio as I step through the clip. I assumed this would be the same as pushing the right arrow key on my keyboard, which does play the audio… but it seems like maybe some different thing is happening?
When you use your big wheel, do you hear the audio while you scrub?