One of our favorite things about Hackerspaces is people tend to spend a lot of time building tools, or repairing/upgrading older ones. This is a case of the former. The vacuum former.
[Adam] wrote in to tell us about this vacuum forming machine which he and few other members built for FizzPOP, a hackerspace in Birmingham, England. The device is used to suck hot sagging plastic around a mold. This is accomplished in two parts, the vacuum table and the heating mechanism to put the sheet of plastic into that sagging state.
 The vacuum part of these tools has been easy to DIY for a long time. Pegboard makes for a very good table surface, with some type of vacuum motor (usually a shopvac or two) in an enclosure below the surface. This design adheres to that common formula.
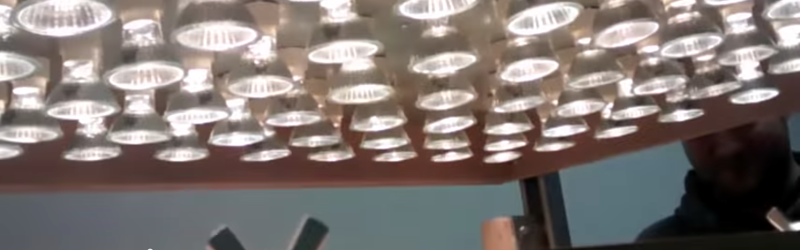
On the other hand, the heating mechanism is more difficult to solve. The plastic is unwieldy and fragile when hot so a frame is very common. Following the example of commercially available models, the FizzPOP crew built a frame that slides along four vertical rails (envision table legs) extending above the vacuum surface. These legs also hold up the heating element. Often this is a nichrome wire array, but not this time. They went with an array of 70 halogen bulbs in a 10×7 orientation. A PCB was milled for each, with a system of bus-bars connecting them all. The trial run showed that the intensity of the bulbs made hotspots directly below each. But a bit more testing helped them solve the issue by keeping the frame further from the array in the heating phase.
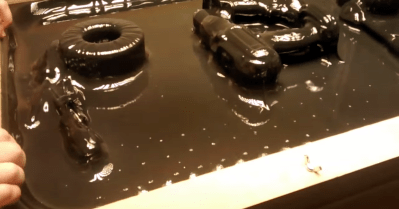
The team’s 13-seconds of fame are found after the break. A black sheet of High-Impact Polystyrene (HIPS) is formed around a compilation of tools spelling out the name of the hackerspace.


the video was disappointingly short.
im alittle concerned by how evenly the heat is applied
They address that in their instructable. Solution: Move the plastic further from the bulbs.
My concern is for the lifespan of the bulbs in a high heat setting.
I find it odd that 70x bulbs and 70x fixtures were cheaper than a spool of nicrhome. Or even salvaged heating elements. But hey, if it works, it works.
There is a funny mathematical theorem….
If you have a street with a line of streetlamps. And if the lamps radiate the same in all directions… THEN if you place the lamps a the same distance apart as that they are high, the light on the road will be perfectly uniform!
With roads in practice placing them as high as they are apart is too expensive. So they place them lower and you get “hot spots” below the lamps.
Here, the “cost” of placing the lamps higher is zero. So as long as you buy lamps that radiate in all directions and don’t try to focus their output, you should be able to get a very good result.
Elegant, but these lamps are designed like a small flood light, +45* cone of light.
yes but anyone who has shined these bulbs know they have a clear hotspot … any time you get a cone reflector there will be hot spots where the focal point is
i dont see how this is cheaper or better than a piece of steel and some resistance wire and a small simple regulator like how i made my sisters … i think i spent $50 out of pocket
What about a sintered foam mat instead of pegboard, to minimize the appearance of pegboard holes yet still retain vacuum?
not necessary the plastic around the tooling is cut away.
Certainly much more elegant than running to the vacuum table with a piece of hot, wobbly plastic fresh from the oven.
That being said, the youtube videos of people running with such hot plastic sheets would likely be more interesting and funny to watch.
Should use LED lamps, much more energy saving.
And reduced heat. Which is the opposite of what they want.
Congrats, you’ve been trolled. Doesnt feel like you thought it would does it?
Well, if you use high power LEDs and turn them around so that their heatsinks radiate onto the plastic…. B^)
Actually LED’s do radiate some heat. I tried masking off the light from a 10W LED with electrical tape once. It started smoking immediately after turning the power on. I found that it would easily burn a hole in the tape from about a centimeter or so in seconds. Still I think LED’s would be a bad idea and I would go for something like this instead: http://www.ebay.com/itm/Black-Infrared-Ceramic-Heat-Heater-Lamp-Bulb-for-Reptile-Brooder-Pet-100W-/261753074013?pt=LH_DefaultDomain_2&hash=item3cf1b2f15d
What about those heat lamps that are used for keeping the pizza slices warmed in a store?
Actually, you want radiation, not heat.
About the lamps. It’s about heat and not light, right? As hot air rises, the heat would be applied more uniform if the lamps were mounted pointing up. Of course, you would probably be blinded by the lamps. ;)
Also, I would be concerned that the plastic is only heated on one side. And to me it seems the ‘wrong’ side. I think you’d either want the plastic to be heated on both sides, or at least on the side that’s ‘pointing’ towards the vacuum.
Thinking along those lines: why not make a box, add one or two heater elements from an old clothes-dryer machine, and use a fan to blow the hot air into the box? You could transport the frame horizontally on rails.
There are vacuform designs that place the plastic above the heating element. The trouble you run into here is different plastics and different thicknesses slump to different degrees, so you can end up scorching plastic. It’s easily solvable, but you need to know how the plastic behaves.
The plastics are thin enough to be of a uniform temperature, or at least uniform enough for these purposes. As for transporting the plastic on rails, you could, but then you need to design a lift mechanism to get the buck and vacuum platten up to the frame, indeed the original starwars helmets were made using a lift mechanism vacuformer. Similar linear designs exist (typically using a hinge and ‘page turn’ motion rather than strictly linear) but they take up 2x the space of your largest platten. In a non-prop shop the space needed for these can typically be better used.
In terms of energy efficiency this is very poor, as a significant amount of the energy is wasted as visible light. Most modern vacuum formers use Infrared heating lamps. This gives the greatest efficiency as the lamp is quick to respond compared to ceramic heating elements, so can be turned on and off as needed. The majority of the light is in the IR spectrum so the surface of the plastic is heated by the light not just the heat from a bulb.
That “significant” portion is 8% at best, not to mention that visible light is also being absorbed by the plastic with a greater then 0% efficiency…it’s just that at higher power (for big machines) it becomes stupidly bright (and incandescent lamps don’t last that long)
Those types of bulbs also come with a free reflector, something not always available when using straight nichrome wire.
Not that I would use bulbs really but it is an idea to keep in the memory file.
Take appart a couple of cheep four slice toasters. Lay all the element frames out flat. Some good insulation with a reflective surface below might help. Adjust the power, time and perhaps the hight of the plastic above the elements. you could even repurpos the thermostat, springs and magnetic latch to raise the plastic again when it’s “done”.
One of the Birmingham HS peeps here but not it’s builder. One of the design features using lamps was that you can light a smaller square of lamps instead of the 10×7 and thus do smaller sheets of plastic. You also block off areas of the vacuum holey surface to do this. Thus you need a weaker vacuum. This saves power on both those fronts. Nichrome wire was considered but there may have been availability issues. Bulbs are certainly easy to get/ replace.
Using nichrome wire like this wouldn’t have worked well. The idea is the IR and visible light does the heating, not the convective heat, which would need the plastic above it to have any sort of effective result.
Lamps are cheap and easily replaced, & allows them to be removed for different sizes of plastic. You can also dim them for less heating on thicker plastic sheets.
Don’t worry – the guys doing the build thought it through. (I wasn’t one doing the build, but I did talk it through with them beforehand at the fuzzPOP open night – every Thursday! :-))
Argh.
fizzPOP open night is WEDNESDAY evenings!
Damn, should’ve thought of submitting my built to Hackaday.
5 weeks ago or so I finished building a huge vacuum forming machine in c-base.
Here is a video of the second test of the device: https://www.youtube.com/watch?v=KcflL6a6t2I
I designed the machine myself, without using any Tutorials or Blueprints for it. For the actual building, I had a lot of help from awesome c-base members. All in all the project set us back about 1100€, from which about half was paid for by c-base and the other half were donations from members.
We are using Polystyrol in varying thicknesses (the clamping frame is self adjusting for material thickness). It is made to form sheets of the size 1m by 1m. We chose this size, because stock-materials usually come in sheets of 1m by 2m, so we chose a size that would minimize cutoff and waste.
The heaters are 12 pieces of 600W/230V Infrared Heating Elements, of the kind that one would put above a baby changing table or outside in a tent for heating it for a party.
The suction is provided by an industrial kärcher vacuum cleaner. We just bought a second suction hose for it and glued that hose with epoxy in the suction box. After we drilled 841 holes manually, we looked at the result and then learned, that one can buy this exact product, it is called “pegboard”. Damn.
We are currently designing a little website showing the process, and details about the machine here: https://ijon.crew.c-base.org/tiefziehtischwebsite/ It is not yet finished, but Photos of the build and some Informations are there.
We want to use the machine to make mainly wall panels for our spacestation, and housings for electronic devices.
This is a neat setup! Good luck with your space station!
Don’t hear that on many forums.
They should try a sheet of aluminum as a heat-spreader and pre-heat it properly, then move the plastic under there and go…
Also I have seen an acrylics-bending mechanism on YouTube where the make salvaged the heating coils from a hairdryer. Toaster would also work I guess… Lamps are nice since you see where the heater has failed though :-)
Also also: Shortest video ever!
can the lighting be diffused for more even heating?