Even with the cost of 3D Printers continually falling, entering the hobby still requires a significant investment. [Skeat] had some typical 3D Printer components available but didn’t have access to a printer for making the ever-so-common frame parts of typical RepRap designs.
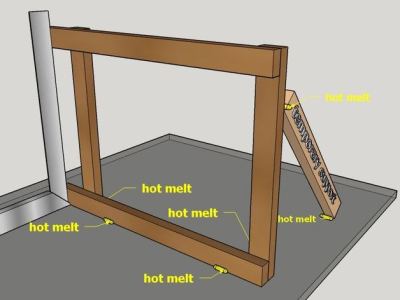
 [Skeat’s] plan was to cobble together a printer just good enough to print out parts for another, more robust one. The frame is made from wood, a very inexpensive and available material. The frame is not screwed together and doesn’t have any alignment tabs, it’s just hand cut pieces glued together. Each portion of the frame is laid out, aligned with a carpenter’s square and then glued together. This design and assembly method was intentional as [Skeat] didn’t have access to any precision tools. He stated that the only parts of the frame that had to be somewhat precise were the motor mount holes. The assembly process is well documented to aid anyone else looking to make something similar.
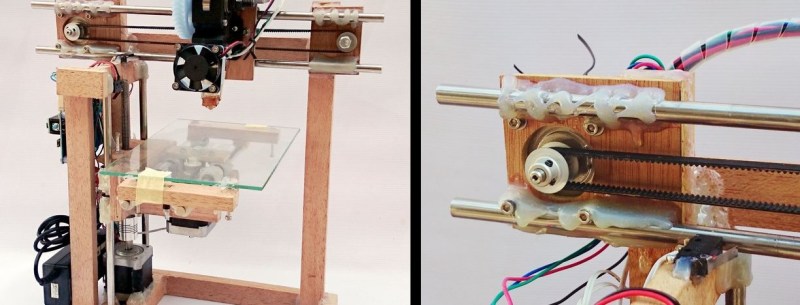
In addition to the wooden frame, all of the components are glued in place. That includes the bearings, rods, limit switches and even the Z axis motor! After seeing the photos of this printer, it would be easy to dismiss it as a poor performer. The below video shows that this printer’s print quality can keep up with any hobby level machine available. We wonder if [Skeat] is rethinking making another since this one works so well.
https://www.youtube.com/watch?v=iDms-eyPZ-Y


The thing that amazes me most is that he seems to be printing PLA on cold glass. The part isn’t that hard for it (nice round corners), but there even seem to be any of the traditional aids, like a coating of PVA glue to help adhesion. The hotglue resulting in a not-bad printing qualitiy is not so shocking: if you clamp things properly (square and parallel) the shrinkage of the glue will help you getting a tight printer. Using it on the motors though is something I would not do: those tend to get hot, undoing the glue. I guess the Z-motors get turned off after a layer, or get very little current.
pritt glue sticks (the largest one) applied to the glass before printing are great for adhesion. Just let it dry for a minute first. (for PLA at least)
Impressive!
Also, if any 3D-printing newbies like myself are wondering how those holes got covered (during the speed-up portion), I’ll save you some brain-wracking for terms: look into “3d printing bridging”
That is awesome! I bought and put together a QUBD 1up (because I was stingy) and I have been suffering from the zip ties and MDF not staying true over time. After seeing this I think I will try the hot glue approach and see what happens.
Givin my poor experiences ( both when I use it and when I receive a product where another used it) with hot blue I’m surprised it held together long enough to print the proper parts needed to construct a more long term durable machine. Where many build metal cutting mills using MDF certainly some have used it to construct 3D printers. Perhaps Matthias Wandel of woodgears.ca has, but I haven’t been keeping up with his projects. Not important if I or anyone else use this idea, only if it worked as Skeat needed it to.
Countdown to patent on A Method of Joining Naturally Cellulose Composite Fiber Bundles….
(sorry, that popped into my head when I saw thingverse)
“We wonder if [Skeat] is rethinking making another since this one works so well.”
From what we see before the video speeds up it looks like it prints pretty slowly. I wonder how long that part took. Also.. how long will the printer last. Then again… printed parts fail a lot too. But.. it is easier to remove some screws to replace a part than to undo glue.
This is by no means meant to be a criticism of his work. I think he made a really great RepStrap! No doubt the RepRap he makes with/from it will be even better.