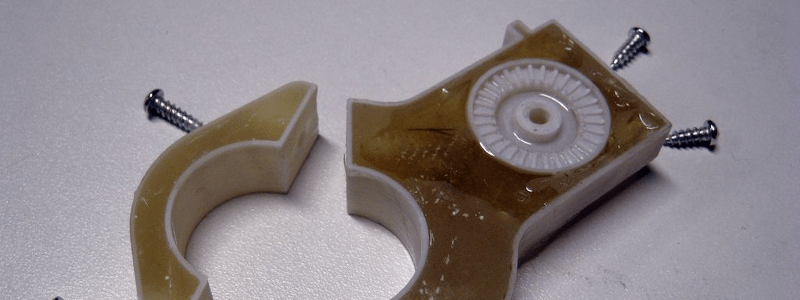
When [hobbyman] wanted some 3D printed parts to attach a bag to his bike, he was worried that the parts would not be strong enough to hold when the bag was full. He decided to find a way to reinforce the part with fiberglass and epoxy. His first model had holes and grooves to be filled in with epoxy.
However, after working with the part for a bit, he decided to take a different approach. Instead of making the part nearly solid plastic with space for the epoxy, he instead created the part as a shell and then filled it with fibers and epoxy. After it all cured, a little sanding started removing some of the plastic shell and what was left was mostly a cast fiberglass part (although some of the plastic was left on).
You can see the result in the video below. According to [hobbyman] the parts are like “granite.” The technique reminded us of how the OpenHand project create molds for urethane. If you are going to try making parts like [hobbyman], you might want to try tinting your epoxy.


Other than machining-to-tolerance I dont see why you would need to remove the plastic shell. Two different materials could give some useful properties.
Well unfortunately they didn’t. First they don’t stick to eachother well. The outer plastic skin didn’t stay in place even i tried to keep it that way. It peels off right away. Secondly while the epoxy-fiber is rock solid, the abs parts are weak and soft. When screwed onto some place, the abs layers are crushed immediately and peels away even more easily.
When you talked about the abs and it peeling, it sounds like a thickness problem. If you made the outside with more width, maybe add a hole to put a nut, then maybe
People have this misconception that epoxy “bonds everything.” Without any additives, the standard epoxy chemistry (reactive epoxide group) isn’t really all that reactive to many plastics (including ABS). Check out a TDS for most epoxies and you’ll find they don’t mention ABS. If you want to bond ABS, you need to use an acrylate adhesive (two part acrylic). Keep a tube of two part “plastic bonder” around (I think virtually every consumer adhesives manufacturer formulates one – JB Weld, Devcon, etc.) Check the datasheet – it’ll bond most hard plastics, other than PP, PE, and fluorinated polymers, all of which unfortunately are very nonreactive and have no easy groups to react with (try cyanoacrylate with primer for PP and PE, but that bond tends to be brittle). If you start using it, you’ll immediately know it’s not an epoxy chemistry by the rather nasty smell (it’s some acrylate, I think).
Cyanoacrylate also works well. It’s possible you can get some decent bond strength with the right method of surface roughening, but contrary to popular belief, some methods of roughening actually make bonding worse.
I’ve verified this with many, many epoxies on ABS sheets and you’ll find they’re quite easy to peel / wedge off. Unfortunately acrylates are structurally not nearly as good as epoxies (the bulk adhesive) and they probably won’t play well with fiberglass.
Personally, I’d take advantage of the non-bonding characteristics, and try to print really thin walls, print in the right direction, or possibly incorporate draft angles that will allow the ABS to demold off of the epoxy. I’ve found that a razor blade (be careful! cut myself a few times doing this) is very useful for starting the demold off of an interface, and after that parts will usually start peeling right off.
You could help with that by using something to hold them together, simplest would be just a T on the inside for the epoxy to hook into. Especially if you went with a flexable filament, you’d have a somewhat padded and adjustable, but hard (from the epoxy) surface to work with.
i don’t know about that guy but my 3d printed parts are quite sturdy, even with “only” 30% infill… crank it up a little and it would require some serious force to break a part like the one he used (ie: you couldn’t break it by hand) so it seems quite a pointless effort to me…
You haven’t tried hard enough to break it then :)
i did… as i said, something like the part shown here you cannot break by hand, nor it can be broken by just having a bag like that full of food and going down a bumpy road…
with tools, yes, you can break it… but what’s the point?
May be hard to break by hand but the strength of the fastening screws can easily crush and break any printed part easily. the load carried by the bikebag on bumpy roads can break any part (in fact even the bike itself) easily in time due to cyclic stress fatique. This is a project idea to strengthen 3d printed parts and it is not for everyone but for the people who might need it.
Pointless? Some of my parts must survive contact with a border collie / lab mix named “Tika, Destroyer of Worlds”, so this seems like a great idea to me. Both nylon and ABS are pretty strong “with the grain”, but they are weaker between layers: this idea fixes that problem. “Can’t break it by hand” is a fairly minimal strength specification! Thanks, Hobbyman, for the excellent idea.
When you need super strength, an ABS nylon blend will do very well provided you build at the right temps. I’ve had to use an arbor press to intentionally damage a part built with such a plastic.
Different uses require parts with more or less strength. Strong enough for your purposes may not be strong enough for others.
Nice idea, I would be inclined to make a vac chamber and add a pour spout to the build that will hold the correct amount of resin, make the fill an open kind of weave then pull all the air out, the resin will suck in to all the areas and you will get no gaps. could be awesome for all kinds of things, You could even use a silicone and make an interesting anti vibration mounting system.
But can printers make an open cell in-fill? ‘Course depending on the printer and settings the output may not be air/water tight anyway. I have a small item I dunked in a plastic cup filled with Future then put in a pressure tank. It filled the whole part. Took quite a while for it to dry out, but all the inside of it has a solid coating of Future.
Many resins aren’t thin enough for that sort of use and doing that with a catalyzed resin would leave the part embedded in a large chunk like a bug in amber.
Remember epoxy gets hot as it goes off, the mould could melt or catch fire. Not good for the shape of the part! Add epoxy in layers and allow to go off between each layer.
Or you could just use some epoxy which has a longer cure-time (e.g 24h), these give of their energy more slowly and it can be dissipated without reaching critical temperatures.
The 5min epoxy I used so far could indeed easily melt the plastic cups I used to mix it in.
To reduce this you have to reduce the amount of epoxy used. That means using a higher percentage of inert, mineralic filler – like glass fiber. Also silica sand is used or glass beads.
As far as I know layers separating is because of extruding to cold. If you want really strong ABS parts use a .6 or larger nozzle (like a e3d volcano) and set the temp to 265.
Don’t forget the possibility of having the 3D printed part hold other parts in place while the fiberglass/epoxy cures. Bronze bushings and aluminum/steel tubes can be embedded that way to form a bushing for a through-bolt. A steel square nut can be “captured” to provide threads for one-sided tightening.
Regardless of the pros and cons mentioned, this is yet another awesome option for 3D printed parts. I have several items I’ve printed that are strong enough, but because they’re in a car in the summer, they soften and distort. This will solve this problem. Thanks for the tip!
I suggest going with ABS if it can’t keep shape in a summer car.
IMHO, epoxies will soften under heat too.. they need to be cured at an higher temp than what they experience during normal use to stay hard.
If the interior was completely enclosed except for inlet and breather tubes you could force an epoxy fibre mix into it under pressure. If you make the part have a second “skin” of removable sections, printed separately you can keep it’s skin thin but still have the over assembly strong enough to handle the pressure during injection of the core material. Like this [(O)], the square brackets are the removable outer “buttress” parts the round brackets are the thin 3D printed part skin and the O is the resin core.
This is similar to what a friend of mine has done a couple of times. However, instead of epoxy, he uses some kind of polyester mix and fiberglass flakes. He destroyed the form afterwards, leaving him with only the polyester adn no 3D-printed material left. Harder to do than keeping a shell (includes an additional step, but probably stronger. Worth to mention (which the article doesn’t), before you do this kind of thing yourself:
1. It’s really messy! Do this on a paper or something and stay out of your kitchen.
2. It smells horrible (at least polyester) and is most likely not human-friendly at all. Again, keep away from food!
3. Use gloves! These kinds of plastics are not nice to get on your hands beacuse they mgiht be posionous and also stick really hard to your hand (ever had cyano on your hands?).
Very cool and sophisticated way. Some hints for future builds:
1. microbaloons (very small hollow glasspheres, which are ment to be added to resin to get ligther material with same volume. pour them between the glaslayers might reduce the weight.
2. print the parts in water-solveable material to simply wash it away (might even make it possible to generate some hollow areas inside to redue weight and lats you imprint the rotary part, instead to glue it to the other part, which will make more stable and rigit.