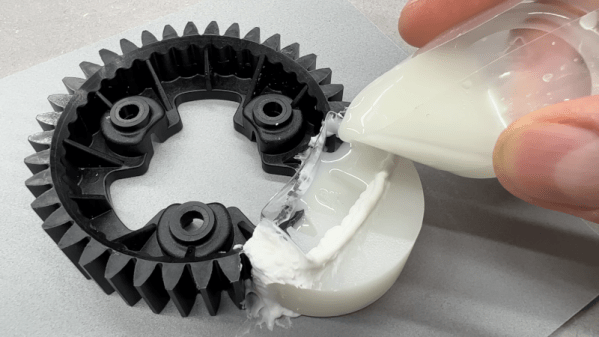
Sandpaper Alternatives For 3D Prints

A finished 3D print, especially plastic deposition types, often have imperfections in them from the process of laying down each layer of material and from the printer itself. For small batches or one-off parts, we might reach for a few pieces of sandpaper to smooth out these rough edges. While that might work for a small number of parts, it’s not always the best or lowest-effort option for refining these prints. There are a few alternative methods to try out if your fingers are getting sore, though.

Rather than removing material as sandpaper does, most of these methods involve adding material to the print in order to fill in the rough edges of the print. There is a 3D-print-specific product listed called 3D Gloop! which is generally used as a glue to hold plastic parts together, but can also act as a fill in a pinch. Two other similar methods, one using spray paint and polyurethane and the other using epoxy, are more general-purpose ways of finishing the prints with a more natural texture than the printer will produce on its own. They’re not all additive, though; the final (and perhaps, most toxic) method here to achieve a smooth surface on a print uses solvent to remove some of the material instead.

While sandpaper does have its time and place, certain prints may lend themselves more to being finished by one of these other methods especially if they are overly complex, fragile, or an unusual size. Take note of the safety gear you’ll want to have on hand for most of these methods, though, as gloves and a respirator are highly encouraged and possibly helpful even if using only sandpaper. These aren’t the only ways of finishing 3D prints, either. Some of our other favorites are using glazing putty or silver for the finish.

Oddball LCDs Reverse Engineered Thanks To Good Detective Work

Is there anything more discouraging to the reverse engineer than to see a black blob of epoxy applied directly to a PCB? We think not, because that formless shape provides no clue as to what chip lies beneath, and that means a lot of detective work if you’re going to figure out how to use this thing.

[Sudhir Chandra]’s detective story starts with a bunch of oddball LCDs, slim 1×32 character units rather than the more familiar 2×16 displays. Each bore the dreaded black COB blob on the back, as well as a handful of SMD components and not much else. Googling revealed no useful documentation, and the manufacturer wasn’t interested in fielding calls from a hobbyist. Reasoning that most manufacturers wouldn’t spin up a custom chip for every display, [Sudhir] assumed there was an ST7066, a common LCD driver chip, underneath the blob, especially given the arrangement of external components. But a jumper set was bodged together under this assumption didn’t get the display going.

Next up were more destructive methods, to decap the COB and see what kind of numbers might be on the chip. Sandpaper worked at first, but [Sudhir] eventually turned to the “Chips a la [Antoine]” method of decapping, which uses heat and brute force to get at the goods. This got down to the chip, but [Sudhir]’s microscope wasn’t up to the task of reading the die markings.

What eventually cracked the case was tracing out the voltages across the various external resistors and matching them up to other chips in the same family as the ST7066, plus the realization that the long, narrow epoxy blob probably covered a similarly shaped chip, which led to the culprit: an ST7070. This allowed [Sudhir] to build an adapter PCB for the displays, with plans for a custom Arduino library to talk to the displays.

This was a great piece of reverse engineering and a good detective story to boot. Hats off to [Sudhir] for sticking with it.

A closeup of the faulty section of the dial - you can spot the plastic rivets that broke off

The Tale Of Two Broken Flukes

Some repairs happen as if by pure luck, and [Sebastian] shows us one such repair on Hackaday.io. He found two Fluke 175 meters being sold on eBay, with one having a mere beeper issue, and another having a “strange error”. Now, theoretically, swapping beepers around would give you one working meter and a kit of spare parts – but this is Fluke we’re talking about, and [Sebastian] wasn’t satisfied leaving it there.

First, he deduced that the beeper issue could be fixed by repositioning the piezo disk – and indeed, that brought the meter number one to working order. This left the mysterious error – the meter would only power up in certain rotations of the dial, and would misbehave, at that. Disassembly cleared things up – the dial mechanics failed, in that a half of the metal contacts came detached after all the plastic rivets holding the metal piece in place mysteriously vanished. The mechanics were indeed a bit intricate, and our hacker hoped to buy a replacement, but seeing the replacement switch prices in three-digit range, out came the epoxy tube.

An epoxy fix left overnight netted him two perfectly working Fluke meters, and while we don’t know what the listing price was for these, such a story might make you feel like taking your chances with a broken Fluke, too. The tale does end with a word of caution from [Sebastian], though – apparently, cleaning the meters took longer than the repairs themselves. Nevertheless, this kind of repair is a hobbyist’s dream – sometimes, you have to design a whole new case for your meter if as much as a wire breaks, or painstakingly replace a COB with a TQFP chip.

Utility Mat Turns Waste Epoxy Into Useful Tools

Epoxy is a great and useful material typically prepared by mixing two components together. But often we find ourselves mixing too much epoxy for the job at hand, and we end up with some waste left behind. [Keith Decent’s] utility mat aims to make good use of what is otherwise waste material.

The concept is simple yet ingenious. It’s a flexible mat that serves as a mold for all kinds of simple little plastic workshop tools. The idea is that when you have some epoxy left over from pouring a finish on a table or laying up some composites, you can then pour the excess into various sections of the utility mat. The epoxy can then be left to harden, producing all manner of useful little tools.

It may seem silly, but it could save your workshop plenty of nickels and dimes. Why keep buying box after box of stir sticks when you can simply make a few with zero effort from the epoxy left from your last job? The utility mat also makes other useful nicknacks like glue spreaders, scrapers, wedges, and painter’s pyramids.

We’ve seen other great recycling hacks over the years too. Video after the break.

Continue reading “Utility Mat Turns Waste Epoxy Into Useful Tools”

Domesticating Plasma With A Gorgeous Live Edge Table

If you’ve been reading Hackaday for any length of time, you’ll know we don’t often cover woodworking projects here. It’s not because we aren’t impressed with the skill and effort that folks put into them, and truth be told, we occasionally we even feel a pang of envy when looking at the final result. It’s just that, you know…they’re made of wood.

But when [Jay Bowles] of Plasma Channel sent in this live edge wooden table that features not only a pair of custom-made neon tubes but the burned out transistors and ICs from his previous high-voltage exploits — we knew this wasn’t exactly your grandpa’s idea of woodworking. In fact, he wisely offloaded a lot of the dead tree cutting and shaping to the burly gentlemen at the local sawmill so he could better focus his efforts on the sparky bits.

At its core, he’s created what’s generally known as a “river table” — a surface made of two or more pieces of live edge wood (that is, a piece of lumber that features at least one uncut edge) that are linked via a band of colored epoxy which looks like flowing water. It’s not uncommon to embed stones or even fake fish in the epoxy to really sell the underwater effect, but this is Plasma Channel we’re talking about, so [Jay] had other ideas.

The first step was hitting up a local neon supplier who could fabricate a pair of neon tubes which roughly followed the shape of his epoxy river. While he was waiting for them to be finished, [Jay] played around with a clever experimental rig that let him determine how thick he could pour the epoxy over the tubes before he lost the capacitive coupling effect he was going for. By embedding a short length of neon tube off-center in a block of epoxy, he could see how the thickness impacted his ability to manipulate the plasma with a wave of his hand just by flipping it over.

With the tube placed on clear standoffs, he was able to position it at the ideal depth for the final epoxy pours. It was around this time that he scattered the remains of his previous projects on the “bottom” of the river, so they can spend the rest of their days looking up at his latest technical triumph. We’re not sure if this is to punish the fallen silicon for giving up early or to honor their sacrifice in the name of progress, but in either event, we respect anyone who keeps a jar of blown components laying around for ritualistic applications.

Once the table was assembled, all that was left was to power the thing. Given his previous projects, [Jay] had no shortage of existing HV supplies to try out. But not being satisfied with anything in the back catalog, he ended up building a new supply that manages to pump out the required amount of juice while remaining silent (to human ears, at least). The unit is powered by a battery pack cleverly embedded into the legs of the table, and is easy to fiddle with thanks to a pulse-width modulation (PWM) module wired hooked to the input. All the components were then held in place with a wide array of custom brackets courtesy of his newly arrived 3D printer.

There’s a lot to love about this project, and more than a few lessons learned. Whether you’re interested in recreating the Tron-like effect of the neon tubes, or have been contemplating your own epoxy-pour worktable and want to see how a first-timer tackles it, this video is a great resource.

Continue reading “Domesticating Plasma With A Gorgeous Live Edge Table”

A transparent blue resin waterfall tabletop with a single wooden leg sits on a grey rug between two grey leather chairs.

Using The Sun To Turn Epoxy Into Furniture

Epoxy resins have been used to make some pretty cool furniture, but since it’s still a relatively new material, makers are still discovering new techniques to work with resin. [Cam] from Blacktail Studio may be the first person to bend fully cured epoxy using nothing but a form and the power of the sun.

Inspired by a friend’s mishap with an epoxy table left out in the sun too long, [Cam] wanted to see if he could purposely bend an epoxy sheet into an interesting shape. The tabletop was poured in sections to give an ombre look before being planed and given a preliminary surface finish. The epoxy sheet was then clamped onto a form made of kerfed plywood and left in direct sunlight on a 104°F (40°C) day. Once the sheet began to deform in the sunlight, ratchet straps and more clamps were added to conform the sheet to the bending form.

After letting the tabletop relax for a few days, [Cam] finished the surface with lots of sanding and an automotive polishing regimen. The epoxy was then attached to a single zebrawood leg to give a very modern-looking, waterfall-esque table.

More interesting projects with resin you might want to check out are this ocean-themed epoxy nightlight, how to degas epoxy on the cheap, or some techniques for cold casting with resin.

Continue reading “Using The Sun To Turn Epoxy Into Furniture”

Extreme Espresso, Part 2: An Inductive Water Level Sensor

[Mark Smith] must really, really like his coffee, at least judging by how much effort he’s put into tricking out his espresso machine.

This inductive water tank sensor is part of a series of innovations [Mark] has added to his high-end Rancilio Silvia machine — we assume there are those that would quibble with that characterization, but 800 bucks is a lot to spend for a coffee maker in our books. We recently featured a host of mods he made to the machine as part of the “Espresso Connect” project, which includes a cool Nixie tube bar graph to indicate the water level in the machine. That display is driven by this sensor, the details of which [Mark] has now shared. The sensor straddles the wall of the 1.7-liter water tank, so no penetrations are needed. Inside the tanks is a track that guides a copper and PETG float that’s sealed with food-safe epoxy resin.

Directly adjacent to the float track on the outside of the tank is a long PCB with a couple of long, sinuous traces. These connect to an LX3302A inductive sensor IC, which reads the position of the copper slug inside the float. That simplifies the process greatly; [Mark] goes into great detail about the design and calibration of the sensor board, as well as hooking it into the Raspberry Pi Zero that lies at the heart of “Espresso Connect’. Altogether, the mods make for a precisely measured dose of espresso, as seen in the video below.

We’d say this was maybe a bit far to go for the perfect cup of coffee, but we sure respect the effort. And we think this inductive sensor method has a lot of non-caffeinated applications that probably bear exploration.

Continue reading “Extreme Espresso, Part 2: An Inductive Water Level Sensor”