If you’ve ever tried to laser flexible rolls of material you’ll know it can be really annoying to setup in the laser cutter.
Most of the time we use magnets, but then you have to make sure the magnets are clear of the work path — and then you end up wasting extra material… It’d be amazing to have a vacuum table that just sucks down your work piece to keep it in place! As it turns out, it’s not that hard to make!
After getting frustrated lasering warped material themselves, [Martin Raynsford] and the gang decided to make their very own vacuum table — using a laser cutter of course.
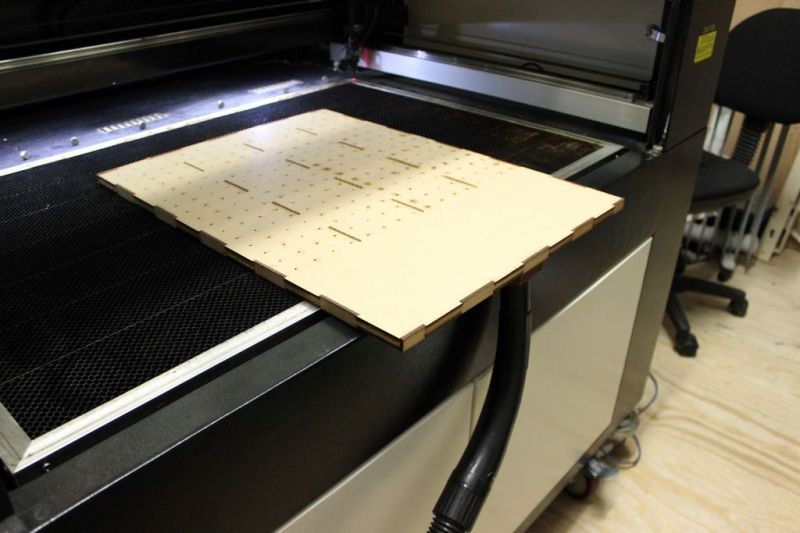
It’s essentially a laser cut box with small slits spaced out on the surface. A hose adapter allows you to attach your shop vac to create the vacuum. If your material doesn’t cover the entire box, simply put a few pieces of paper down to block the slits you aren’t using. The resultant suction on your work-piece will keep everything nicely in place.
The system works great but since it’s MDF you’ll have to be careful not to laser through your material and then through your vacuum table! Maybe once it’s proven effective they’ll have the top layer of the box made out of metal.
Speaking of lasers, did you know you can laser cut 3D objects with your laser cutter and a bit of ingenuity?


Alfoil over the slits?
Great idea, but worried about flammability. Aluminum honeycomb? Waterjet cut aluminum box? CNC milled aluminum with maybe a rubber gasket? How to easily cover sections that are not in use? Aluminum foil would work but feels a bit awkward.
Wood treated with borax will only char but should not be able to sustain combustion.
I’ve owned lasers for more than a decade. Would still prefer an inherently noncombustible material. There’s a lot of airflow / oxygen / fuel with this setup. We use vacuum hold downs for certain CNC applications that’s very similar to this and are commercially available. It’s basically a few HP, high flow and reasonably high vac rotary vane single stage vacuum pump (not a high flow, low vac shop vac), coupled with a machined aluminum hold down table with a gasket. Would need to research a suitable gasket material for this. Perhaps silicone sheeting? Would still be sacrificial but at least it’s not going to provide fuel to a fire or burst into flame like wood or paper.
Aluminum is generally not a good material for a bed of a laser as its highly reflective, and the reflections cause burning on the underside of the object you are cutting. Its not just its surface reflective, but also the crystal structure is reflective
Steel plate would be a better choice.
Aluminum or steel makes no difference. Reflectivity is nearly the same at 10um wavelength. Aluminum honeycomb is available and the tiny cross section of the metal relative to the angular incidence of the laser beam would cause no issue.
Depends on the type of laser though? Different wavelengths reflect differently.
One could anodize the material, which would help at least the first time the laser passes over it. Better would be to use honeycomb as you are suggesting, to minimize the surface cross section. It also provides a nice gap, to defocus the laser enough to sharply reduce the energy being reflected. Maybe honeycomb on the surface and then the bottom could have small cutouts for the vacuum or better still, the honeycomb could have some means of being enclosed to better interface to a vacuum yet still ensuring airflow between the honeycomb “cells”? Some Epilog machines sort of do this already, except you supply the blower and once you drop the bed down a bit, the “vacuum” drops off because the interface port becomes disconnected. Plus, it is not well sealed and the smoke removing blower is typically not suitable for this. It helps a bit but it isn’t a suitable solution to actually vacuum material down like this is trying to be.
“The system works great but since it’s MDF you’ll have to be careful NOT to laser through your material”
Umm. No good if you want cut anything with the laser then….
Just make sure you keep the power low enough to only cut through the top material, if it was 3mm MDF you were cutting make sure you aren’t using 6mm mdf settings or you’ll cut through both layers. This works great on foam and paper where the power is nowhere near enough to get through the mdf in the bed :)
That’s like installing a lighter on the end of a gas pump with instructions to not use it if gas is flowing but only use it to illuminate your trunk and hoping that nobody actually activates both at once. It *works* but really isn’t a great idea because as soon as somebody doesn’t use the exact correct settings, your laser catches fire.
Using MDF you don’t really need the slats, it’s porous. Just mill or sand of the surface finish to improve porosity and save yourself a lot of work. You just need a good vacuum.though.
With my low power Laser I plan on using Recessed ceiling light panels. 2′ x 4′ x .50″ white plastic panel, sturdy thick , anti break , and available from Lowes. Around 1/4″ square holes that I can cut with wire snips down to size. I don’t think my laser can cut that.
Might look into the screen fence section for something more beefy. Or Visit my local metal smith and get some scrap perferated panel.
If these are made from polystyrene, which I suspect they are, believe me that your laser will happily cut, melt and catch that on fire. It’s not as bad as foam polystyrene but it will still easily catch fire.