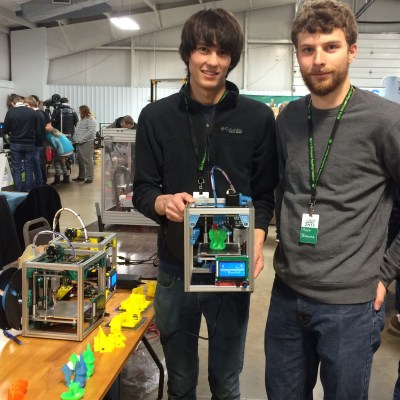
[Patrick] and [Matt] have been coming to the Midwest RepRap Festival from Minneapolis for the past few years and bringing their trusty Tantillus printers with them. However, sometime between this year and the last [Patrick] decided that it would be really fun to make his own 3D printer, and liking the size and accuracy of the Tantillus, started there.
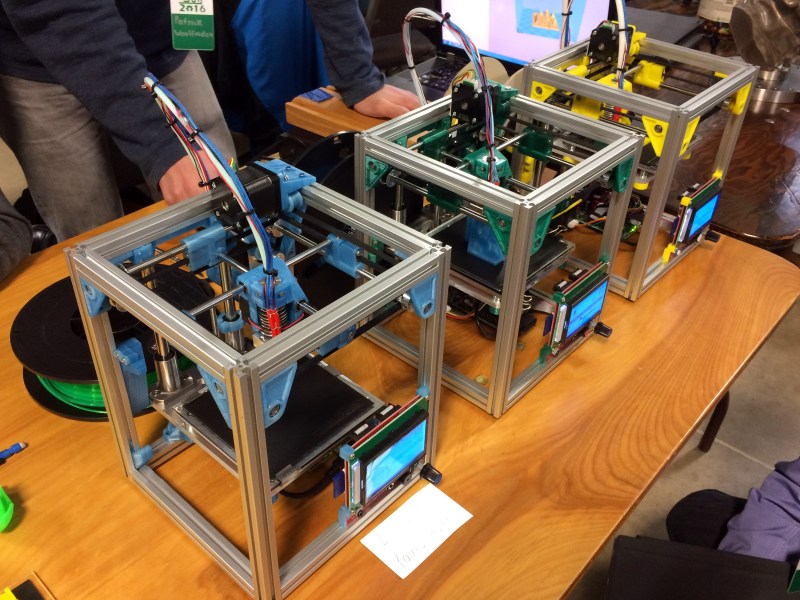
The adorably sized printer is adorably named too: Kitten 3D printer. The printer is certainly an enthusiast’s choice. It’s expensive at 1200 and small, but very well made. Its one big advantage? It prints really accurate parts.
The Tantillus also printed well, but the extruder left a lot to be desired, and the low stretch fishing line movement was very difficult to get tensioned just right. The secret behind the Tantillus and Kitten’s great print quality, aside from good design, is the small xy movement and low weight of the extruder set-ups. By having a movement over a very small range, cumulative errors in construction never get to add up. Also vibrations are less likely to show and smaller moments on the joints mean less flex at the extremes of the movements.

[Patrick] is a mechanical engineer for his day job, and since this was a just for fun printer, he cut no corners. The frame is made with Misumi extrusions and linear movements. The build plate sits on a machined aluminum plate. It’s not flexing or going anywhere.
Part of what really stood out to me about the printer are a lot of neat little features which show careful thought. For example, the extruder movement sits neatly under one of the motors. All the parts except for one can be printed inside its build envelope without support. It uses around 200g of plastic. Every axis is constrained just enough, rather than the common tendency to over constrain that plagues 3D printer design. The spec sheet reads like my printer part wishlist: Bondtech extruder, Rambo board, E3d nozzle, heated bed, flat borosilicate build plate, name brand linear movements, and a well designed Z.

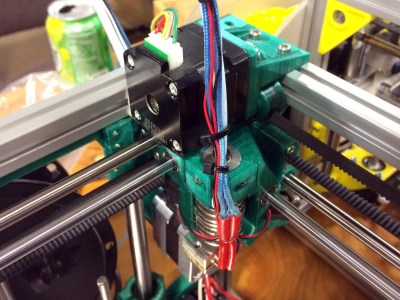
Another interesting aspect of the design is the extremely light extruder assembly. The lighter an extruder can get, the less ringing will show in your parts at speed. This is one of the most compact designs I’ve witnessed. It consists of two fans, an E3d v6 lite nozzle, and two small linear bearings. The cold end is handled by a bowden set-up and a Bondtech extruder at the back of the printer. The only way to get it lighter would be a different nozzle, such as the upcoming insanely light 13g Pico from B3 unveiled at the festival. I was also interested to see that the bearings on the supporting rails were printed bushings to keep the weight even lower. [nop head] has tested these extensively, they should be fine as long as the rods have a good finish.
I’ve mentioned the size before, but it’s hard to grasp just how adorable this printer is without seeing it. The build envelope is 100mm x 100mm x 100mm, the printer itself is 200mm x 200mm x 240mm. That’s only 50mm wider than the build footprint. It’s a really fun design just to look at and see how they fit it all in there. There are lots of neat little tricks with belt routing and part design to get it all right.
For the enthusiast this would make a good small parts printer and travel printer. However, for me, it was neat to see people still setting out to try designing their own printer. In some ways the 3d printer movement has become crowded with Chinese knock-offs, and I was excited to see something new at the festival. It wasn’t the only new printer design there, but it stood out to me the most. I like the uncompromising nature of it, many people try to design for the lowest BOM and not the nicer print. There are still lots of low-hanging fruit in the 3d printer world and many of them are just getting the mechanics right.
[Patrick] and [Matt] came to the festival with their printer to see if people would like it. They didn’t have grand dreams of selling tons of printers and making millions. They were quite aware that their price point and the small size made it not for everyone. However, their table always had a small crowd. They just really like 3D printers, and that honesty resonated. They didn’t even have a website up at the start of the convention, but by the end they had gotten so many requests they had to oblige. They expect to have 3 kit options available by the end of April. If you’re interested there’s a mailing list sign up on their website. Let’s hope we see them at MRRF again next year with another cool design to look over.


Gerrit,
I wouldn’t blink an eye, if Jenny or Kristina had used the word “adorable”, reading it from your keys, sends chills up my spine!
B^)
Haha, well you know… Some people think kittens are adorable. Some people think tiny printers called kitten are adorable. Practically the same thing. Not weird at all:P
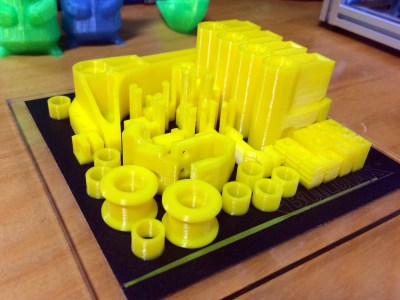
P.s. Were all those parts on that 1×1 decimeter tray printed simultaneously ?
Yes.They had a good printer seriously dialed in. That tray of parts is what made me want to write about it. Very good. Embiggened photo: https://hackaday.com/wp-content/uploads/2016/03/goodprintquality.jpg
1200$? Hmm… It may be an adorable and precise little printer, but unfortunately the price is not so adorable and little. I see a 250$ china clone comming in 3… 2…1…
i spent 400 on a printrbot play, 75 on the y axis extention and heated bed upgrade, and about 50 in filament. its been a pretty solid printer so far.
as much as i like the design on the kitten here, id have to say its not very much bang for the buck.
For $1200 I believe the print quality is no that great. If you take a look at the foto that [Gerrit Coetzee] placed in the comments then looking at the objects on the left side of the build plate you can see some serious banding.
Indeed. The quality is decent. But for that price you can also buy the Ultimaker Original kit. Which will spew out the same quality (or even better) with a bigger build volume.
The yellow that they used also hides artifacts for the non-trained eye.
https://github.com/woolfepr/Printer-Kitten/
For that pricetag i would expect supported rails, ballscrews and a closed case. Of cause if you go that way, just make it bigger. Or way more precise with a 0.1mm nozzle… But I wouldn’t want to wait days for a part…
What is it with those open-end z-leadscrews anyway? Is that a better solution for some reason than having a counter-bearing at the end?
Gerrit, take a look at the DICE, a well engineered 3d printer (Print volume 90x75x80mm). It was designed to fit inside a 200x200x200 area. CoreXY, Linear rails, and perfect cable management make a compact and very accurate printer.
See his blog here: http://well-engineered.net/index.php/en/projects/12-dice-english
Most of his updates are on google+, including a link to a group purchase (Under $800): https://plus.google.com/+ReneJurack/posts
Both are base onTantillus
and the TinyBoy2 just only $239
https://www.indiegogo.com/projects/tinyboy-2-3d-printer-for-education/#/
and you can change it to E3D V6 by youself.
Why pay $1600 for same thing?