We’re not sure if [Stefan Gotteswinter] ever makes anything but tools to make more tools in his shop. This nice set of toolmaker’s magnets are no exception to the trend.
We can gather that [Stefan] is a professional machinist by trade. Like all professionals who do the same thing for work and play, he was spoiled by the nicer tools at work. One tool in particular, a toolmaker’s magnet, always came in handy. These are strong magnets that have been ground flat, square, and parallel.
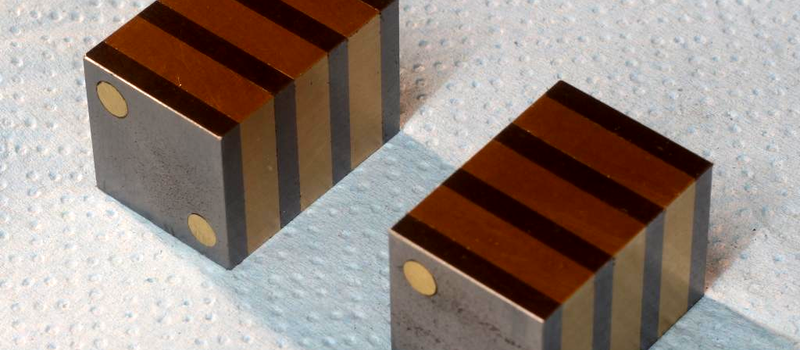
He really only needed one magnet, so he started to build a 20 x 20 x 100 mm one. It would be made out of alternating mild steel and brass plates. The steel plates would have a hole drilled through them and he’d place a correctly oriented magnet in the middle. It would all be clamped and glued together.
The build was going pretty well when he decided that he couldn’t really trust the glue alone. He had just begun grinding, but decided to switch to a quick drilling operation. Two brass rods through the whole assembly would be enough to hold it together. He started drilling, and then, suddenly, he had two magnets.
The assembly had broken in half. He decided that, all things considered, two 20 x 20 x 50 mm magnets were also handy. So he completed the drilling, and ground the new set of magnets to be a perfect match to each other. In the end he had a tool that looks just as expensive as the commercial option. There is also a video series on the magnets, part 1 and part 2, viewable after the break.


When messing around with RE mags. it’s really handy to have a shop demagnetizer. Everything you touch with those wonderful blocks will be picking up chips and worse. Mine is an old Weller high power soldering gun. Reel to reel tape demags work great too.
For tough objects (ie not brittle) a couple of sharp whacks should demagnetize them.
How do you use a “old Weller high power soldering gun” to demagnetize thing? I haven’t heard of that trick!
Really old ones put out a large 60Hz alternating magnetic field. I’ve never heard of using one as a degausser, so I learned something today. :)
You use the back end of the soldering gun, the part with the coils.
http://www.wikihow.com/Degauss-a-Computer-Monitor
This typical 100W soldering guns have a transformer in it that steps the voltage down to ~2V which is applied directly to the tip, which is some kind of wire loop. These transformers are mostly crappy and overrated, as they are only used in pulse operation while you press the button. They also have to be small and lightweight to fit into the “Gun” Housing. So they also have a high stray flux.
You stick tools that get hairy with steel wool and shraf into the loop of copper wire that is the tip. Power on first and insert then retract then let go of the trigger. To charge up stick tool in and pulse the trigger and test with a steel screw to see if it is good enough, repeat if not. You are catching the peak of a half cycle of power and that’s DC. Done this forever.