If you were around tech in the bad old days, magnets could be really bad news. They were fine on the fridge, no problem at all. Put one near a floppy disk, or a hard drive, or even a computer monitor, though, and you were in for some pain. You’d lose data, possibly permanently destroy a disk or drive, or you’d get ugly smeary rainbow effects all over your screen.
The solid state revolution has eliminated a lot of these problems. We all use SSDs, flash drives, and LCD monitors now, all of which care a lot less about flirting with magnets. However, the same can’t be said about all our modern hardware, for a magnet could cause your smartphone some major grief indeed.
Electro-permanent magnets (EPMs) are pretty nifty concepts, and if you aren’t familiar with them, they are permanent magnets with the ability to be electrically switched on or off. Unlike an electromagnet — which maintains a magnetic field only while power is applied — an EPM can remain “on” even when power is removed. Want to see one work? There’s a video embedded below that shows one off, but if you’d like to know how they work, we have you covered.
Inside are two types of magnet, one of which is permanent and the other being a semi-hard magnet paired with an electromagnetic coil. A semi-hard magnet’s flux can be changed by exposing it to a strong enough magnetic field, and that’s the key to making it work.
Being able to electrically switch a permanent magnet on or off is a neat trick.
When both magnets work together, the EPM is “on” and acts like a permanent magnet. To turn the EPM off, the polarity of the semi-hard magnet is flipped with a short and powerful electromagnetic pulse, after which the two magnets oppose one another and more or less cancel each other out. So rather than generating a magnetic field, an EPM more accurately reconfigures it.
As intriguing as EPMs are, we haven’t really seen one properly in action until it was brought to our attention that [Dave Jones] of EEVblog tried one out last year. He received a Zubax FluxGrip EPM, which is intended for drone and robotic applications and can hold up to 25 kg. Watch [Dave] fire it up in the video (link is cued up to the 7:30 mark), it’s pretty interesting to see one of these actually work.
EPMs are not prohibitively expensive but they are not exactly cheap, either. But if a switchable magnet sounds up your alley and you can’t afford an EPM, consider an alternative “switchable” magnet design that works by momentarily canceling out a permanent magnet with a paired electromagnet. Unlike an EPM, it’s not a permanent switch but it would be enough to drop a payload.
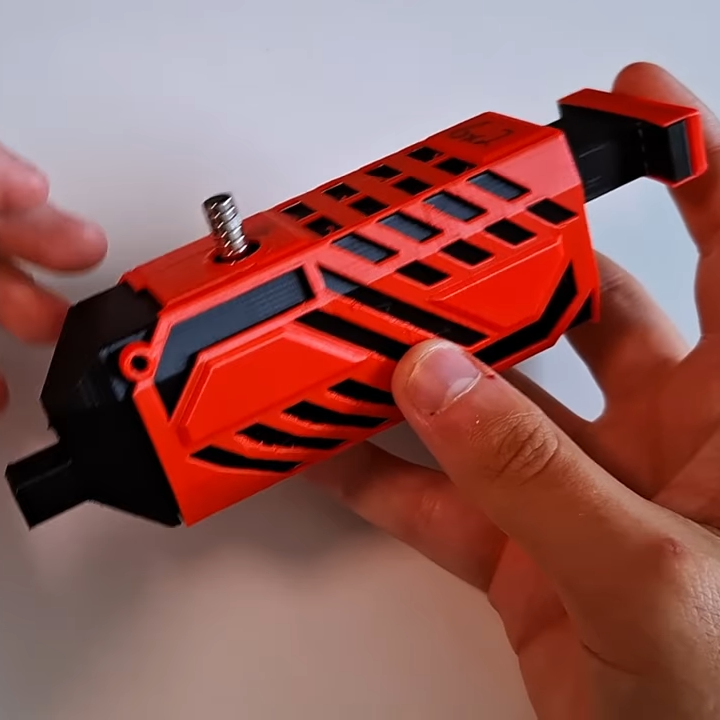
A stack of magnets auto-feeds with every press of the plunger.
That is a trickier task than one might imagine, because magnets can have a pesky habit of being attracted in inconvenient ways, or flipping around and sticking where they should not. [EmGi] solves this with a clever rack and pinion mechanism to turn a single plunger press into a motion that shears one magnet from a stack and keeps it constrained while the same magnet responsible for holding it to the tip takes care of dragging it down a feed path. It’s easier to see it work in action, so check out the video (embedded below) in which [EmGi] explains exactly what is going on.
This design is actually an evolution of an earlier, non-reloading version. This new one is mechanically more complex, but if it looks useful you can get the design files from Printables or Makerworld and make your own.
The only catch is that this reloading design is limited in what sizes of magnet it can handle, because magnet behavior during feeding is highly dependent on the physical layout and movements. For a different non-reloading placement tool that works with any magnet size and is about as simple as one can get, you can make your own with little more than a bolt and a spring.
To the extent that you’re familiar with magnetostriction, you probably know that it’s what makes big transformers hum, or that it’s what tips you off if you happen to walk out of a store without paying for something. But magnetostriction has other uses, too, such as in this clever linear position sensor.
Magnetostriction is just the tendency for magnetic materials to change size or shape slightly while undergoing magnetization, thanks to the tiny magnetic domains shifting within the material while they’re aligning. [Florian B.]’s sensor uses a side effect of magnetostriction known as the Wiedenmann effect, which causes a wire to experience a twisting force if a current pulse is applied to it in a magnetic field. When the current pulse is turned off, a mechanical wave travels along the wire to a coil, creating a signal. The difference in time between sending the pulse and receiving the reflection can be used to calculate the position of the magnet along the wire.
To turn that principle into a practical linear sensor, [Florian B.] used nickel wire stretched tightly down the middle of a PVC tube. At one end is a coil of copper magnet wire, while the other end has a damper to prevent reflections. Around the tube is a ring-shaped cursor magnet, which can move up and down the tube. An exciter circuit applies the current pulse to the wire, and an oscilloscope is used to receive the signal from the wire.
This project still appears to be in the prototype phase, as evidenced by the Fischertechnik test rig. [Florian] has been working on the exciter circuit most recently, but he’s done quite a bit of work on optimizing the cursor magnet and the coil configuration, as well as designs for the signal amplifier. It’s a pretty neat project, and we’re looking forward to updates.
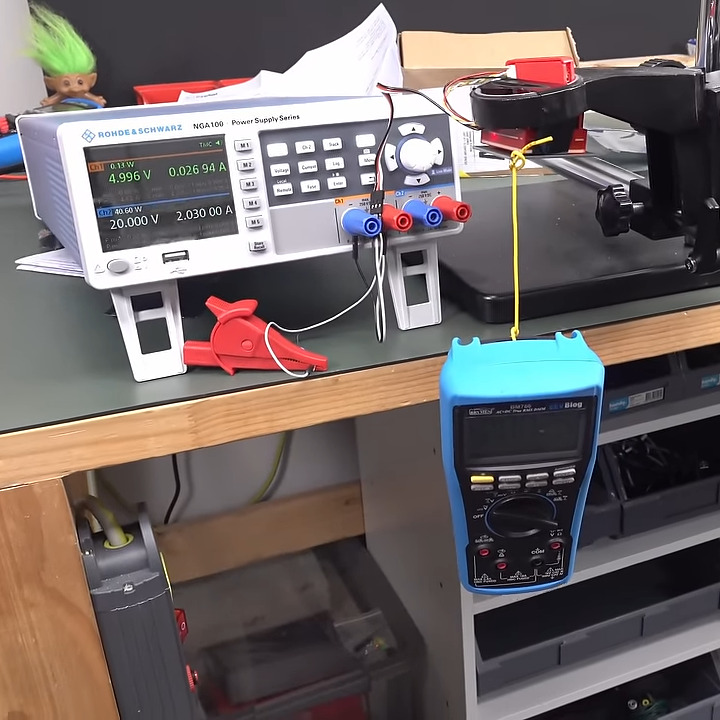
Although the Earth’s magnetic field is reliable enough for navigation and is also essential for blocking harmful solar emissions and for improving radio communications, it’s not a uniform strength everywhere on the planet. Much like how inconsistencies in the density of the materials of the planet can impact the local gravitational force ever so slightly, so to can slight changes impact the strength of the magnetic field from place to place. And it doesn’t take too much to measure this impact on your own, as [efeyenice983] demonstrates here.
To measure this local field strength, the first item needed is a working compass. With the compass aligned to north, a magnet is placed with its poles aligned at a right angle to the compass. The deflection angle of the needle is noted for varying distances of the magnet, and with some quick math the local field strength of the Earth’s magnetic field can be calculated based on the strength of the magnet and the amount of change of the compass needle when under its influence.
Using this method, [efeyenice983] found that the Earth’s magnetic field strength at their location was about 0.49 Gauss, which is well within 0.25 to 0.65 Gauss that is typically found on the planet’s surface. Not only does the magnetic field strength vary with location, it’s been generally decreasing in strength on average over the past century or so as well, and the poles themselves aren’t stationary either. Check out this article which shows just how much the poles have shifted over the last few decades.
Permanent magnets aren’t typically switchable. They’re always doing their magnet thing. However, if you align them with a bunch of other magnets in just the right way, you can create a permanent magnet that you can effectively switch on and off. [Andrew Klein] has done just that with his 3D-printed magnetic switch design.
The concept is simple enough. The design consists of a 3D-printed housing in two parts, top and bottom. When set into one orientation, the housing holds two arrays of magnets in opposite orientations. This effectively cancels out their magnetic fields and allows you to move the assembly around as if it’s pretty much not magnetic at all. However, rotate the device to its alternative orientation, and the magnets poles are aligned. This effectively combines their magnetic fields and makes the assembly act as one big large magnet.
These devices are useful if you want to create magnetic clamps or fixtures that can be attached and detached at will from ferrous surfaces. Being able to effectively “switch the magnet off” is much easier than trying to wrench a powerful magnet from a metal plate, after all.
If you have a late-model laptop, you’ve probably seen how the chargers magnetically snap into place. In theory, this should be easy to recreate for your own purposes. But why reinvent the wheel when [DarthKaker] has already done the work for you — assuming you only need two conductors.
The 3D-printed shells take the usual round magnets. Obviously, the north pole on one part should point to the south pole on the other part. In addition, if polarity matters, you should also have each housing contain one north-facing and one south-facing magnet so that the connectors will only mate one way.
It appears the project uses wires soldered or spot welded to the magnets. Heating magnets sometimes has bad effects, so we might try something different. For example, you could solder the wires to thin washers affixed to the magnets with epoxy, perhaps. Or use the magnets for alignment and make a different arrangement for the contacts, although that would take a different shell design.
We have talked about magnet soldering for connectors before. Don’t forget that you can build magnets into your prints, too.