Stereo microscopes are very handy tools, especially for a lot of hackers who now regularly assemble, test and debug SMD circuits using parts as small as grains of sand. We have seen a lot of stereo microscope hacks here at Hackaday, so it helps to take a look inside one to understand how they work. Thanks to [noq2]’s teardown of a Wild Heerbrugg model M8 stereo microscope, we get to do exactly that. His M8 is from the mid-1970s, but it is in mint condition and doesn’t look like it’s over 40 years old. Despite being so old, [noq2] still uses it regularly, so the teardown is not super detailed. But there’s enough for us to get a good idea of how they work.
Stereo microscopes use one of two optical designs — the Common Main Objective (CMO) optical system and the Greenough optical system. [MicroscopeWorld] has a nice blog post explaining these two types and their pros and cons. Not surprisingly, stereo microscopes, just like other optical instruments, are highly modular to allow attaching various extensions, adapters and accessories. The Wild M8 uses the CMO design and its main parts are the binocular head, the main body and the objective lens.
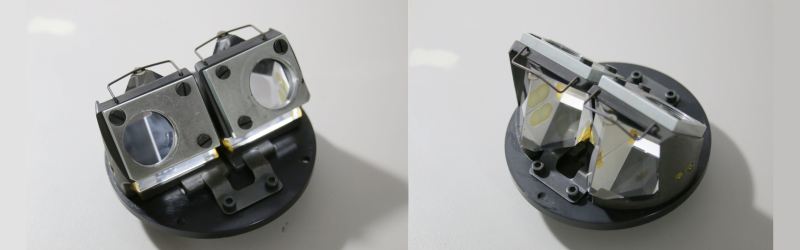
The binocular head consists of the two eyepieces and a pair of prisms that create the binocular split. The alignment of these prisms is critical and they must not be disturbed in their mounting cages. The prism cages have a sliding adjustment to help set the interpupillary distance. The main body contains the zoom and magnification optics and the related mechanics. [noq2] is impressed with the lack of plastics used in the construction of these fine instruments. Finally, there’s the huge objective lens, which [noq2] feels is the Achilles heel of the instrument. Its design is not plan-apochromatic and that causes significant chromatic aberrations, especially when trying to capture photographs. Thankfully, there are other objective lenses which can be used, including some DIY adapter solutions. The Wild Heerbrugg brand was taken over by Leica who still produce a range of stereo microscopes under that badge. If you have one of these microscopes, [noq2] suggests you head over the French forum at lenaturaliste.net where you’ll find extensive information about them.
As a bonus, also check out [noq2]’s ghetto lighting solution for his microscope – a pair of high power LED’s attached to salvaged heatsinks, and mounted on the frame of an old 80 mm cooling fan. The fan frame is perfect since it is the right size to slide over the objective lens. If you’re looking for a more capable lighting solution for your microscope, then check out “AZIZ! Light!”, a microscope ring light with a number of different features.


You won’t be too impressed with lack of plastics in some older optical instruments that have pot metal parts and appear to be getting https://en.wikipedia.org/wiki/Zinc_pest or similar.
All the Wild microscopes I have seen were definitely not made of pot metal, even the older models that look they were pulled out of tanks. I once received a slightly misaligned binocular head that had been abused in shipment; otherwise, every microscope I have checked has been in factory alignment. The longevity of these microscopes is almost scary.
Wild, Leica, Nikon, Olympus, Zeiss. They will outlive you.
Enough Bausch & Lomb Stereozooms floating around out there to outlive everybody!
Just picked up a Zeis Stemi SV11 head unit at a swap meet for $15. Missing eyepieces, stand, focusing and lighting but it’s a start.
microscopes are notoriously bad at photography, you are better off using actual macro objectives or normal objectives with a reverse macro adapter, i have pictures of 0603’s where the chip itself is covered by 20MP.
sure there are many microscopes that will magnify more but at the scale of electronics a camera will do just fine, big bonus is the 1080p video, vastly better image quality and the possibility of live view.
that’s not necessarily true. the trouble in getting old gear is well its old tech meaning three things 1) the optics might be sub-par (compared to current state of the art) with respect to aberrations and defects 2) the optical ports may be non standard depending on how old your material is and 3) old school equipment is almost unbreakable or easily fixed. so image quality will vary greatly from setup to setup but what your forgetting is those stereo microscopes are designed to have a great working distance so you can actually work underneath them i want to see you try to do that with a macro objective. if your using such as setup for documentation only then yes a macro or reverse objective will do as well.
Anybody have experience with dental loupes? Would they be good for electronics?
Yes, but I prefer stereo microscopes, because holding high mag head-mounted optics steady is hard.
The electronics are on the bench with the microscope, so everything in the high mag field of view is stable.
But try an Optivisor, then think “higher quality and more comfortable”.
I’ve been muddling along with one of these deallies…
http://www.rehabmart.com/include-mt/img-resize.asp?path=/imagesfromrd/MA-74265.jpg
Though I might whack this together for the Intel QX3 I grabbed a little while back….
http://kurokesu.com/main/2016/08/02/diy-pcb-inspection-microscope/
That picture quality looks pretty good, nice job! Is there a noticeable image lag?
messmaker, picture lag is in a range 100-200ms.
I use a Canon Loupe 4X quite frequently. It’s useful for reading chip labels or checking for solder bridges. At 4x, it is held about 1″ away from the object of interest, and it has a good trade-off between field of view and compactness. I also have a 10x loupe that I rarely ever use, since it is small and has to be held very close, also blocking out light in the process.
If you use your microscope for soldering, some fume extraction should be used as well, or the smoke will cloud up the lowest lens over time. And good light, preferrably from a ring of LEDs really helps a lot. With just a single point of light (like a lot of standard solutions on these microscopes offer) you cast shadows with higer components making it harder to see the solder joint you want to actually look at.
To protect the optics I use a piece of Saran wrap stretched over it and a rubber band. Change as needed.
That’s a cool hack! No chromatic aberration?
Those are good tips. A lot of stereo microscopes have a threaded mount underneath for a supplementary objective lens, which lets you add a protective filter.
Is it possible to give a different angle photo from focal assembly. I can’t understand how the knog rotation can move the up and down focal lens. Thanks in advance.