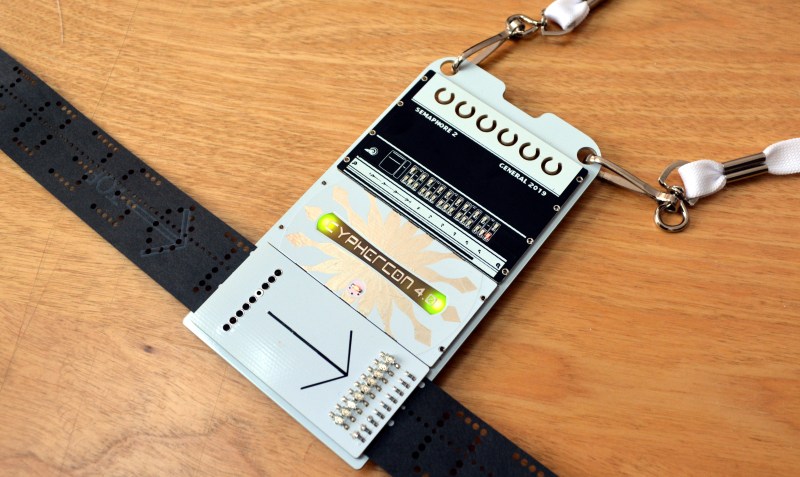
Cyphercon 4.0 came to life in Milwaukee, Wisconsin on Thursday and the conference badge is a brilliant and engaging design. At first glance it looks like a fairly mundane rectangular badge. But a closer look reveals simplistic elegance wrapping around some clever mechanical design and the awesome interactive mechanism of being able to read paper tape.
That’s right, this badge can read the series of holes punched in the long paper strips you normally associate with old iron of 50 years ago.
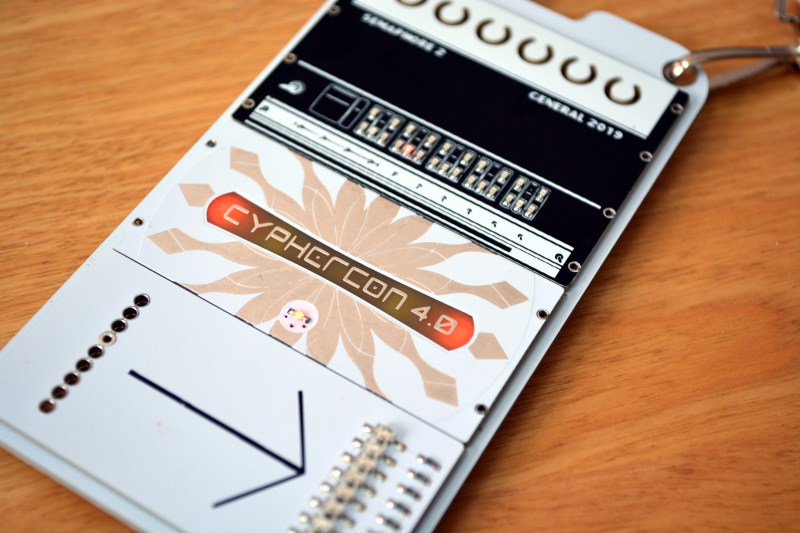
This is a design by the @tymkrs, the team who designed last year’s DEF CON 26 badge and the previous Cyphercon badges. This one is made up of three different panels placed vertically. The top is the Semaphore panel (named so because it’s printed on the silk screen) which includes an array of 25 LEDs arranged in groups of five. Just above that you’ll see the horseshoe-shaped holes. These are consumables, parts of the substrate clipped off with angle cutters when you visit the paper tape punching machine — it limits the number of times you can get these tapes made to hack your badge. The next panel down is the one with “Cyphercon 4.0” on the front and the coin cell battery on the rear. The final panel is the tape reader and the logic circuitry.
Along the right edge of the tape reader you can see the array of IR emitters and sensors that make up the tape reader itself. Along the left edge there is a series of holes intended to act as a guide so you may punch your own tapes. On the back of the badge you’ll find the PIC16F15355.
The tape is fed through, with one hole in the center (smaller than the rest) serving as the clock signal. The other eight holes deliver the data.
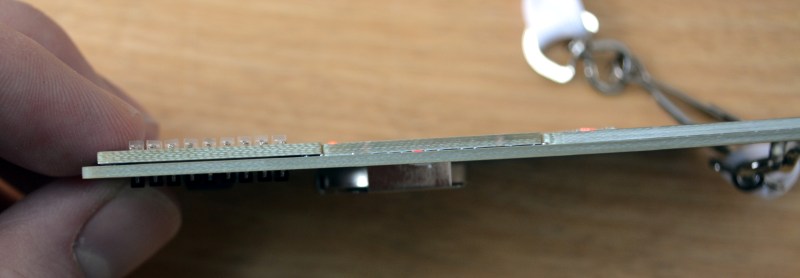
The assembly technique for this badge is incredible. If you look along the edge you can see how the three panels rest on the carrier board. During fabrication some metal stock was used as a spacer to leave room for the paper tape to feed after the panel was reflowed — there are pads on the underside of the panel that mate with footprints on the carrier board.
I would be very expensive to manufacture this if you used a contract manufacturer. Luckily, the Toymakers are their own CM so they just splurged on custom processes by adding to their own labor. It’s really impressive to see the modular design and commitment to making this work. I like it that the depth of the carrier board helps to reduce how far the battery holder for the CR2450 coin cell sticks out.
Here are detailed views of the panels. The rear-mounted LEDs on the battery panel are red/green, and the LEDs on the semaphore panel are red only.
The conference is called Cyphercon, so it’s not surprising there’s a puzzle to be solved. You find tape patterns on the back of the badge and in the conference guide book. Badges for presenters and organizers are different and I assume you need to collect all the patterns and assemble them to unlock what’s hidden within.
It’s a beautiful badge, even if you’re not trying to solve the badge puzzle. But the interactivity is so enticing. So far I’ve seen one team who brought a laser printer and transparencies to make their own tapes, leaving the “holes” unprinted on the strips. And another person mentioned trying to connect directly to the IR sensors with another microcontroller to electrically spoof feeding tape through it. It’s a simple mechanism, and a hit for everyone trying to solve the puzzles at this conference.
Here’s a video about the badge made by Toymaker’s to explain the activities involving this badge.


Looks like it would be an ideal thing to mod to connect to an computer that’s missing a tape reader or has an unreliable or broken tape reader.
Does the reader read existing paper tape standards, or something proprietary? (because it’s CypherCon!)
I see in the banner photo, numbers are plainly visible, which is not the way it was done back in the Army.
I suspect that’s intended more as an example than it is for actual data.
The numbers in the banner photo show a ‘header’ … the leader of punched tape that could have a program name, data-set name, data, or anything else identifiable in human readable format. The actual data starts after that header.
Way back when, the teletypes also printed what was punched in ink along the edge of the tape. That is how most labeled their programs/data.
That oil saturated paper tape shown in the picture is both one of the best to use, and rare, very difficult to source. An entire roll holds roughly 180Kb data…
video here: https://www.youtube.com/watch?v=0hTXV7WTQjE
I wonder if it does Enigma…
Good seeing you again Ed…
8 level…bet we could build a second set of guides to do Baudot. The real problem might be that the more common oiled yellow tape doesn’t work well with optical readers, because the difference in light level between a hole and no hole is not that great — low SNR. Black or mylar would be a better choice if available (and chadless is right out).
// proud owner of a chadless TT-253/UG
I imagine there is some Chad out there looking for his TeleType…
Thanks, I added this to the article.
The smaller holes were originally meant for the sprocket drive in a mechanical reader, but they are also quite nifty for optical reading. Use these holes to generate the clock signal and the data bits will be already settled on the rising edge of the clock.
Plugging my own project here. This little reader would be a perfect companion to my PTAP2DXF commandline utility that makes real paper tapes that are readable by vintage equipment ….without a punch.
Not many people have a working vintage paper tape punch these days, however CNC vinyl cutters such as the Silhouette Cameo are reasonably priced and accessible nowadays. This started out as an experiment to see if a home consumer-grade CNC stencil cutter could cut the tiny holes (chads) and happily it turns out they really can.
An example:
https://github.com/1944GPW/ptap2dxf/blob/master/Photos%20and%20screenshots/19_finished_tape_2_small.jpg
The project is open source, has a full illustrated PDF manual and samples and is up on Github:
https://github.com/1944GPW/ptap2dxf
Even without a stencil cutter, it can also be used to visualise .bin, .ptap and other tape files for/from SimH.
Teaser example (looks better with fixed font eg Courier):
$ ./ptap2dxf.exe –text=”Hackaday”
+———+
| O O. |
| OO . O|
| OO . OO|
| OO O. OO|
| OO . O|
| OO .O |
| OO . O|
| OOOO. O|
+———+
$
It can also make 5-level Baudot tapes as well.
Arrgh spaces got removed. Oh well, check the github doc and pictures.
Holy mother forking shirtballs. That’s outstanding.
Does anyone know of a DIY from-scratch paper tape punch machine project?
That might be a fun re-purpose of a 3D printer or CNC machine, feed it some G-Code to punch out a strip of paper.
A 3d printer with a well leveled bed can print a punch tape. An infinite-Z design 3d printer can produce a roll containing some meaningful data.
You could use my utility described above to turn your program/data/banner into a DXF that you could import into say OpenSCAD, apply some thickness then try 3D printing that. The paper/vinyl cutter does a more realistic job though.
I’ll keep your utility in mind. Don’t have any paper tape reader yet though ;)
I spent a bit more time reverse engineering the tape code data format, and this is what I came up with https://gist.github.com/gigawatts/539fe5c6ee05a1fa04d80f0294a40b7e
I would like to see a BOM and schematic on this, particularly the LED’s and photo conductors. I was not not entirely satisfied with my choices for my PTR at https://hackaday.io/project/162182.