For many of us our landscapes are dotted with wind turbines, the vast majority of which are horizontally aligned as if they were giant aircraft propellers. A much rarer sight is the vertical wind turbine, which remains a staple of the wind power experimenter. [Troy] and his brother have posted a video showing a small wind 3D printed vertical turbine, which unusually includes an alternator made from scratch as well as the rotor itself.
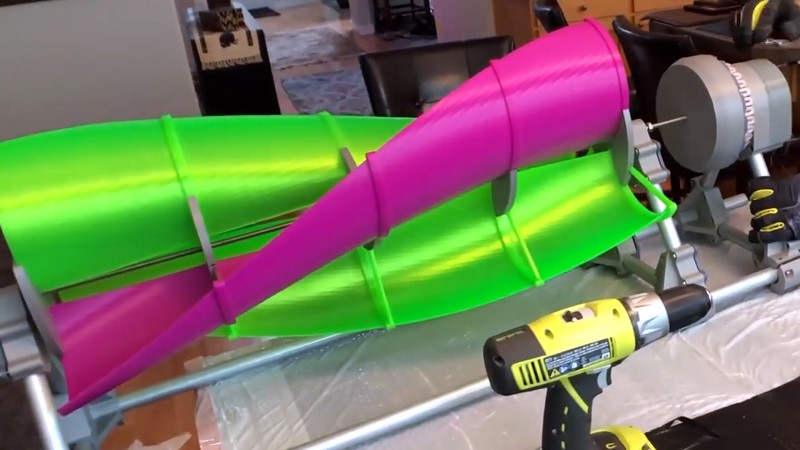
The machine adopts a Savonius rotor design with three scoops, which offers simplicity and high torque at a lower rotational speed than some of the alternatives. The scoops are assembled from a number of 3D-printed sections, and directly drive the generator which uses a large number of coils on a stator encircled by a rotor containing an array of magnets. A simple rectifier and three-terminal regulator produces a 5-volt output.
Sadly there was not enough wind to give it a decent test for the video, but they demonstrate it with a very large fan standing in. We like the alternator design but we’d be interested to see how the sectional rotors hold up in outdoor conditions, and perhaps that regulator could benefit from a switch-mode component. If you fancy a go he says he’ll release the files as open source if there’s enough interest. We’re interested [Troy], please do!
Many wind turbines have passed through these pages over the years, and for contrast here’s a horizontal 3D printed example.


This looks like an excellent work to be honest. Taking an idea and refining it to become reality is no that easy, and I’m proud of them making things as brothers. But overall this can be greatly improved. I’ve been working with Savonius VAWT and something I’ve noticed from recent investigations is that 2 bladed rotors perform better. Also using endplates increases the pressure on advancing blade, and some complex designs like elliptical blades and such are better tan semicircular profile. Props on getting the twisted blade design, this one seems to get better starting torque. Great job, it’s a really beautiful prototype
This is a very beautiful art work. Its shows your pasion and abilities
The twisted blade idea is +20 old.
From the lead photo, I thought the turbine was driving the drill to generate the power.
More of a Joutsiniemi design
Why the Hulk colos scheme?
More seriously, is there an advantage of helical blades taht need to be 3D printed vs straight blades cut longitudinally from PVC 6″ pipe?
They mention improving starting torque – seems to me the helical blades would have a smoother power delivery, but I don’t know if it would be significant over your simpler parts.
More consistant and continuous force, since the surface area moving with and opposed to the wind is always constant. With straight PVC, you will have a cyclic output with each vane: increasing-max-decreasing-min as each vane passes the point perpindicular to wind direction.
Also, the twisting allows this type of vane to be more self-supporting, without the need for drag-inducing additional support.
Even so, there are much more efficient designs… But this is a place where people make stuff just because….
Physics of VAWT are such that they are really inefficient.
My recollection (from long ago) is that a propeller type does a good job of extracting energy from the disk or air moving through it. This design looks like it can take energy from 1/2 of the area it blocks, minus the drag from the other half, and I will guess it is pretty poor. It is pretty and I’m betting far from the best DIY choice. I’m suprised they got all that printing done in a weekend.
I have no experience with wind power, but there are some up sides.
* It is always “facing into the wind” unlike a normal design which needs components to adjust as the wind shifts direction.
* Propellers can have supports at an any interval along the shaft, allowing them to get arbitrarily long without snapping off.
* The shape is convenient. There’s a house in my area that has one 3 stories tall. It’s anchored at the top to a small beam projecting from their roof. It takes up all of ~4 square feet of their lawn. That’s a lot of DIY power collection with very little footprint.
But the propeller type chops birds in half! Long live the birds!
Second the opinion of VAWT. The balance of plus and minus wind resistance does not balance out. It’s the most ineffective design for a wind turbine. A flat piece of plywood as a propeller would be better. IE: Ye, old farm water pump design.
This is super cool first of all. Definitely falls into the bin of things that are entirely 3d printed mainly for SEO and youtube views, though. It’s suuuuuch a huge print. Could probably whittle one out of wood in the amount of time it must take on an average hobbyist printer. Would be good to print just some hardware bits n’ bobs and then make the rest out of other materials, e.g. plastic sheeting or PVC sections for the vanes and an existing alternator.
Also, yeah, the printed ‘scoops’ are gonna crack along the layer grain once you put that in real outdoor environments for any amount of time.
The difference between 3D-printing and another manufacturing method is the amount of time required from the user to create the prototype. I don’t care if the printer takes hours per print — those unattended hours are time I can spend working on the rest of the design.
So print multiple layers for the scoops in different directions and put the layers together. If done correctly you could do this without a massive increase in weight. The big advantage I can see would be the ability to print replacement parts easily and minimize downtime. Especially once it was installed. Imagine the ability to have all the parts sitting there for a spare, and cheaply print a part to your specifications. Maybe even modify the design as you see weakpoints etc.
I am very interested!
Cool project! It does seem like you are using a linear regulator though. Seems like you could increase overall efficiency of the design by using a switching power supply. You’re probably losing a lot of power in the regulator itself. Probably not a weekend project though. Best of luck!
Very cool stuff guys! have you heard of Saphon energy? They have a gyroscopic wind turbine with a disc for its “blade.” They claim to have broken the Betz limit with their design. Anyhow… you guys did something very interesting. Thank you for such an entertaining video of your ingenuity!
Using back/boost converter would be better than LM317
Awesome project. I love that being from Portland the project required copious amounts of coffee.
Since there was some interest, I’ve released the design as open source. The files can be found here:
https://github.com/shadowtag/TroysLab/tree/master/Scoopy