At the end of August I made the trip to Hebden Bridge to give a talk at OSHCamp 2019, a weekend of interesting stuff in the Yorkshire Dales. Instead of a badge, this event gives each attendee an electronic kit provided by a sponsor, and this year’s one was particularly interesting. The RC2014 Micro is the latest iteration of the RC2014 Z80-based retrocomputer, and it’s a single-board computer that strips the RC2014 down to a bare minimum. Time to spend an evening in the hackerspace assembling it, to take a look!
It’s An SBC, But Not As You Know It!
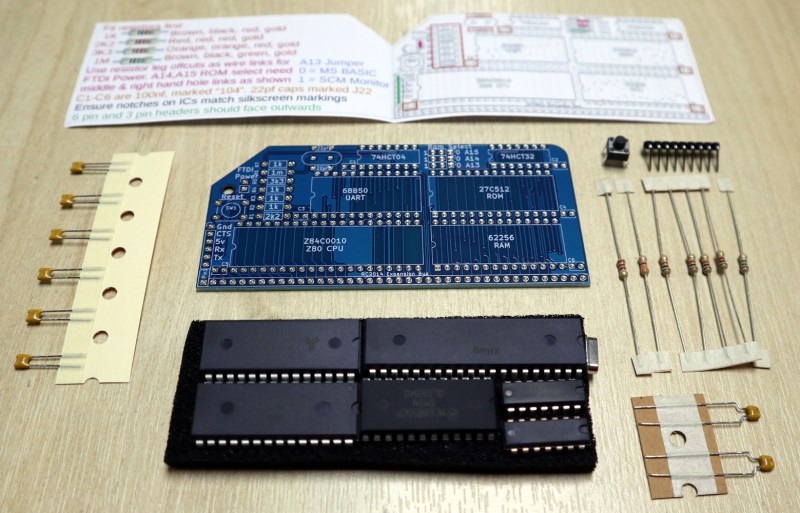
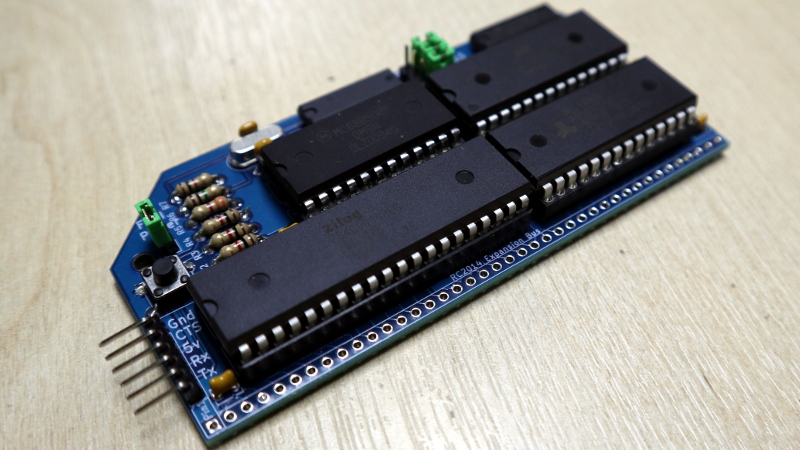
The kit arrives in a very compact heat-sealed anti-static packet, and upon opening was revealed to contain the PCB, a piece of foam carrying the integrated circuits, a few passives, and a very simple getting started and assembly guide. The simplicity of the design becomes obvious from the chip count, there’s the Z80 itself, a 6850 UART, 27C512 ROM, 62256 RAM, 74HCT04 for clock generation, and a 74HCT32 for address decoding. The quick-start is adequate, but there is also a set of more comprehensive online instructions (PDF) available.
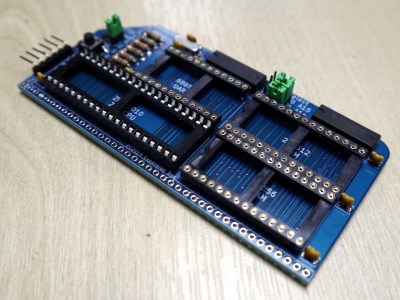
Assembly of a through-hole kit is hardly challenging, though this one is about as densely-packed as it’s possible to make a through-hole kit with DIP integrated circuits. As with most through-hole projects, the order you pick is everything: resistors first, then capacitors, reset button and crystal, followed by integrated circuits.
I’m always a bit shy about soldering ICs directly to a circuit board so I supplemented my kit with sockets and jumpers. The jumpers are used to select an FTDI power source and ROM addresses for Grant Searle’s ROM BASIC distribution or Steve Cousins’ SCM 1.0 machine code monitor, and the kit instructions recommended hard-wiring them with cut-off resistor wires. There was no row of pins for the expansion bus because this kit was supplied without the backplane that’s a feature of the larger RC2014 kits, but it did have a set of right-angle pins for an FTDI serial cable.
Your Arduino Doesn’t Have A Development Environment On Board!
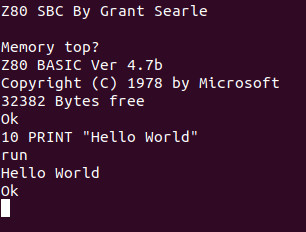
Having assembled my RC2014 Mini and given it a visual inspection it was time to power it up and see whether it worked. Installing the jumper for FTDI power, I attached my serial cable and plugged it into a USB port.
A really nice touch is that the Micro has the colours for the serial cable wires on the reverse side of the PCB, taking away the worry of getting it the wrong way round. A quick screen /dev/ttyUSB0 115200 to get a serial terminal from a bash prompt, hit the reset button, and I was rewarded with a BASIC interpreter. My RC2014 Micro worked first time, and I could straight away give it BASIC commands such as PRINT "Hello World!" and be rewarded with the expected output.
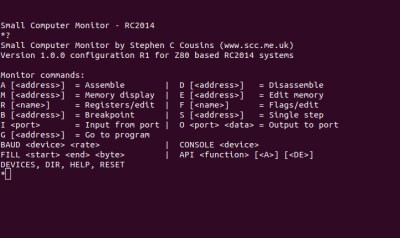
So I’ve built a little Z80 single board computer, and with considerably less work than that required for the fully modular version of the RC2014. Its creator Spencer tells me that the Micro was originally designed as a bargain-basement RC2014 as a multibuy for workshops and similar activities, being very similar to his RC2014 mini board but without provision for a Pi Zero terminal and a few other components. It lacks the extra hardware required for a more comprehensive operating system such as CP/M, so I’m left with about as minimal an 8-bit computer as it’s possible to build using parts available in 2019. My question then is this: What can I do with it?
So. What Can I Do With An 8-bit SBC?
My first computer was a Sinclair ZX81, how could it possibly compare this small kit that was a giveaway at a conference? Although the Sinclair included a black-and-white TV display interface, tape backup interface, and keyboard, the core computing power was not too far different in its abilities from this RC2014 Micro — after all, it’s the same processor chip. It was the platform that introduced a much younger me to computing, and straight away I devoured Sinclair BASIC and then went on to write machine code on it. It became a general-purpose calculation and computing scratchpad for repetitive homework due to the ease of BASIC programming, and with my Maplin 8255 I/O port card I was able to use it in the way a modern tech-aware kid might use an Arduino.
The RC2014 Micro is well placed to fill all of those functions as a BASIC and machine code learning platform on which to get down to the hardware in a way you simply can’t on most modern computers, and though the Arduino represents a far more sensible choice for hardware interfacing there is also an RC2014 backplane and I/O board available for the Micro’s expansion bus should you wish to have a go. Will I use it for these things? It’s certainly much more convenient than its full-sized sibling, so it’s quite likely I’ll be getting my hands dirty with a little bit of Z80 code. It’s astounding how much you can forget in 35 years!
The RC2014 Micro can be bought from Spencer’s Tindie store, with substantial bulk discounts for those workshop customers. If you want the full retrocomputer experience it’s a good choice as it provides about as simple a way into Z80 hardware and software as possible. The cost of simplicity comes in having no non-volatile storage and in lacking the hardware to run CP/M, but it has to be borne in mind that it’s the bottom of the RC2014 range. For comparison you can read our review of the original RC2014, over which we’d say the chief advantage of the Micro is its relative ease of construction.





Want, need, must have… no money :P
Hmmm, need 20 other people to get that sweet sweet price point…
Hey Hackaday!
Why not do a bulk buy for your faithful minions, like you did with the HaD Pro Trinket a couple of “days” ago!
https://hackaday.com/2014/10/10/10th-anniversary-trinket-pro-now-in-the-hackaday-store/
Nice!
I’ve played with the thought of buying the RC2014 (As Seen On T…indie!).
Thanks for the review.
Is yours “just” missing the pin headers that would make it work with the RC2014 Motherboard
or are parts/functions missing?
https://www.tindie.com/products/tindiescx/sc114-z80-motherboard-kit-for-rc2014/
Well, I guess you kinda answered that in Paragraph 7…
This was an interesting read, thanks! I’ve been wanting to get something like this Z80, but wasn’t sure what the best way to do it would be. This might be a good option :)
I enjoyed building this kit. Better vintage vibe. http://www.sunrise-ev.com/z80.htm
That is neat as well… I might have to pop for this. Brings back lots of memories of o’ PC computing with CP/M and basic. Plus at work, we had a Z-80 rtu that was written all in assembly. Anyway, looks like a good solder project and not need a lot of space to use…. much like an RPI space wise.
OMG, I see I am not the only one having a flashback. I was just going to mention CP/M. I built my first computer in the early 80s with a Z-80 at the heart of it, 64 kb, 2 8 inch floppy drives that dimmed the lights when they were they spun up, and a mono-chrome monitor.
Very neat. I built another kit from CPUville a few months ago too. It’s able to run CP/M off a harddrive. The author makes fantastic assembly manuals. I learned a lot in the process of putting it together.
http://cpuville.com/Kits/Single-board-kit.html
My question is, if we stuff those pin holes at the long side with pin headers, could one access them like a reasonable big number of gpio ports ?
Not without additional logic – although that is not hard to do. As it stands its literally just the cpu address and data bus, and a few other control signals.
But can it run TRS DOS or DosPlus ? It would be cool to put that in an old TRS 80 cabinet.
trs dos might be dependent on having a disk drive of some sort. it is a DOS afterall.
So you want to stuff a Z-80 single board computer inside a 40 year-old case for a Z-80 single board computer?
I wish, Excellent! On new self built hardware…Why not… I can certainly see the appeal.
My guess it would not run Penetrator out of the box. If so, could I manage it at 7Mhz vs my old TRS-80/4’s 4 Mhz.
I use a TRS-80 model 4 case to house an Intel i9 CPU 24GB RAM with a suitable cheap Chinese 4K colour 4:3 display and a Logitech G512 led lit K/B, UHD Blu-Ray drive, DDS-4 Tape/3.5’/5.25′ drives also. Emulation nostalgia. Running on real hardware gives a warm feeling inside which is not achived to the same degree with emulation. Great stuff!!!
My Arduino also has a development environment on board. Granted, it’s an ESP8266-based board that I flashed with MicroPython ;-P
A FPGA emulation would be interesting for those who happen to have some FPGA boards (like the really cheap Pano logic boxes) lying around. It would also work great for those who want to try building a cluster of them for fun.
Yes, for sure there is some “retro” fun to be had with FPGAs. You can start with this 80Mhz Z-80 design for inexpensive FPGAs. :) http://sowerbutts.com/socz80/ (and there are many others)
Oops, actually that was “Z80 compatible T80 CPU core at 128MHz”…
i’d like to get “into” the RC2014 scene, but the lack of clear licensing for the RC2014 is a concern. i really wish they’d clear that up!
Yes, I got confused on Tindie when I “searched” for “RC2014”. There are a number of vendors using that name for their products, with overlapping capabilities and “daughterboards”. I really don’t know which (if!) ones work together.
and then there are the Z180 based boards/systems with similar confusion.
As I understand it the original is Spencer’s RC2014, which established the backplane and bus wiring. The other boards are for the RC2014 bus. And yes, there’s quite an ecosystem.
yes but there is no clear licensing for the bus interface or card format, which means as business people are going to be wary of making products for it….
Nice just too bad it can’t run CPM and you’re foced to buy several other boards before you can anything with it.
That can be as simple as a bit of stripboard and a few 74 chips for a port though.
Replace the Z80 with a 6809 and I’ll be interested:
The 6809
Part 1: Design Philosophy
https://cdn.hackaday.io/files/460001968064000/byte_6809_articlesx3.pdf
Like this? http://dangerousprototypes.com/blog/2018/08/09/6809-cpu-board-for-the-rc2014/
That’s a nice read. Thanks for the link. Writing 6502 and Z80 code was fine back in the day (early 80s) but it was knowing the 6809 that opened up job opportunities for me (in the UK) where the chips were being put into arcade games and the new generation of slot machines. Sadly there was more money to made COBOL programming back then, so my machine code skills never advanced beyond the 6809. Most excellent times though.
Then it could run Microware OS-9. It us amazing that even static RAM has gotten so dense since the 6809 stepped aside that one IC will fill the address space, even have leftover. So add a bit of hardware to do memory mapping and it can be more than 64K of RAM.
Terminals, or computers that run as terminals, are now so common and cheap that it’s easy to play with old computer boards. Even decades back I thought of buildinh a small 6809 board to add a decent computer/operating system to my Model 100, though the small screen is still an issue. Now yku can even do away with floppy drives. Either with some sokid state device or a hard drive, now so cheap and easy to interface.
Michael
Ohh old memories. I have a couple of Z80’s in a drawer someplace along with a tube of 8051’s. 8bit computing is just not the same as Raspberry Pi’s and python. Thank goodness…..
I also received a RC2014 Micro at OSHCamp. It’s a great little kit, but I wish that Spencer would fully acknowledge that it was designed by Grant Searle, the version of BASIC he supplies came from Grant Searle and the SCM Monitor was written by Steve Cousins.