[Leaded Solder] found some ColecoVision game cartridges at a flea market, and like most of us would, thought, “I’ll build a ColecoVision console from scratch to play them!” Well, maybe most of us would think of that, but not actually do it. He did and you can read about the results in great detail since he wrote up two posts, one covering the design and one covering the construction.
The ColecoVision was a game console that famously could be expanded into a nice — for its day — personal computer. It even had a daisy wheel printer in that configuration. However, in either configuration, the game console was the brains of the operation. According to [Leaded Solder] the price of a unit in working order is high even though over 2 million were made because of several design problems that make them less likely to survive the decades. Rather than repair and modify an original unit, it was cheaper and much more educational to build new.
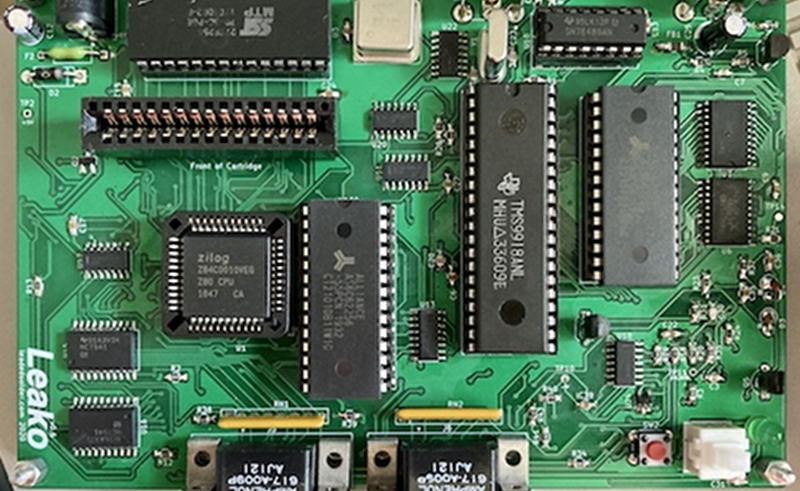
The design goal was to use composite video, a single power supply, and reduce the size of the board, mainly by using surface mount parts where possible. [Leaded Solder] admits he didn’t fully understand how address and data buses worked in a system like this when starting this project, and he documents what he learned and winds up with a pretty succinct summary of bus operation. We’d argue that the statement, “…only one chip on a bus is supposed to be enabled at a time…” is a little misleading, however. Two chips are enabled at a time, one writer and one reader. In addition, it isn’t uncommon to have several devices read at the same time (for example, some CPUs have two copies of each register). But that’s a nitpick, especially in the context of the Z80 CPU used here.
By the time the PCBs arrived, the total price tag was up to just over $68 Canadian. We remember scrambling EPROMS on circuit boards to make layout easier. After all, you don’t care that location 0 and 1 in your EPROM are actually in adjacent cells. You just care that when you ask for one, you get it. The ColecoVision apparently did the same thing with its video and audio chips. The data bus runs in reverse. That is the Z80’s D0 pin connects to D7 and D7 connects to D0. Unfortunately, the original PCB didn’t take that into account for the sound chip, so a new board revision solved that problem.
The posts are pretty blunt about mistakes made and maybe we can all learn a little from reading about them. For example, subtle differences in footprints caused several problems with the first two versions of the board. By the end, there were 6 spins of the board. Luckily, PC boards are cheaper than they used to be.
Even so, there are still some controller issues, but we have no doubt he’ll solve it and tell us about it when he does. If you’ve ever tackled a project of this size, you are probably all too familiar with the process of debugging a new board. But most of us don’t document it to this extent. If you ever wanted to watch over someone’s shoulder doing a new design like this, you’ll want to read these posts.
Maybe before making boards, a breadboard would have helped. The idea of converting a game console into a PC wasn’t just for the ColecoVision and Adam (the ColecoVision’s computer personality). There were some attempts to do the same with the popular Atari 2600.


Breadboard something like this? I’d rather do revs of boards.
So I guess my ColecoVision – http://www.robotsandcomputers.com/computers/misc_coleco.htm – is a rarity?
I see a ColecoVision console in the thrift shops at least a few times per year, so they can’t be that scarce. They are all pushing 40 years old though, and a lot of electronics that old need a little love to get it working properly. So of the number of consoles you bump into, only a portion of those is plug-and-play these days.
The folks at CollectorVision went another route and designed a compatible console using an FPGA which doesn’t require the fussy controllers and can talk to modern televisions. The Phoenix was available for $199 until recently. While I applaud Leaded Solder’s efforts for purely technical/learning reasons, in this case it doesn’t seem to be the most efficient way to play ColecoVision cartridges.
I’ll also concur with macona’s comment that breadboarding this would have been a waste of time. Perhaps an individual circuit or two for testing, but if you built it all up and spent a ton of time doing it, you’d still spend the time time doing the board layout anyway. As the article said, board cost has come way down.
Kudos on teaching yourself how classic computers were made though. We cover some of that in lab classes at the university and it’s eye-opening to most of the students.
Did you follow the link? It has been breadboarded.
That was someone else, I thought. If your only interest is making one as a goof, then a breadboard is a much better way of learning. If the goal was to make a board then a breadboard isn’t a great use of time. That’s generally true these days, given that board layout software is so available and boards have become cheap.
It was someone else. Despite how cheap it is to spin boards now, I still think there is a place for either breadboarding or rigorous simulation because both allow you to do “what if” that is at least discouraging to do with a PCB. Case in point with this board. There were errors in the source schematics and other issues that would have been quickly resolved with a proper breadboard and then maybe one or two board spins. But everyone has their own process.
A lot of Colecovision often have problems. The most common is dirty power switch, the IC connecting to controller port is blown, and burned out RAM chips. RAM chips are easily replaced with a more common version that doesn’t need -5v, the IC for controller port is easily replaced and the switch can be taken apart for cleaning. The final issue is the old RF out, some modern TV do not offer legacy tuner for pre-ATSC devices so one would need to find RF to AV demodulator or install video mod. The original power supply comes with a hefty price tag (to match the hefty size and weight!) but USB adapter is available which uses a much smaller USB power supply (no more hogging 3 outlet spots on power strips!!)
Colecovision still has a lot of life, many new games have come out and even the SGM which offered enhancements for games that uses SGM. And lastly, there’s Colecovision Phoenix which is basically Colecovision and SGM put together in one package with both Colecovision controller ports and SNES controller port, it supports SNES NTT controller. Personally I like Jaguar controller better and I’ve modded my Colecovision to have Jaguar controller ports.
Composite only? Doesn’t the TMS video chip have YCbCr output? I’m pretty damn sure I read that on the pinout when I fixed a few Colecovisions.
(btw. Nintendo’s first consoles – PONG ones from 1977 – also use YCbCr internally)
I just checked the (insanely great) breadboarded recreation blog linked at the end, that states that, as their Video Display Processor, NTSC models use the TMS-9918A (composite), and TMS-9929A (YPbPr) is used instead in PAL models… and this is true for the TI-99 too ! (see VDP datasheet for differences).
There’s an FPGA TI VDP replacement which has VGA out. It’s a drop in replacement for any computer (TI-99/4A, TOMY Tutor, MSX1) or game console that uses the 99**A series VDPs.
The most commonly used were the 9918A NTSC 60Hz composite out and 9929A 50Hz component out. There was a 9928A 60Hz component out version but it was very rarely used. IIRC a 9919A PAL composite out version was never made because it was easier to adapt one component out video version to SECAM and various slightly different PAL standards by doing the conversions in the external RF modulator.
The 9928A and 9929A do not have the video input pin that the 9918A (and 9919A would if it existed) had, that was used for some video titlers. TI prototyped a video disc system that fed video through a TI computer that overlaid graphics onto the video, but it never got past that stage of development, possibly because only the NTSC version of the console could work with it.
The original articles are a soap opera for nerds!
Al, thanks for bringing this pearl; awesome reading material !
agreed!
Once I perfect time travel first thing I’m definitely going back to tell my sister not to give away our ColecoVision and ADAM expansion module.