Reactive Heat And Wind Come To VR, Thanks To Smart Plugs

Want to feel the heat of nearby fire, explosions, or radiation? Or even just the gentle warmth and breeze of a sunny day in the wasteland? If you said yes, you’re in luck because [GingasVR] created an immersive heat mod and wind mod for the VR version of Fallout 4 that leverages economical smart outlets and game scripting to do just that.

The heart of this hack lies in gluing two things that don’t normally go together. In this case [GingasVR] uses a bit of game scripting to control TP-Link HS100 or HS110 Smart Plugs, allowing virtual events to control things in the real world. An ordinary fan in a smart plug creates wind on demand, and heat comes from a 250 watt infrared heat lamp aimed toward the player. For heat, an IR lamp is the way to go because it’s highly directional, can be quickly cycled on and off, and responds rapidly.

The range of immersive effects opened up by this is pretty compelling. Sunny weather yields a gentle glow of warmth, but nearby explosions cause a short full-blast flash of heat. The heat of fires also grows and fades with proximity. This being Fallout, [GingasVR] ensured local radiation has an effect on the heat level as well. Want to see it in action? She briefly explains around the 3:20 mark in this video.

Using ordinary appliances and smart plugs controlled from within VR to modify environmental effects is clever, and we like that it’s entirely nondestructive. The scripting mod for the game doesn’t overwrite any game files, and the hardware used requires no modifications.

Not into Fallout? [GingasVR] has similar Skyrim VR mod, if that’s more your bag. And if you’re modding Skyrim VR anyway, consider adding a “meditation device” headband to make magic respond to your actual state of mind.

Giving The NES An Optical Data Storage Add-On

The introduction of optical media in the form of CDs meant a revolution in the world of gaming consoles, escaping the restrictions of a few dozen MB of storage and instead offering a theoretically infinite amount of storage through the miracle and tedium of swapping discs. After the SNES narrowly escaped getting a CD add-on and the N64 doubled down on cartridges, we can now at least get an impression of what it’d be like if the Nintendo Entertainment System had been gifted a CD add-on back in the 1980s, courtesy of a project by [Throaty Mumbo].

The NES future we could have had. (Credit: Throaty Mumbo, YouTube)
The NES future we could have had.

There’s also an accompanying video containing typical hijinks and a demonstration of this system. Initially [Throaty Mumbo] was going to make a SNES CD add-on to match that console’s initial prototype, but doing it for the NES seemed more fun. Obviously, since the NES is quite limited hardware-wise it was always going to be a struggle, even if the original front-loading NES conveniently has a mostly unused expansion slot.

On the custom PCB there is an RP2350B microcontroller that mediates between an Everdrive N8 Pro cartridge and an IDE CD drive, along with a PCM5102 audio DAC. The expansion port is hereby used to receive the audio samples on its audio mix input pin, along with power. After boot the game ROM is read off the CD by the MCU and streamed over USB to the Everdrive.

Combined with the previous work [Throaty Mumbo] did to revive the long-defunct Japanese online service for the NES, it’s an exciting time for fans of the iconic console.

Continue reading “Giving The NES An Optical Data Storage Add-On”

A man’s hands are shown holding a video game controller. A cable runs to a box with an orange front surface, which has a series of divots arranged in a points on a grid. These divots form a vertical line, with one other divot to the right of and below the line.

Playing Snake With A Pneumatic Display

[soiboi soft]’s vacuum-driven dot matrix display is part suction gripper, part touchscreen, and altogether impressive. Its display capabilities are entirely shadow-based, with each pixel being made of a cavity behind a flexible silicone sheet; when the display’s microfluidic logic circuitry activates a pixel, a vacuum pump pulls the sheet inwards, creating a visible hollow.

As in previous iterations, the display’s control circuitry is built around a pneumatic “transistor”, which allows an air channel to be opened or closed by applying vacuum to a control channel. As a first test, [soiboi soft] built a 16-pixel dot matrix display. Eight control channels – four row and four column channels – are multiplexed to individually control each pixel. The transistors act like one-way valves, so the pixels hold their state, even when pressed in by hand; simply add some circuitry to read a pixel’s state, and it would be a fully-functioning touchscreen. The supporting pneumatics also got an upgrade; the solenoid valves now cleanly mount to the back of the board, and the vacuum pump connects via a Luer lock adapter.

The 3D printing used to make certain parts and silicone molds caused issues when scaling up to a 64-pixel display, however. The parts were warping, destroying the seal necessary to keep pixels “on”. To straighten them out, [soiboi soft] pressed the printed part against a flat glass build plate in a vacuum bag and annealed it at 60 Celsius for several hours. This worked quite well, particularly when slightly raised rings were printed around the area to be sealed. Once all these bugs were worked out, the display was clear and decently responsive. [soiboi soft] was able to display letters, numerals, and animations, and even able to play Pong and Snake. It won’t be setting any refresh rate records, but it was nevertheless fully usable.

For another approach to playing Snake with microfluidics, check out this project. If printing molds and casting silicone seems too fiddly, there are always other ways to make microfluidic circuits.

Eenk Provides EInk, ESP32 Powered Text Adventures

There’s a niche genre of text adventure that’s halfway between a traditional novel and a videogame. Think Zork if it had an extra few novels worth of words of well-crafted story to go with the action. [t0mg] is a fan of such adventures, and also quite enjoys carrying around his palm-sized ESP32 powered Xteink e-ink reader, so decided to create a project to merge the two interests, called eeink.

The Xteink readers have gotten popular lately because their modest internals and size make them very affordable. Not to mention hackable, since they’re basically an ESP32-C3 e-ink dev board that comes with a nice case and battery. The X4 Pro notably comes with an ESP32-S3 which means a lot more RAM, but this project targets both that and the X3/X4 that use the C3 version. Using the C3 means working within some rather stringent limits, as Xteink didn’t spring for any PSRAM, so [t0mg] had less memory to work with than folks did in the 80s.

This project is specifically focused on adventures using the scripting language ink, and comes with its own IDE called eenky to roll your own choose your own adventure book. It’s all on GitHub under an MIT license, and if you want to see it in action there’s a demo video embedded below.

Speaking of Zork, it wasn’t just the first commercial text adventure; it brought some important technological innovations, too.

Continue reading “Eenk Provides EInk, ESP32 Powered Text Adventures”

Claude Plays DOOM

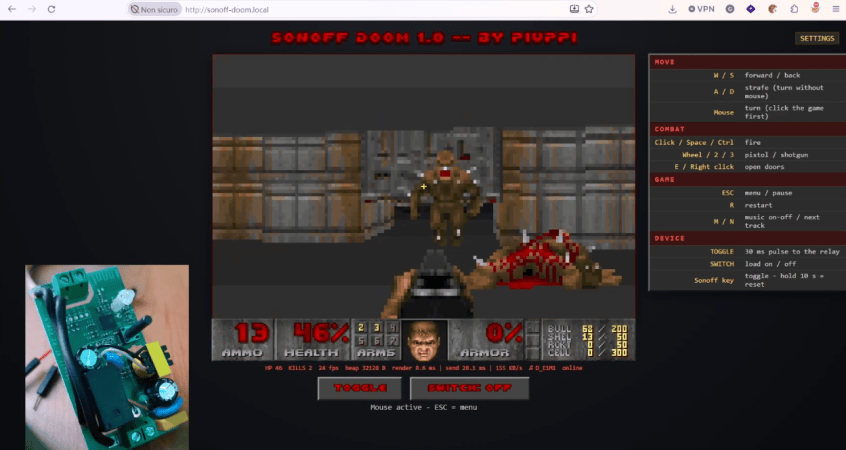
Large language models (LLMs) are generally thought of as machines that accept textual prompts and spit out textual content. However, if you’re creative in the way you interface with them, you can get them to do a wider range of tasks. For example, [Andrea Ricci] figured out how to get one to play DOOM.

For this project, [Andrea] began by porting the game to the SCINTIX P4. It’s a rather interesting device, being a single board designed in the Raspberry Pi CM4/CM5 form factor, but carrying an ESP32-P4 and an ESP32-C6 instead. The game runs on the P4 and is displayed on a 1024×600 MIPI DSI panel, but it’s only stepped through a few frames at a time. These frames are then passed to Claude Sonnet via a WebSockets setup. With only the same information as a human player would get, the LLM has to figure out what it’s looking at, and then respond with movement and fire commands to play the game.

It’s quite interesting to watch the system play—the LLM mostly accurately describes the game world, navigates down corridors, opens doors, and shoots at enemies. There is a bit of work behind the scenes to enable it to see and understand the game world—namely, using a depth fan across the field of view so it can figure out where walls are and how not to bang into them. There’s also an ASCII automap used to allow the system to keep track of where it has already been. But fundamentally, the LLM is playing the game without any other sort of additional assistance.

We’ve seen some other great ways in which AIs have been whipped up to play various games, like Trackmania.

Continue reading “Claude Plays DOOM

Using The Basic SNES Hardware To Play Minecraft

After previously putting a very basic version of Minecraft on the Game Boy Color, [Tobi] decided to have some fun and port that version also to the Super Nintendo (SNES), just to see what would happen with its more powerful hardware. Even without using an add-on chip like the Super FX 3D chip that made games like Star Fox and Doom possible with its 3D-rendered geometry, the basic SNES hardware can already provide a serviceable Minecraft experience.

You can download the SFC file here, featuring a starting world in which you can do all the usual Minecraft-ing shenanigans, like world destruction and construction. Unsurprisingly the game’s resolution is much higher than on the GBC, though the brief glimpse [Tobi] shows of Minecraft on the Game Boy Advance (GBA) with its proper 3D-rendering hardware are leaps ahead of what the basic SNES can do.

This of course raises the question of what Minecraft on the SNES could look like once you add the Super FX or similar 3D accelerator chips for the SNES into the mix. Rather than just being limited to sprite-based graphics and transformations, suddenly you can use real polygons.

Continue reading “Using The Basic SNES Hardware To Play Minecraft”

Running Zork On The Steam Controller

The Steam Controller is a device capable of many interesting feats. It’s intended to act simply as an input device, and yet, it can run games all on its own. As [Owen Feldman] has demonstrated, by having the Steam Controller play Zork.

[Owen] took quite an interesting route to get the there: he wrote a Rust program to emulate the Intel 8080 CPU and CP/M, as one does. This was ported to the Steam Controller, which emulates the CPU and memory on its own internal processor. I/O is streamed over USB, since the Steam Controller lacks a keyboard or screen. The CP/M disk lives in the controller, but the Zork disk data is streamed over USB as well.

If you’re wondering how [Owen] got all this running on the controller, he explains on his personal website. He used what appears to be an undocumented tool included with Steam that allows flashing firmware on the device. Helpfully, Valve also include the original firmware in the same folder, unsigned and only relying on a simple CRC checksum. [Owen] bricked his controller a couple times experimenting with this tool and loading his own firmware, but all came good in the end.

The Steam Controller is probably the oddest device to run CP/M for a while, but hey—it’s a neat party trick. Not much is going to top the auto-docking hack from a few months ago, though.

Continue reading “Running Zork On The Steam Controller”