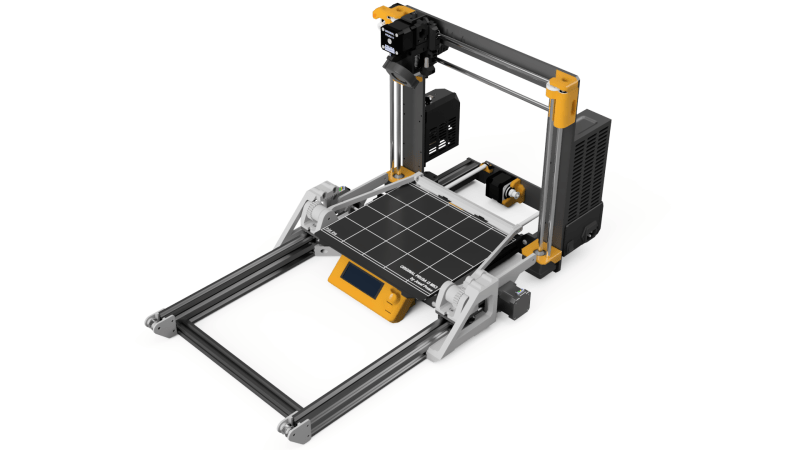
Giving a 3D printer the ability to remove its own prints means that it can crank out part after part automatically, without relying on a human operator between jobs. [Damien Weber] has done exactly that to his Prusa MK3/S printer, with what he calls the Chain Production Add-on.
 [Damien]’s approach is one we haven’t quite seen before. When printing is complete, a fan cools the part then an arm (with what looks like utility knife blades attached at an angle) swings up and behind the bed. The arm zips forward and scoops the print off the bed, dumping the finished part in the process. It’s all made from 3D printed parts, aluminum extrusion and hardware, two stepper motors, and a driver PCB. The GitHub repository linked above holds all the design files, but there is also a project page on PrusaPrinters.org.
Not quite sure how it all works? Watch it in action in the video embedded below.
We have seen quite a few different approaches for automatic part removal in the past. Literally punching prints off the bed is a thing we have seen, and we’ve also witnessed an industrial robot arm handle an entire print farm.


Kudos to Damien. What is the build surface? The “release” is unreal to the point of -looking- fake.
I have a lot of trouble with my MP Mini Delta where the parts won’t come off. Some have stuck so much that I had to peal off the build surface to remove the print.
Yes, I have the same problem to get the part from the bed. Better if I wait an hour but sometime It’s hard.
For me, it’s easier when bed is still hot, but even then parts are stuck so hard I move whole printer a little when removing parts. Wiping build surface with window cleaning spray before each print helps a little.
When I can, I chamfer the bottom of my parts. I find that helps.
Great idea, Tom – I’ll definitely try that out on my next project.
Genius.
Really depends on the Plastic as well – getting some of them to stick to the bed at all can be a challenge.
I agree that really doesn’t look real, but it could be. Even if it is I would be concerned that the bed is going to be left with debris all over it – so chaining more than a few prints together will have problems with the lower layers and possibly bed adhesion too, seems to me its better (reliable) to just have the machine summon its pet human to reset it properly – yeah bound to be slower as you won’t want to rush off and deal with it all the time. But it does mean the bed will be properly clean etc so you won’t waste plastic trying to print over the model that didn’t release from the bed just sheared the top off and you can watch it putting down the crucial first layer to be sure its actually going to stick..
>I agree that really doesn’t look real
Neh, it’s the normal powder coated textured sheet from prusa. When you buy the printer you can choose between that and smooth PEI. It really comes of this easy after cooldown.
Unless he also has purge line everything should come off really clean.
Actually, there is a purge line, but the scrapper take care of it, you can see it at the middle-front of the bed.
Hmm I might just have to try a new bed on mine then does it really work that well on all filaments?
What works for one filament really well inevitably doesn’t work well on them all in my experience – so the best looking beds I’ve seen have been the sheet metal flexible ones – any adhesion boosting method you like and just flex the bed to release the print..
I do alot of ABS and to really cut down on the warping potential I like the doped with ABS Acetone slurry approach with it – sticks rather too well at times – but a layer of sacrificial tape between the bed and print fixes that. By far the most reliable method I’ve played with for ABS (even parts that should warp awfully by their shape tend to stay stuck down with this method). And I like ABS because solvent bonding parts together is strong, lets you put layer lines where you like etc and its relatively cheap..
I don’t know how well this sheet works with ABS. I only tried PETG on it.
For ABS I only have limited experience, but I use the Smooth PEI sheet, no adhesives. Same for PLA.
Both textured and smooth are flex metal.
It’s the Powerder coated texture sheet from Prusa. When the parts cool they pop right off, even PETG.
It looks like the prusa steel bed that has the kind of matte finish. My parts stick to it well with some hair spray when the bed is hot. After the bed cools down, they have practically no stick; really cool.
It’s the prusa powder coated textured sheet. No adhesive needed for PETG.
Prusa also sells the smooth PEI sheet. Here prints stick more, even after cooldown. Yet easy to remove when flexed.
What I’ve started doing is setting my heat bed to begin its cooldown process about 30% of the way through the print or sooner. If it’s going to warp, those early layers are when it’s going to happen. If all’s good, then by the time the print is done, the plate is cool to the touch and 9 times out of 10, the part pops right off without any drama.
I just upgraded my Mini Delta to have a Wham Bam build surface and it’s a game changer. Popping off the surface and bending the spring steel to get parts off is very nice.
You might also want to adjust your z-offset if parts are that stuck. Using the stock profile in the latest Cura has been pretty fool proof outside of it being a little too fast.
That’s the magic of PEI, baby. ABS and PLA work like a dream on it. PETG is good but not great…. Print with bed surface at ~70 for PLA and 80 or 90 for ABS… Let it cool down to room temperature, and it’s the easiest lift of a part you’ve ever done.
Looks like the textured surface. I have that for my Prusa and it is amazing. Once the bed is cooled enough (normally about 20-30C lower than the print temp) the prints can be removed with little effort. Let it cool to ambient and they have removed themselves.
It needs a lot of space, and you wouldn’t want to have kids or cats in the room.
Also, there seems to be a lot of cooling time involved, perhaps as much as half an hour? And then everything has to heat up again.
When I’m busy, I try to get the print off fast and start the next print while the bed is still warm.
Do you want to have kids and cats in the room with a normal printer?
This can run while you are not close to the printer.
I was thinking the same, but the application for this is more about printing more without human intervention, like overnight. It’s probably better to start the next print automatically after half an hour of cooldown/reheat thrn to waste hours until the user takes care of it.
Why not just fill the bed and print 15 ~ 20 in one go? If your consented about quality you can spreed them out more and print sequentially.
I was testing repetition, but yes ofc, as it take ~20min for the full cooling/eject routine, it’s better for longer prints.
Cool, I look forward to seeing how it does with a full bed!
He just wanted to demo it with single object because that is faster. You can fill up the bed and still use this.
Hi guys, OP (Damien) here.
This has been designed for the batch production of the case for our new IoT device, here at WeMaintain
We can print 100 cases per week with only 2 printers, and only change the spool once per week max (5kg spool).
The build surface is the mk3s textured pei sheet.
Cooling take 15min, down to ~25/30°
Currently i’m working on the arduino firmware for TMC2130, you’ll see an update on the github soon
Thanks for sharing, that sounds really wonderful. Love hearing about neat tools doing actually useful work.
I print on glass, sticks good till it cools and then pops off. Pretty much all the time. Some prints take a little whack from the scraper handle to let go. That’s where this worries me, I think it needs AI or something to be sure the part really came off, make sure the bed didn’t get disoriented somehow during removal, etc.
With powerder coated texture sheet you can be somewhat sure that everything pops off. You never use a scraper on them.
I was worried about the magnetic sheet sliding off but no cases so far.
Although I will add “endstops” for the magnetic bed that will be attached to the 2040 extrusions.
And the ejector know when it fails (tmc2130 stallguard2), so it will retry (currently ten times)
the makerbot conveyor belt bed was a better idea, as the bed went round it pelled off the print.
The benefit of this solution is you can just attach it to your existing mk3, and also remove it.
Looks way more useful than the makerbot tom
It looks a bit similar to my setup:
https://www.youtube.com/watch?v=IxuGIh25YJg
My latest change is a modification in the G-code. I let the printer make a wedge on the brim. This way the knife is pushed under the brim so I get a better succes rate.
Oh, that’s neat! I especially like the little fold-down brush, very cute :D
Oh, I thought this was going to be a device that removes SMD parts from a PCB once the reflow temperature has been reached.
Crank up the flow volume on your hot air pencil.
At work I replace a lot of QFN’s with bottom-side die attach pads to the midlayer ground plane and about the time it gets hot enough to get the ground plane attachment melted, all the little caps around it have blown away.
What I don’t understand is why the elaborate flip over the top and to the back then scrape, then flip back to the front.
Why not just simple linear action back to front and back.
I would guess so that it’s out of the way of the platform which moves back and forth during the print. It needs to move up and down a little bit to get on to the platform without colliding and then going down to be really flush.
Not to mention it looks and sounds cool hehe
i usually just monitor my prints from work with octoprint over chrome remote desktop, when they finish i just drive the hotend into the print to knock it off the build plate, poops out the front of the machine into a box on the floor, no extra gadgets needed
Neat hack. How do you deal with the purge line?
my print head can barely go over the edge of the build plate, i have a little nugget of gcode that squidges the nozzle on the edge of it before starting the print but after heating up the hotend
I wonder if you could reuse the linear action of the build plate itself somehow, so you don’t need all the additional hardware for the linear rails… Maybe have the broom sit at the back of the build plate, lightly attached with some magnets and a mechanism to lock it to the X-axis (the one that moves the extruder left and right).
Nice hack. During the start of the pandemic we were printing face shields by the mass using gcode we edited to use the gantry to push the shields off the build plate and start the next one. The gcode files were in excess of 300mb. As you would just duplicate the gcode over and over again. Printing 24 hours a day without needing any supervision. Not bad for an ender 3 lol. We would start cooling the bed about 3mm from the top layer, and while printing on glass with pla it managed to release relatively easily with a push from the hotend. All additional parts was a piece of paper taped to the front of the bed so the shield would get jammed on the rail.
While a cool idea, I think the belted bed that rolls the part off the end is far superior.