Ever since the high-quality camera for the Raspberry Pi was released a few months back it has been the center of attention for many hacks. In this quick build [Martin Mander] shows us how to make a servo-powered focusing mechanism entirely from LEGO.
The inspiration for this project came to him while he was working on his 1979 Merlin Pi Camera and found that setting the focus just right is vital in order to get good quality pictures. So he set himself the goal to build a mechanism that allows him to focus the camera precisely and remotely.
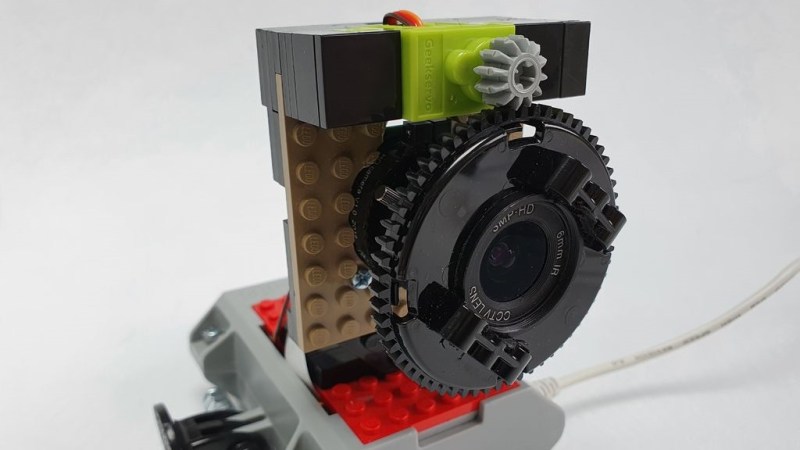
It is the plethora of LEGO-compatible parts that are available off-the-shelf that make such a project possible without the use of any 3D printed components. He not only found a LEGO-compatible continuous rotating servo but also a LEGO-compatible case for the Pi, and a LEGO cogwheel which almost fits exactly onto the camera lens. He also added a tripod mount to the case that allows him to set up the camera anywhere. The camera and focussing mechanism are controlled with a custom GUI based on guizero Python 3 library and the camera can be accessed remotely via VNCViewer.
If you prefer 3D printing over LEGO there are also other stylish Raspi HQ camera builds.
Video after the break.


I remember making something similar for a webcam almost a decade ago. It’s surprising how good the zoom is when you adjust the focal length to just a couple of centimetres.
Another favourite thing is to remove the IR filter.
You suddenly realise that coca-cola is transparent under infrared. Granted it’s not enough to see body heat but you’ll see if your soldering iron is up to temperature.
Next step: autofocus.
Years ago, while playing around with the focus control on a monochrome security camera, I noticed that the dynamic range of the signal was greater when focused and much less when out of focus. In other words, when focused the whites were bright and the darks were black. When way out of focus the scene was very gray.
Later, I found out Sony had already patented and implemented the idea.
Look into the OpenCV ‘variance of the laplacian’ for the sharpness detection portion of an autofocus search algorithm.
To the other comments – dynamic range goes down in a regular scene when the lens is defocused because the optical spot size increases. If you use a ‘flat field’ white or black target, the dynamic range is the same. Similarly, the Imatest DarkWorld Chart will not be degraded if close enough. This is why Image Engineering created a new Low Light test chart that factors in lens/sensor focus, as well as dynamic range.
You divide the screen [ or a spot on the screen ] into chunks, average the chunks, compare the chunks and when the values are different enough you make the chunks smaller and repeat the process until you stop getting better results or run out of pixels.
i like these lego compatible servos. sure beats 3d printing an adapter or gluing hobby servos to bricks.