While there are still plenty of folks out there tinkering with custom 3D printers, it’s safe to say that most people these days are using a commercially-available machine. The prices are just so low now, even on the resin printers, that unless you have some application that requires exacting specifications, it just doesn’t make a whole lot of sense to fiddle around with a homebrew machine.
As it so happens, [Nicolas Tranchant] actually does have such an application. He needs ultra-high resolution 3D prints for his jewelry company, but even expensive printers designed for doing dental work weren’t giving him the results he was looking for. Rather than spend five-figures on a machine that may or may not get the job done, he decided to check out what was available in kit form. That’s when he found the work of [Frédéric Lautré].
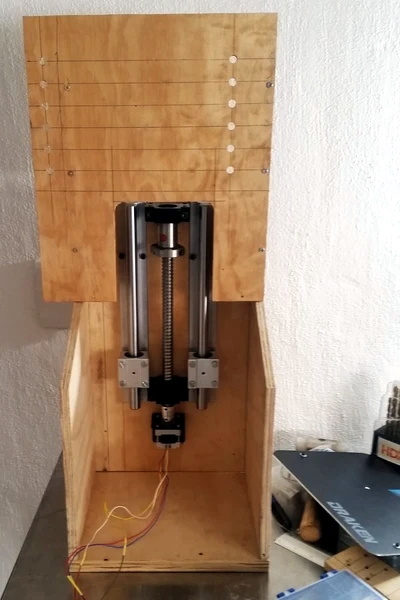
He purchased the unique “Top-Down” SLA kit from him back in 2017, and now after four years of working with the machine, [Nicolas] decided he would share his experiences with the rest of the class. The basic idea with this printer is that the light source is above the resin vat, rather than below. So instead of the print bed being pulled farther away from the resin on each new layer, it actually sinks deeper into it.
Compared to the “Bottom-Up” style of resin printers that are more common for hobbyists, this approach does away with the need for a non-stick layer of film at the bottom of the tank. Printing is therefore made faster and more reliable, as the part doesn’t need to be peeled off the film for each new layer.
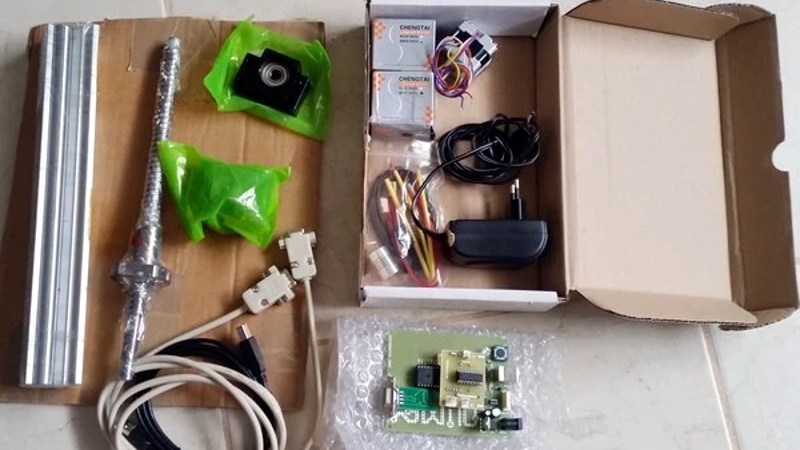
[Nicolas] goes into quite a bit of detail about building and using the $700 USD kit, including the occasional modifications he made. It sounds like the kit later went through a few revisions, but the core concepts are largely the same. It’s worth noting that the kit did not come with the actual projector though, so in his case the total cost was closer to $1,400. We were also surprised to see that [Frédéric] apparently developed the software for this printer himself, so the tips on how to wrangle its unfamiliar interface for slicing and support generation may be particularly helpful.
Unfortunately, it sounds like [Frédéric] has dropped off the radar. The website for the kit is gone, and [Nicolas] has been unable to get in touch with him. Which is a shame, as this looks to be a fascinating project. Perhaps the Hackaday community can help track down this mysterious SLA maestro?


The print example in the original page show a lot of X/Y offset layer shift. I wonder if their “hyperstatic” solution to remove screws on the Z axis is just too loose and gives some unwanted X/Y offset anyway.
I see no evidence of x-y shifts in the parts of interest, so I expect its a slicer setting making the supports less perfect over the printer being too sloppy, as the detailed parts seem very smooth and crisp, and the axis itself seems well enough engeneered.
Only real downside to this type of printer is you need vastly more resin initially, as the tank has to be filled to the full z height of the printer..
Hello, I am Nicolas from Vivalatina-shop.
Your comment about the resin volume is true, this is an downside, but I can use cheap resin if I want and the Emerald resin from B9creation is much cheaper thant the 3DSystem resin 1/5 the price.
The base of the support is ugly because it is tricky to stick the support on the plate for the first layers. It’s ugly but it works.
I do have sometimes offset layers on my prints (sometimes) when I print in 50 microns, much much less or none with 25 micron layers. I could print with 12,5 microns layers but it is too long time for the quality benefit I could expect.
Thanks for your interest.
Very true, also for a shop like yours where you will be I assume using the printer very often you are getting through the volume of resin that needing to spend more upfront to fill the vat isn’t a big deal over your consumption costs anyway. I also doubt you change the resin in use much, as once you have one that does what you need at a good price you are sorted.
That is for me the best bit about the reverse lift it out of the resin approach, it lets you have small quantities of many resin options and still print a big piece, as really all that matters is the volume of the final model + a minimum volume to skin the bottom of that sort of printer – which if you are doing a variety of jobs I think could prove great. But not relevant to all, and from what I’ve seen there are not yet a great variety of material properties to choose from in UV cure resins – its not like FDM where you can print really flexible rubbers, stiff, hard plastics, plastics easy to solvent weld etc..
hmm, perhaps moving the print bed to fast and having the parts ‘float’ slightly as it only happens on the bigger moves – try lowering the speed on that movement step in your slicer?
Hi Nicolas, nice work!
You mentioned oxygen slowing the polimerization. Did you consider printing inside a chamber which you fill with Nitrogen?
Hello Nick, no I did not mention about oxygen, or I do not remember. Please show me the text to be sure.
You wrote “The oxygen in the air seems to disturb the polymerization of the resin which then requires a longer exposure time.”
Hello Nick,
ok right, I wrote this several years ago, my recent english publication is just a translation of the old French article.
I still use the same projector and the B9 emerald resin. I have got 4 years of experience now and I could not be 100% this is because of the oxygen. Since then I have changed the lamp of my projector and notice that once it is old, it is less effective (quite obvious no ?)
The exposure time I use now for printing a layer of 50 micron is 13s and 7s for a 25 microns. This time is the same as used with the Draken printer.
Maybe you could use and more dense material below the resin to use only a fraction of the resin you need.
You fill the tank with something like an dense oil and the add the resin
As long as the two don’t mix I guess that could work, but being denser than the resin means its probably dense enough the part will always try to float on it as you print, so you suddenly need good bed adhesion on the machine with the selling point that you don’t need much support and stick as everything is the same density so the part is suspended…
I wouldn’t call the volume a real problem either really, its a reasonably compromise/downside, though – if you print enough to actually need super rapid print speed you will get through enough resin that costing you two – four bottles upfront really isn’t relevant, as you will be adding in a new bottle every few hours, days, maybe a week at the outside… For everyone else there is the other direction of resin printing, which probably makes more sense for them – and for folks in that awkward zone where neither clearly win pay your money and live with which ever style you selected (which is likely to be lift part out as those machines are so easy and cheap to get now).
Hello Juli,
I theory, this is a good idea.
I tried to do so with salted water that is denser than my resin. I works, but the trouble is in the long term, the resin needs to be mixed or the pigments go at the bottom of the tank. And here start the mess as the pigments accumulate in the salted water and when you mix, then you mix the pigments with the salted water with the resin and the mix is not usable anymore.
Also, if you do not use the machine for a while, the salt goes at the bottom of the tank also and mix with the pigments.
Well, this is a mess, so I use only genuine resin in my tank, this is much easier with no troubles.
Thanks for your interest.
Hi, when using this type of machine, filling the vat with salted water works perfectly. Then few amount of resin is required over the water volume.
Hello Frédéric,
Thanks for taking action as your are the creator of this printer.
I don’t use this method as I found in the long term the resin’s pigments mix with the salt at the bottom of the tank, when the machine is not used for a while.
As I need to print every week all year long, I bought a stock of resin 10 liters, and still have 0,7 l of resin in the tank always ready to print.
Ball screws have zero radial and axial clearance. They are not easy to use properly. It isn’t really simple to get the axis of the screw perfectly aligned with the axis of the slide so there is minimal sideways force on the screw. A thousandth of an inch over the length of the screw is what you want. If you try for some sort of compliant coupling it has to be rigid on the travel axis and will slide slightly in X and Y every time you move the screw. And, you need duplex bearings at the drive end of the screw since a single bearing will give you at least several thousandths of axial play. All the cheap bearing blocks I’ve seen use cheap bearings which are just pressed into the housing with no shoulder to seat the bearing against.
The other problem with this style, surely, is that voids in the model will be filled with uncured resin, unless drain holes are left in the print.
That is generally the case with the more common resin printers too (e.g. in my case the Elegoo Mars). I always have drainage holes in voids – but for no other reason than it is a waste of resin to fill the void.
It’s also an interesting… effect… when there’s unwashed resin left in voids after a couple of days. My first few hollow test prints actually EXPLODED, presumably due to the chemical reaction of the slow-curing resin left in the void. So, not only is it wasteful, it can actually destroy your prints.
It seems the more exotic the resin, the more pronounced the effect. I tested it with Siraya Blu (clear v2) and the results were fairly spectacular.
Hello, This is true. For our jewelry design, we avoid having such voids. In fact, we rarely have this kind of design in jewelry, but it would be an issue for curing and casting.
I love this! I’ve never seen this style of printer before, and it comes at the perfect time to mesh with another new printer idea I saw recently, which is the inkjet resin printer from Mimaki (3duj-2207, $40,000). I was struck that you could probably achieve the same results on the cheap by using a DLP printer and just adding a layer of ink between each layer of resin, just using a cheap color inkjet, nearly as-is. But I couldn’t figure out how to get the newly-exposed layer out of the vat and up to the inkjet section without making a mess and having it covered with uncured resin, and it also seemed like it would need to be flipped over. This solves both issues! Now I may actually have to see if I can cobble together a cheap full-color resin printer.
Yep, Disney has a patent on this exact process from about 3 years ago.
At $800 for just the print head, there is unlikely going to be a home model anytime soon.
There is still some work done in this area, but the current 10 month ink shelf life makes it unreasonable for hobbyists. ;-)
The only top down SLA I’ve had the opportunity to work with was the GiziPro 390, which you could load with a whopping thirteen liters of resin. The thing was super finicky, but when it actually finished a print they were pretty spectacular.
Hello, for this printer, I use 0,5 or 0,7 liter of resin of resin to print. I could optimize the size of the container to spare some resin. It is OK like this for me.
I seem to remember a Kickstarter that rather than moving the bed, they added water to float the resin layer upward. Pretty sure they were using a laser to cure the resin and using a complicated mechanism that relied on an audio signal to move the laser.
If you eliminated the laser and used a very slow servo actuated peristaltic pump, you could control the flow very precisely between each layer. That would eliminate the hassle of trying to drive a Z axis.
That was the infamous Peachy printer. Too bad partner stole the funds
https://hackaday.com/2013/09/22/a-100-stereolithography-3d-printer/
Thanks for sharing this. Effectively Frederic, the inventor of this printer shared to me he had taken the idea of printing bottom up from another old 3D printer project.
Nicolas
That looks like a very old version of that technology. Check out the top down high speed printers by Gizmo 3D printers here in Australia. Some of their demo’s are pretty crazy regarding speed.. I tend to use more FDM technology for my prototyping, but the guys at Gizmo 3d have industrial repeatability and are super fast. The Gizmo printers come ready to print out of the box with the projector installed. I had them print a few things that were too big for my build envelopes.
heres a more commercial one. Curiously their kickstarter was also from 2017 but they appear to still have a working store at their actual website.
https://www.milkshake3d.com/
This discussion in French is about this printer, with Frederic the inventor sharing his view. https://www.lesimprimantes3d.fr/forum/topic/52540-imprimante-3d-sla-top-down