While FDM printers have gotten bigger lately, there’s almost always going to be a part that is bigger than your bed. The answer? Break your design into parts and assemble them after printing. However, the exact method to do this is a bit of a personal choice. A mechanical engineering student wrote:
After researching the state of the art as well as your ideas here on reddit, I realized, that there are almost no universal approaches to divide a large part and join the pieces which maintain mechanical strength, precisely position each segment, and also counteract tolerances due to the FDM-process.
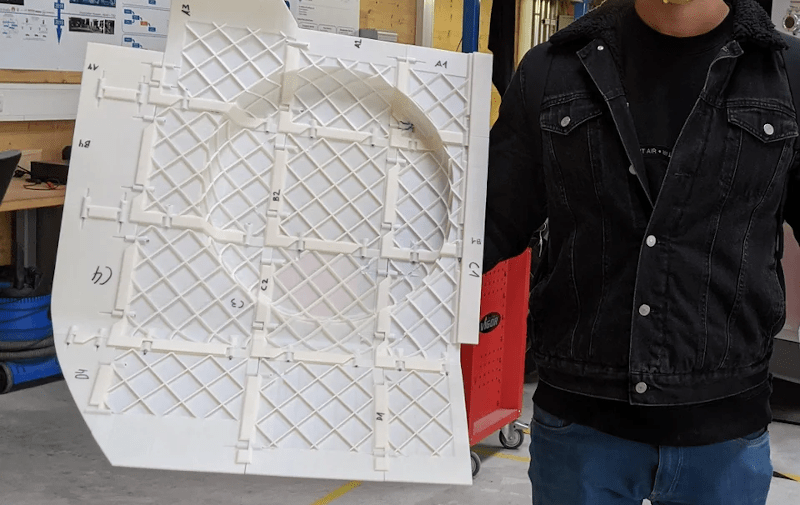
Therefore I tried to develop a universal method to segment large trim parts, additively manufacture each segment and finally join those segments to form the desired overall part.
The result is a research paper you can download for free. The method focuses on thin parts intended as automotive trim, but could probably be applied to other cases.
You can read about the thought process, but the final result was a joggle — a joint made with a rabbet and tongue. Adhesive holds it together, but the joint offers advantages in constraining the final product and the transmission of force in the assembly. Judging by the picture, the process works well. It would be interesting to see slicer software develop the capability to segment a large model using this or a similar technique.
Of course, you can just build a bigger printer, at least to a point. It seems, though, that that point is pretty big.


Nice!
Luban was featured on Hackaday and is still improving.
https://hackaday.com/2019/09/01/ultra-benchy-is-a-big-plastic-boat-alright/#more-374563
Seconding this, Luban is the way to go.
Pity it costs $400 if you want to save a file over 10MB… Which seems very likely if you’re needing to split it.
I don’t think it offers good value if splitting up prints is all you need from it. What other software can perform the task?
Now are replacement automobile 🚘 panels available on Thingiverse?
You wouldn’t download a CAR.
I would.
i usually just find some plastic screws and add attachment points and screw holes to the model. a few weeks ago i modeled a fan shroud to fix a cpu cooler who’s fan died, only to realize that the thing didnt fit on my printer bed when i finished the model. so i had to bisect it and add the needed geometry. in my case i modeled it in such a way that the two halves were identical. so i only had to print the same model twice.
Yep, sounds like the logical thing to do, to prepare two identical halves.
A week or two or three back here on HaD was a digital clock where due to the size, the builder had split the digits frame into printable T-pieces and C-pieces, but had two versions of the T-piece. As soon as I saw that I grabbed a scrap of paper and drew the shape of a single interlocking T-piece. I wouldn’t be surprised if other HaD readers would have done the same.
Along the same lines, this Tremors fan is making a “full sized” Graboid head trophy.
https://www.reddit.com/r/3Dprinting/comments/s41gwq/graboid_update_the_right_jaw_is_done/?utm_medium=android_app&utm_source=share
I quite frequently split even small parts so I can rotate them to allow printing without hard to remove supports. It’s very easy in CAD like Fusion 360 to add pegs and sockets to make alignment easy and the glue joint stronger. Superglue works very well on PLA and PETG but I’m trying to find alternatives as I’ve become sensitised to it.
A clever technique I’ve seen is to add sockets to the print that are the same diameter as the filament, and then just cutting small lengths of filament to use as the pegs.
You could try using 3d pen (like 3doodler) to weld pieces together. For gluing if you don’t need CA, there are many montage glues (some very strong and tacky) or use epoxy.
I use a 3d pen a lot, but for joining pieces a wood burner with various tips is often better- better temperature control, functional tip shape and working without adding material. In many applications the pen adds too much even at slow speeds and a lower heat burner works better, especially if you design in a little extra to melt into the joint.
I use JBWeld Plasticweld exclusively now for PLA. Superglue has a tendency to crystalize and fail in colder temps.
Since switching, I haven’t had one joint failure. It also helps with gap filling!
Although not a 100% solution, you could create a rotational print bed where the print bed rotates like a record. That would allow you to create 50% larger prints. It would require additional calibration but could potentially a unique way to increase print size without making a printer larger. The print bed would need to have markings that would be read by a laser so it can accurately determine location. The printer components would also need to be raised so the bed can rotate underneath.
Part of the print bed would be hanging over the edge, so the bed material needs to be strong, light and rigid. But it would be possible. I imagine it would also change how layers and details are printed.
Would also like to see this feature built into a slicer program. BD
+1