A Dodgy Dial Gets A Teardown And Some Oil

The pulse-dial telephone and its associated mechanical exchange represents the pinnacle of late-19th and early-20th century electromechanical technology, but its vestiges have disappeared from view with astonishing rapidity. [Matthew Harrold] is a telecoms enthusiast who’s been kind enough to share with us the teardown and refurbishment of that most signature of pulse-dial components, a telephone dial. In this case it’s on a rather unusual instrument, a British GPO outdoor phone that would have been seen in all kinds of industrial and safety installations back in the day and can probably still be found in the wild today if you know where to look.

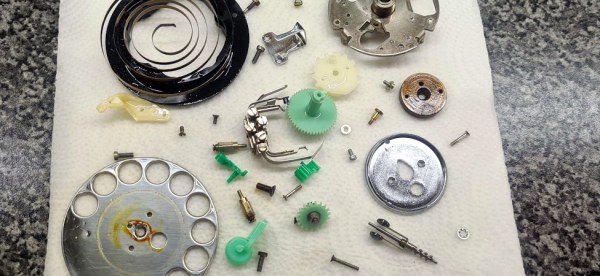
The teardown soon identifies a dial that runs very slowly and is sorely in need of a clean. There follows a detailed part-by-part dismantling of the dial mechanism, followed by a careful clean, polish, and reassembly. He notes that a previous owner had used grease to lubricate it, probably the reason for its slow operation.

The result is a smoothly running dial and a refurbished phone that would probably last another half-century or more before needing more maintenance. It’s enough to make others who’ve experimented with pulse dial phones very envious.

Open Source Replacement For EzCAD

[Bryce] obtained a fiber laser engraver to use for rapid PCB prototyping last Fall. But he was soon frustrated by the limitations of the standard EzCAD software that typically comes with these and similar devices — it is proprietary, doesn’t have features aimed at PCB manufacturing, only runs on Windows, and is buggy. As one does, [Bryce] decided to ditch EzCAD and write his own tool, Balor, named after the King of the Fomorians.

The controller board in [Bryce]’s machine is a Beijing JCZ LMCV4-FIBER-M board, containing an Altera FPGA and a Cypress 8051 USB controller. So far, he hasn’t needed to dump or modify the FPGA or 8051 code. Instead, he sorted out the commands by just observing the USB operations as generated by a copy of EzCAD running know operations. A lot of these engraving systems use this control board, but [Bryce] want’s to collect data dumps from users with different boards in order to expand the library.

Balor is written in Python and provides a set of command line tools aimed at engineering applications of your engraver, although still supporting regular laser marking as well. You can download the program from the project’s GitLab repository. He’s running it on Linux, but it should work on Mac and Windows (let him know if you have any portability issues). Check out our write-up from last year about using these lasers to make PCBs. Are you using a laser engraver to make rapid prototype boards in your shop? Tell us about your setup in the comments.

Hackaday Links Column Banner

Hackaday Links: January 16, 2022

As winter well and truly grips the northern hemisphere, it’s time once again to dunk on Tesla for leaving some owners out in the cold — literally. It seems that some Model 3 and Model Y owners are finding their ride’s heat pump isn’t exactly up to the task of, you know, pumping heat. That this seems to be happening mostly in the northeastern US and southern Canada, where a polar vortex is once again dominating the weather and driving temperatures down into the -30 °C (-22 °F) range, perhaps speaks more to the laws of thermodynamics than it does to the engineering of the Tesla climate control system. After all, if there’s not much heat outside the car, it’s hard to pump it inside. But then again, these are expensive machines, some of which have had extensive repairs to address this exact same issue when it cropped up last year. It seems to us that owners have a legitimate gripe with Tesla about this, and they may be getting some help from the Feds, who are taking an interest in the situation from a safety standpoint. After all, no heat likely means fogged up windows, and that’s hardly conducive to a safe trip. But hey, that’s what self-driving is for, right?

Much has been made of the dearth of engineering cameras on the James Webb Space Telescope, and the fact that we’ve been relying on animations to illustrate the dozens of deployments needed to unfurl the observatory and make it ready for its mission. Putting aside the fact that adding extra cameras to the spacecraft makes little sense since the interesting stuff was all happening on the side where the sun doesn’t shine, we did get treated to what was billed as “humanity’s last look at Webb” thanks to an engineering camera on the Ariane 5 rocket. But not so fast — an astrophotographer named Ethan Gone managed to spot the JWST as it transited to L2 the day after launch. Granted, the blip of light isn’t as spectacular as the Ariane shots, and it took a heck of a lot of astrophotography gear to do it, but it’s still thrilling to watch Webb moving gracefully through Orion.

Continue reading “Hackaday Links: January 16, 2022”

A tupperware-sized 3D-printed aeroponics cell, a grid-like contraption, with about 30 cloves of garlic in it, about five of them starting to grow. The cell is printed with white plastic, and there's a semi-transparent acrylic roof with LED strips attached to its underside, lifted about 3-4 inches above the garlic.

Aeroponic Cell Grows Garlic, Forwards CellSol Packets

Certain pictures draw attention like no other, and that’s what happened when we stumbled upon a Twitter post about “resuscitating supermarket garlic” by [Robots Everywhere]. The more we looked at this photo, the more questions popped up, and we couldn’t resist contacting the author on Twitter – here’s what we’ve learned!

This is an aeroponics cell – a contraption that creates suitable conditions for a plant to grow. The difference of aeroponics, when compared to soil or hydroponics methods, is that the plant isn’t being submerged in soil or water. Instead, its roots are held in the air and sprayed with water mist, providing both plenty of water but also an excess of oxygen, as well as a low-resistance space for accelerated root growth – all of these factors that dramatically accelerate nutrient absorption and development of the plant. This cell design only takes up a tiny bit of space on the kitchen countertop, and, in a week’s time, at least half of the cloves have sprouted!

Much like a garlic bulb, this project has layers to it – in that this aeroponic cell is also a CellSol node! The CellSol project is a distributed communication system that can use LoRa and WiFi for its physical layer, enabling you to build widely spanning mesh networks that even lets you connect your smartphone to it where it’s called for – say, as an internet-connected hub for other devices to send their data through. We’ve covered CellSol and it’s hacker-friendliness previously, and one of the intentions of this design is to show how any device with a bit of brains and a SX1276 module can help you form a local CellSol network, or participate in some larger volunteer-driven CellSol-powered effort.

If, like us, you’re looking at this picture and thinking “this is something I’d love to see on my desk”, [Robots Everywhere] has published the STL files for making a hydroponic cell like this at home, as well as all the code involved, and some demo videos. Hopefully, the amount of aeroponics projects in our tips line is only going to increase! We’ve covered Project EDEN before, a Hackaday Prize 2017 entry that works to perfect an aeroponics approach to create an indoor greenhouse. There’s also a slew of hydroponics projects to have graced our pages, from hardware store-built to 3D printed ones!

Continue reading “Aeroponic Cell Grows Garlic, Forwards CellSol Packets”

Thirty Seconds At 100 Megakelvins

Back in Dec 2020 we wrote about the Korea Superconducting Tokamak Advanced Research (KSTAR) magnetic fusion reactor’s record-breaking feat of heating hydrogen plasma up to 100 megakelvins for 20 seconds. Last month it broke its own record, extending that to 30 seconds. The target of the program is 300 seconds by 2026. There is a bit of competition going, as KSTAR’s Chinese partner in the International Thermonuclear Experimental Reactor (ITER), the Experimental Advanced Superconducting Tokamak (EAST) did a run a week later reaching 70 million degrees for 1056 seconds. It should be noted that KSTAR is reaching these temperatures by heating ions in the plasma, while EAST takes a different approach acting on the electrons.

The news reports seem to be using Celsius and Kelvins interchangeably, but at millions of degrees, that’s probably much smaller than measurement error. These various milestones are but stepping stones along the path to create a demonstration large fusion reactor, the goal of the global ITER mega-project. Currently China, the EU including Switzerland and the UK, India, Japan, Russia, South Korea, and the United States are members of ITER, and Australia, Canada, Kazakhstan, and Thailand are participants. The ITER demonstration reactor is being constructed at the Cadarache facility located 60 km northeast of Marseille, France, and is on track for commissioning phase to begin in 2025, going operational ten years later.

Portable VO2 max measurment mask

Printable Portable Mask Gives You The Numbers On Your Workout

We’re currently in the midst of New Year’s Resolutions season, which means an abundance of spanking new treadmills and exercise bikes. And one thing becomes quickly obvious while using those machines: the instruments on them are, at best, only approximately useful for measuring things like your pulse rate, and in the case of estimating the calories burned by your workout, are sometimes wildly optimistic.

If precision quantification of your workout is your goal, you’ll need to monitor your “VO2 max”, a task for which this portable, printable mask is specifically designed. This is [Robert Werner]’s second stab at a design that senses both pressure differential and O2 concentration to calculate the maximum rate of oxygen usage during exercise. This one uses a commercially available respirator, of the kind used for painting or pesticide application, as the foundation for the build. The respirator’s filter elements are removed from the inlets to provide free flow of air into the mask, while a 3D printed venturi tube is fitted to its exhaust port. The tube houses the pressure and O2 sensors, as well as a LiPo battery pack and an ESP32. The microcontroller infers the volume of exhaled air from the pressure difference, measures its O2 content, and calculates the VO2 max, which is sent via Bluetooth to a smartphone running an exercise tracking app like Zwift or Strava.

[Robert] reports that his $100 instrument compares quite well to VO2 max measurements taken with a $10,000 physiology lab setup, which is pretty impressive. The nice thing about the design of this mask is how portable it is, and how you can take your exercise routine out into the world — especially handy if your fancy exercise bike gets bricked.

Giant 3D Prints Piece-by-Piece

While FDM printers have gotten bigger lately, there’s almost always going to be a part that is bigger than your bed. The answer? Break your design into parts and assemble them after printing. However, the exact method to do this is a bit of a personal choice. A mechanical engineering student wrote:

After researching the state of the art as well as your ideas here on reddit, I realized, that there are almost no universal approaches to divide a large part and join the pieces which maintain mechanical strength, precisely position each segment, and also counteract tolerances due to the FDM-process.

Therefore I tried to develop a universal method to segment large trim parts, additively manufacture each segment and finally join those segments to form the desired overall part.

The result is a research paper you can download for free. The method focuses on thin parts intended as automotive trim, but could probably be applied to other cases.

You can read about the thought process, but the final result was a joggle — a joint made with a rabbet and tongue. Adhesive holds it together, but the joint offers advantages in constraining the final product and the transmission of force in the assembly. Judging by the picture, the process works well. It would be interesting to see slicer software develop the capability to segment a large model using this or a similar technique.

Of course, you can just build a bigger printer, at least to a point. It seems, though, that that point is pretty big.