Dovetail joints on a piece of furniture are one of those features that make it say “master carpenter” rather than “IKEA”. Traditional hand-made dovetails require accurate measurements and even more accurate sawing and chiseling, skills that may take years to develop. A slightly less artisanal method is to use a router and a dovetail template; the router makes perfectly straight cuts while the template makes sure it goes only where it needs to go.
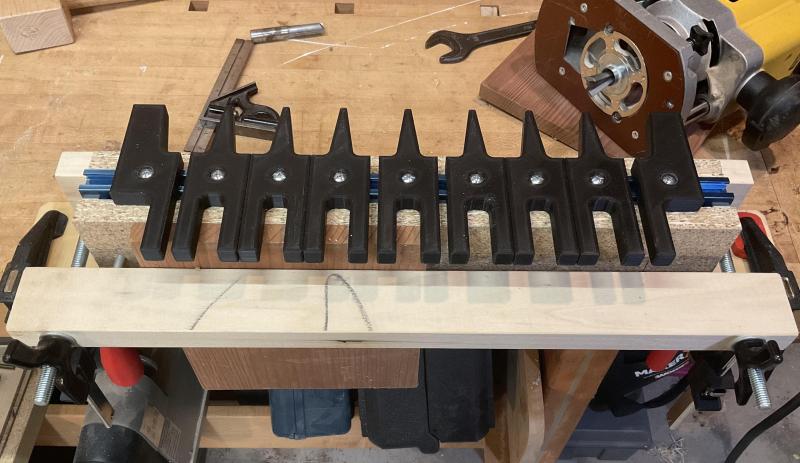
If you haven’t got one of those templates yet, check out [Guy Perez]’s design for an adjustable dovetail template that’s easy to produce with a 3D printer. It consists of ten separate pieces mounted on a T-rail, which enables them to slide sideways and thereby generate pins and tails of varying widths. The T-rail is mounted on a wooden body with an integrated clamp to hold the target piece, as well as an endstop to provide a reference for all measurements.
As you can see in the video embedded below, the resulting jig is easy to use and should result in near-perfect dovetails each time. [Guy] made the CAD files available as well as detailed instructions on their design, so you can easily adjust them if you need pieces with a different tail angle or want to use thicker wood.
While this jig will make cutting ordinary dovetail joints a lot easier, you can still show off your manual skills by making an impossible mallet. Want to join metal bits instead? Check out this cute little dovetail cube.


I made something similar but used polycarbonate and cut them on a CNC machine. Sadly, they polycarbonate simply does not hold up well enough so I switched to aluminum which does.
Do you have the cad file for the pieces of the jig? I intend to mill them with my CNC machine. Also I intend to only use drawer pcs that are only 1/2 thick. Will the pieces work of 1/2 inch material?
Dovetail joints are from a time where people had poor quality wood glue. With modern glue, you can make simpler joints that are just as strong.
Glueing endgrain still doesn’t hold well. Of course dowels do but it’s, as started in the article, often also an artistic touch. If it’s only about having little work and low cost, why diy furniture anyways?
Because you like making stuff but lack the tools and skills for fancy stuff?
Do simple things, learn skills, collect tools to match, work your way up to fancy.
“why diy furniture anyways?”
Because you can walk up to living and bed room sets costing in the thousands of dollars and still find particle board.
Very much this, premium brand built in bespoke ‘wooden’ wardrobe company that is at best a real wood veneer over cheap chipboard, with perhaps a few real wood frame elements, ironically Ikea sell cheaper,better, and freestanding (which makes being better for a space much harder) products with more real wood content…
There is also my usual problem of being rather taller than average, living in an old small space so making stuff fit both me and the space well is often not an off the shelf problem. For instance my desk was a dining table (from a charity shop – solid wood but oh so cheap!), but the legs have been heavily modified to both raise the table height to a better level for me and set them off centre so they can be against the wall, with a decent monitor stand on the top.
It depends on what is important to you.
If you want a particular piece of furniture to last longer than you do, and enjoy the fact that your children will fight over it when you die. Hard wood and fancy joinery (like dovetails) are the way to go.
Yes, some utilitarian projects you just want to get done and move on… pocket hole joinery comes to the rescue.
Nice jig!!!
You can do the whole Gomer Bolstrood nine yards, but just having stuff that doesn’t go rickety on the first move and fall apart on the second is nice.
As I note in the Instructible that I wrote about my jig, I choose dovetails for both strength and appearance, and aesthetic considerations play strongly in the choice of many woodworking joints. I’m curious as to what joints you think are simpler yet just as strong as dovetail joints – it would be nice of you to share your expertise. Finger joints come to mind, because, like dovetails, they increase the glue surface area and provide face-grain to face-grain mating surfaces, which provide superior glue adhesion over end-grain surfaces. I’m also curious about the glues you have in mind. Two-part epoxy and modern urethane adhesives provide superior holding strength to hide glues, aliphatic resin and PVA glues, but few woodworkers would want to deal with the mess and clean up required for those in most projects. So again, maybe it would be better for you to elaborate on your dismissal of the benefits of dovetail joints than to leave us all guessing.
Nice job. I like the tip on setting the bit height. I would make it a little longer and modify the end pieces so that you may adjust the in/out distance of the pins without removing the 3D printed templates. I’ve been using the Leigh Jig but your jig could be useful for making really long joints, or modifying the 3D templates to use a different angle. You could also print Templates for cutting box joints. Or print templates for use on the Leigh Jig.
The Leigh Jig flips the template over and uses the same side reference for tails and pins. While your jig is rotated so that the reference to the edge of the board needs to be set properly. I wonder if the pattern set with the 3D Templates needs to be symmetrical? Plus the dowel pins need to be located in the correct place.
Duh missed the fact that you use the pin on the opposite side so that you are referencing to the same side of the board and asymmetric patterns will work.
Thanks! Keen observation about making the t-track longer so you can get at the screws for adjusting the fit without removing the template. That’s the way I had it on the original jig I made some 15 or 20 years ago, but I only adjusted the fit once or twice in the lifetime of using the jig, so I went for a more compact fit this time around. My shop space is at a premium so I’m in the mode of making things only as big as I will need for 90% of my use.
And yes, you can arrnage your template for an asymmettic joint, but you’d then have opposite ends of the same board also be asymmetric, which I think would look odd. To deal with that, you could do one setup to cut the joints for one end of each board, then reset the templates and cut the joints for the other ends of the boards.
I also do provide instructions on how to calculate the dimensions for templates for use with dovetail bits with different angles and cutting diameters in the Instrucible, and provide a couple of screencams on how to turn those dimensions into 3D printable designs in Fusion 360.
love this project, beautiful joints. I have, and love, a givkins jig, and 3d printers, this will let me build bigger and assymetrical.
thank yoy very much