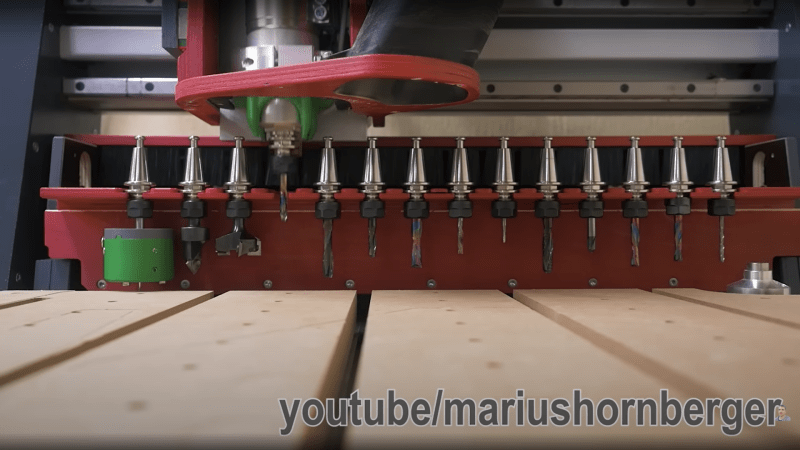
[Marius Hornberger] has been busy hacking his “Hammer” CNC router again, and now it sports a much desired feature — an automatic tool-changer. Having wanted one for a while, [Marius] was unhappy sacrificing a big chunk of useable bed area just to park the tool-changer magazine. An obvious solution would be to have the magazine retract away from the bed, outside of the working area. Sadly, the CNC controller had only enough spare outputs to drive the pneumatic tool changer (mounted on the spindle) leaving none spare to control the magazine assembly. So, there was only one obvious route to take, use some simple spring-loaded mechanics to move the magazine into tool-picking range with the Y axis motion instead.
Obviously, the whole thing is CNC machined on the machine itself, taking only a couple of iterations and smidge of table-saw action to get everything to fit well and operate smoothly without binding or colliding with the moving gantry. A cunning pair of levers on each end of the magazine allow it to move much further than the advancing gantry, swinging it quickly into position when the Y axis is at the extreme of its travel, and retracting away when the gantry moves back. Another nice addition to the build was a tool depth sensor (AKA: a switch) mounted off to one side, which allows the machine to find the bottom of each tool, if it is not known, so the Z axis can compensate. When combined with the automatically retracting dust shoe, this is a definitely a CNC build we’d love to see in a shop near us!
We’ve had a fair few CNC hacks over the years, including tool changers, like this one, but 3D printers can use some tool changer love too!


Very interesting design, wonder how it will wear with use.
I think I’d have kept it simpler in that situation and just had the auto release spindle and still manual tool changes or accepted the larger working envelope loss myself (assuming working on the electronics to have more IO is out of the question) but this is very neat mechanical method.
or use one of the i/o’s for pneumatic in/out movement of the tooltray and switch the vacuum through a master/slave mains socket? But anyway great build and very interesting to watch.
I used to run an Agie Charmilles diesinking EDM machine, which held up to 5 electrodes and the probe in the toolchanger- which was basically just a rack with fingers in the open holding tools (electrodes). In that case, the entire rack just like this was tools side by side the only difference was the entire rack moved out about one foot on two pistons one at each end to get them under the head of the machine to tool change.
I see no reason why a similar setup cannot be replicated on simple cnc machines, staging the tools just outside the work area and then having 2 pistons shoot out the rack into the area of the spindle work zone at its edges, to allow the machine head to come down and change, just like the EDM did.
This would of course require some pneumatics but I think if you are already looking at a tool changer you are capable of making something like this.
Look up Agie Sp300 to get an idea.
It could, but author was missing one spare IO pin. So instead he sacrificed about 2cm of machine travel to have a lever which also pops the toolchanger.
it’s an interesting mechanical solution, but it seems like the best option is to lose a couple millimeters and add a momentary limit switch for logic to operate a tray
please add identify of tools. softweare must read information and chose good tools for working if You dont put correctly tools on correct slot
Amazing how one engineer can add an amazing enterprise worthy feature to an existing product on there own time.
If you make a 40-minute video about your project put the 5 second demonstration of it working in the first 5 seconds of the video, most of us don’t need to see you waffle on about it for 36 minutes just to comprehend how the mechanism works.
If you write an article about someone’s 40-minute video, at least give us the time-stamp of where the magic happens, or make a GIF of it and post it, or something.
Wow how about skip the video you idiot. You have a choice not to watch it.
Cool, but I really don’t see the point. If the tool magazine slides into place mechanically when the gantry moves into the rear, then the rear area from the point at which the gantry engages the mechanism will never be useable machining area. May as well leave it in a fixed position.
Now you loose about 5cm on the back side of the work area, but if the tool holders were stationary you would loose about 20cm of the work area because the router would have to go much further forward to clear the toolholders before it can go down.
I think you meant lose, bud! Lose vs Loose, two different things!
Remember there is a ratio of movement here – not only does the gantry going backwards bring the tools to it – so half the workspace loss required is removed right there at 1:1 but its also on a lever arrangement that moves the tools further than the gantry moved, so its better than that!
Still not convinced by this approach, as it seems like a finicky maintenance hog with chips getting into, perhaps jamming the mechanism and wear being a potential problem.
But its a very neat solution to minimize bed loss for tool changing so far, and my concerns may prove unwarranted, or at least not effect the builder with how they use the machine.
Where did you get the tool changer adapter; the part that attaches to the spindle?
I would like to make something like this.
This is a nice solution. I would like to know more on the software side of how you add in the tool changer position, movements etc. I am looking to add a stationary tool change to my table, but have almost zero knowledge on the software side of how to do this.
Thank you
I saw this amazing project on YouTube a few weeks ago. Glad to find it here as well!
However I was a bit misled by the entry’s title. This is not a “passive” tool changer, it uses an active pneumatic system.
What is passive here is the movement of the tool drawer or tray.
How can I have this on my CNC
Please note the usual Paul here didn’t make that comment. I’m not that daft.