Evaluating the performance of 3D printers and component upgrades is a more difficult than it may seem at first glance, and subjective observations can lead to incorrect conclusions. To objectively determine the maximum flow rates of different FDM 3D printer hotends, [MirageC] is developing a robust testing standard backed by more than just visual observations.
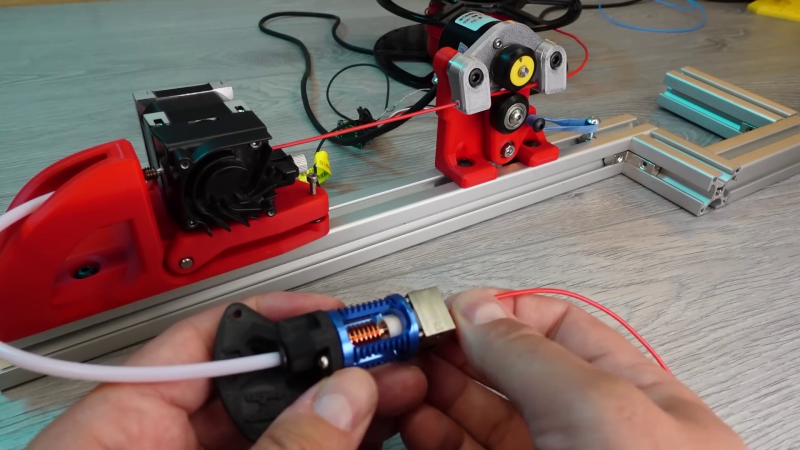
Defining the max flow rate threshold is not straightforward. A common method is to run a test print while slightly increasing the flow rate with each layer, and visually making a judgment on the last acceptable layer. It would be easy to miss errors, or unconsciously be inconsistent with observations over time. [MirageC] wanted to back up observations with measurements. To do this, he is measuring the true feed rate of the filament with an encoder wheel, and the backpressure of the filament on the extruder using a load cell. A Bowden tube helps to isolate the extruder from the vibration of the moving printhead.
After much testing, [MirageC] determined that the numerical threshold would be a specific deviation percentage between the desired and actual flow rate. At temperatures above 230°C, [MirageC] found that the last visually acceptable layer was consistently around 5.75% flow rate deviation for one specific PLA filament. It does not mean that 5.75% will be the magic number for all filaments and nozzle size, but it does provide a measurable parameter to back up visual observations.
In a world of questionable product reviews this dedication to objectivity is a breath of fresh air. If you are looking to upgrade your 3D printer’s hotend [MirageC]’s tests would be a good source of information.
We’ve covered a few hacks for improving the flow rate of a hotend, including adding nuts to a volcano nozzle, adding copper wires to the inside of the nozzle.


Stefan at CNC kitchen has done a lot of work on this topic, not just hot ends but nozzles as well. https://www.youtube.com/c/CNCKitchen.
Really great work, Mirage!
I think the best “objective” methodology is to do exactly what you’re doing — look at a bunch of prints and figure out at what % deviation they start to have noticeable defects. Do this over a bunch of filaments / temps / speeds / printers / nozzle diameters / (oh crap, that’s a lot of variables!).
At the end of six months of doing these tests, you’ll have a lot of “subjective” % thresholds, and you round down to be conservative, and you call it a “standard”. 5% looks about right from what you’ve done, and it’s a nice round number. So round, that it almost sounds arbitrary. And “arbitrary” is the little sister of “objective”!
So if I were you, I’d say that you justified the arbitrary choice of a 5% deviation very well already, and just run with it — save yourself the six months. I’m sold, anyway.
But it _was_ really neat to see that the point where the nozzles really start failing to keep up — that knee — is way past when the prints get noticeably bad. This means that you could probably extrapolate out to the 5% mark from just a few observations, because it will probably fall within the region where the deviation scales linearly with requested flow. If this holds across tests.
If I understand correctly, most printer don’t have an optical sensor to monitor the actual filament consumption rate. So you can’t actually know when your filament flow rate is 5% off the target, right ? And 5% is likely too small to find out by counting missing step on the stepper motor (if your stepper motor does have a driver that report them), since it can be a slow, invisible friction based resistance on the filament’s grip.
I’m wondering if weighting the filament spool might work here. So let’s say you’re supposed to consume 100g of filament for your print, weight the spool before the print, then after and check if you’re actually using 100g or only 95g. In that case, reduce the flow rate, rinse, repeat until you reach the limit.
But while doing this, you might as well observe your print to figure out if it goes wrong or not.
The standard calibration method in #reprap (Triffid’s guide explains it very well) has pretty much always been that the last few percent of Esteps tuning is visual. Typically, using a solid layer which is far enough up in Z to be unaffected by incorrect Z0.
Also, sometimes running faster makes the extruder not perform as expected. Skipping steps can sometimes be hard to catch if you are not visually (and audibly) paying attention.
3D printing have matured enough that youtube content creators are now turning to tiny numbers like the PC enthusiasts. Numbers that 99% of 3D printers users don’t need or want to know because they get nice print from their printers.
it’s impressive work but i don’t buy the premise that it’s better than a subjective measurement. objectively, the characteristics i care about are strength and dimensionality…but subjectively, i do care about whether it looks like it’s falling apart, whether i feel like the post-processing is taking a lot of work. those are subjective things and they can truly be optimized through a subjective process.
sensor drift is mentioned, and this is a problem in both objective and subjective measurements. you do need to repeat experiments to account for sensor drift. once you come to a conclusion, you’ve probably refined your methodology as you went. and if you want to have faith in your result, it’s a good idea to go back and repeat your very first steps just to see if your evolved methodology agrees with your naive approach. “is the ground moving beneath my feet?” if it isn’t, you can have faith in your results..if not, you need to find the sources of variability…subjective measurements have obvious sources of variability but so do objective ones.
i think the real challenge is that variability. you can be as objective or as thorough as you can imagine in your initial experiments and still there will be something that comes along. humidity, age/wear, filament batch, etc. it’s very hard to come at a consistent result.
i finally got a bad batch of formfutura easyfil (the trouble-free filament has been dethroned, sigh). i can easily tell that it’s different from the previous batch just by looking at it (it’s too glossy). or by touching it with my finger (it’s slightly sticky, like poorly-cured epoxy). or by watching it ooze out of the hot end (even after retraction it oozes at nearly the same rate as when intentionally extruding). or by glancing at the strings on my results (many many). i think they should probably invest in an objective test since they’re doing so much production, but it isn’t actually necessary to prevent this result: a purely *subjective* quality control process would have easily detected it.
I did see the “CNC Kitchen” measurements some time ago, where the length of filament was measured (or time at fixed extruding speeds), but I found these measurements lacking. Why not just simply measure the duty cycle of the heating element (or more accurate, real input power) Specific heat and melting energy are quite constant for each sort of plastic, and therefore input power is a good measurement for extruder performance. (Of course correct for static heat loss at “zero” extruder speed).
At the extruding speed the duty cycle of the heating element reaches 100%, it can’t keep up anymore and the temperature of the extruded plastic will start getting lower, and this will have an influence on the print quality.
Another thing I did not understand is that he accepted some slippage, where the amount of extruded plastic was becoming less then it should have been. With such an extruder speed you already do not get the programmed output, and your printed part will deviate.
We use Melt temp and pressure on a daily basis in profile extrusion.
Recently I worked at a company that we were making PHA straws for Starbucks.
The PHA had a consistent melt temperature of 170°C and a consistent pressure of 290psi. One of the issues with extrusion is getting consistant material out, and that is controlled with back pressure. Back pressure is controlled with screens, restrictions, and heat(shear). There is also back pressure from screws, but not always. Screens are good for a few things. They are used for mixing materials, contamination, and back pressure. Depending on the material extruded will determine the screen size and the amount needed to achieve the desired back pressure. Once, material is flowing, contamination will start its buildup on the screen caused from foreign particulates or in the case of PHA, cystalization from barrel temp being to low. Shear heat is fiction heat from material generating its own heat.
On extruders for PHA we had 4 zones. Zones 1 to 3 had to be cooled with blowers if not then we would have issues with temperature exceeding 100°c more then set point just from friction. We had a blower go out on us and we could not run the line until we improvised and bought a blower fan from HomeDepot and kept it on max to control the extra heat. Each zone was set to about 170°(from memory).
Granted 3d printers dont have all of the above and are just controlled with heat. But, this wont tell ya much as most as its basically material related and dwell time in an extruder. If the material can stay at a its melt time for a certain period of time, it has time to melt to get the correct flow and makes the best looking parts. If the flow changes and that changes the dwell time of the material in the extruder, and it has less time to mix, release gases and to melt properly, this will lead to poor performance. Also speeding up the flow will carry away more heat from the extruder and cause the extruder cycle more heat to compensate. A smaller extruder therfore would be at a disadvantage if it was compared to a larger extruder. An extruder that had a longer barrel and heat block will most likely always out preform a smaller extruder.
Im not going to be putting a 1.2mm nozzle on my Makergear M2 and think im going to be printing at the same speeds that i would be printing with a .25mm nozzle. My heat block is just to small for that type of nozzle.
Also, 3d printed extruders dont have screws. Screws are good for mixing materials, even temperatures, and metering. 3d printer the metering is all done by the drive. The drive can push all it wants and if the temperature is not up to melting, then you will just jam up the printer.
Also, the further away the drive is from the actual point that the filament is melted, the more issues there will to having a consistent extrusion. It has to do all the pushing of the filament into the barrel.
I could go on and on, lol.
In conclusion, there is no direct comparison to extruders in 3d printing, they all have their differences. Some are better at higher heats and have consistent heating. I think, alot is determined with the size of the nozzle in relation to the size of the heating block of the extruder.
Or, you know, measure required force to extrude at a given rate at a given temp.
Force gauge and a suitable rig.
Boom, objective measure of hotend efficiency.