
Last time I tried to convince you that, if you haven’t already, you should try running your 3D printer with Klipper. There are several ways to actually make it work.
The first thing you need is something to run the Klipper host. Most people use a Raspberry Pi and if you already have one that runs OctoPrint, for example, you might well use it. Just tuck your SD card away in case you give up and install a fresh Linux system on a new card.
However, a Pi isn’t your only option. You should be able to make it work on nearly anything that runs Linux. We’ve even seen it running on Windows under WSL. If you have an old laptop that can run Linux, that would work, too. We’ve even heard it works on a Chromebook.
The other option is to get a “pad.” Several vendors make touchscreens with some Linux single-board computer bundled together with Klipper preinstalled. For example, there is the Creality Sonic Pad, along with similar devices from other 3D printing companies.
If you decide to go that route, you might want to make sure it is easy to install your own software easily. Some pads, like the Creality unit, are notorious for having so much customization that they don’t lend themselves to upgrades unless they come from the manufacturer. In some cases, you can wipe out the stock firmware and install a normal operating system, but at that point, you could probably just buy a Pi and a touchscreen, right?
Installation
If you use something like a pad, it probably has a menu option to provide prebuilt firmware for your printer. Typically, you let it save the code to an SD card or a USB stick and then you are expected to flash it to your printer which, of course, depends on what kind of printer you have.
If you are rolling your own, you use a menu configuration program something like building a Linux kernel. If you have a pre-built configuration file, it will probably tell you in its comments what things you should pick. You need to know, for example, the type of CPU your board has, the bootloader offset, and if you are connecting via USB or serial. You can find details on the Klipper project pages.
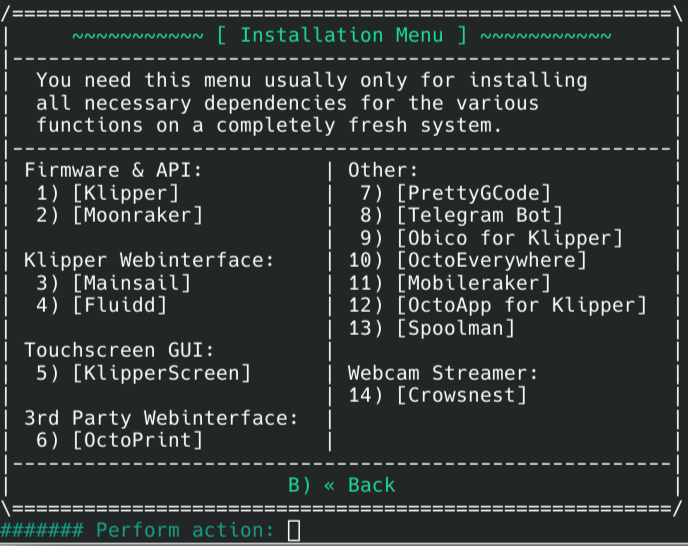
Installing the Linux side is easy because there is a nice script called KIHUH. The easiest thing to do is clone the Git repository and run it. From there, you can install Klipper, Moonraker, Fluidd, Mainsail, and some other things, too.
The real trick isn’t installing the software. The challenge is creating a proper configuration file for your printer. If you have a totally stock and popular printer, you’ll probably be in luck. But, how many of us can say that?
Start with the GitHub list to see if your printer or board is there. Even if it isn’t an exact match for your hardware, it will give you a start. For example, my custom printer is a Fysetc Spider, but the canned configuration is for a core XY machine, which means I have to make changes.
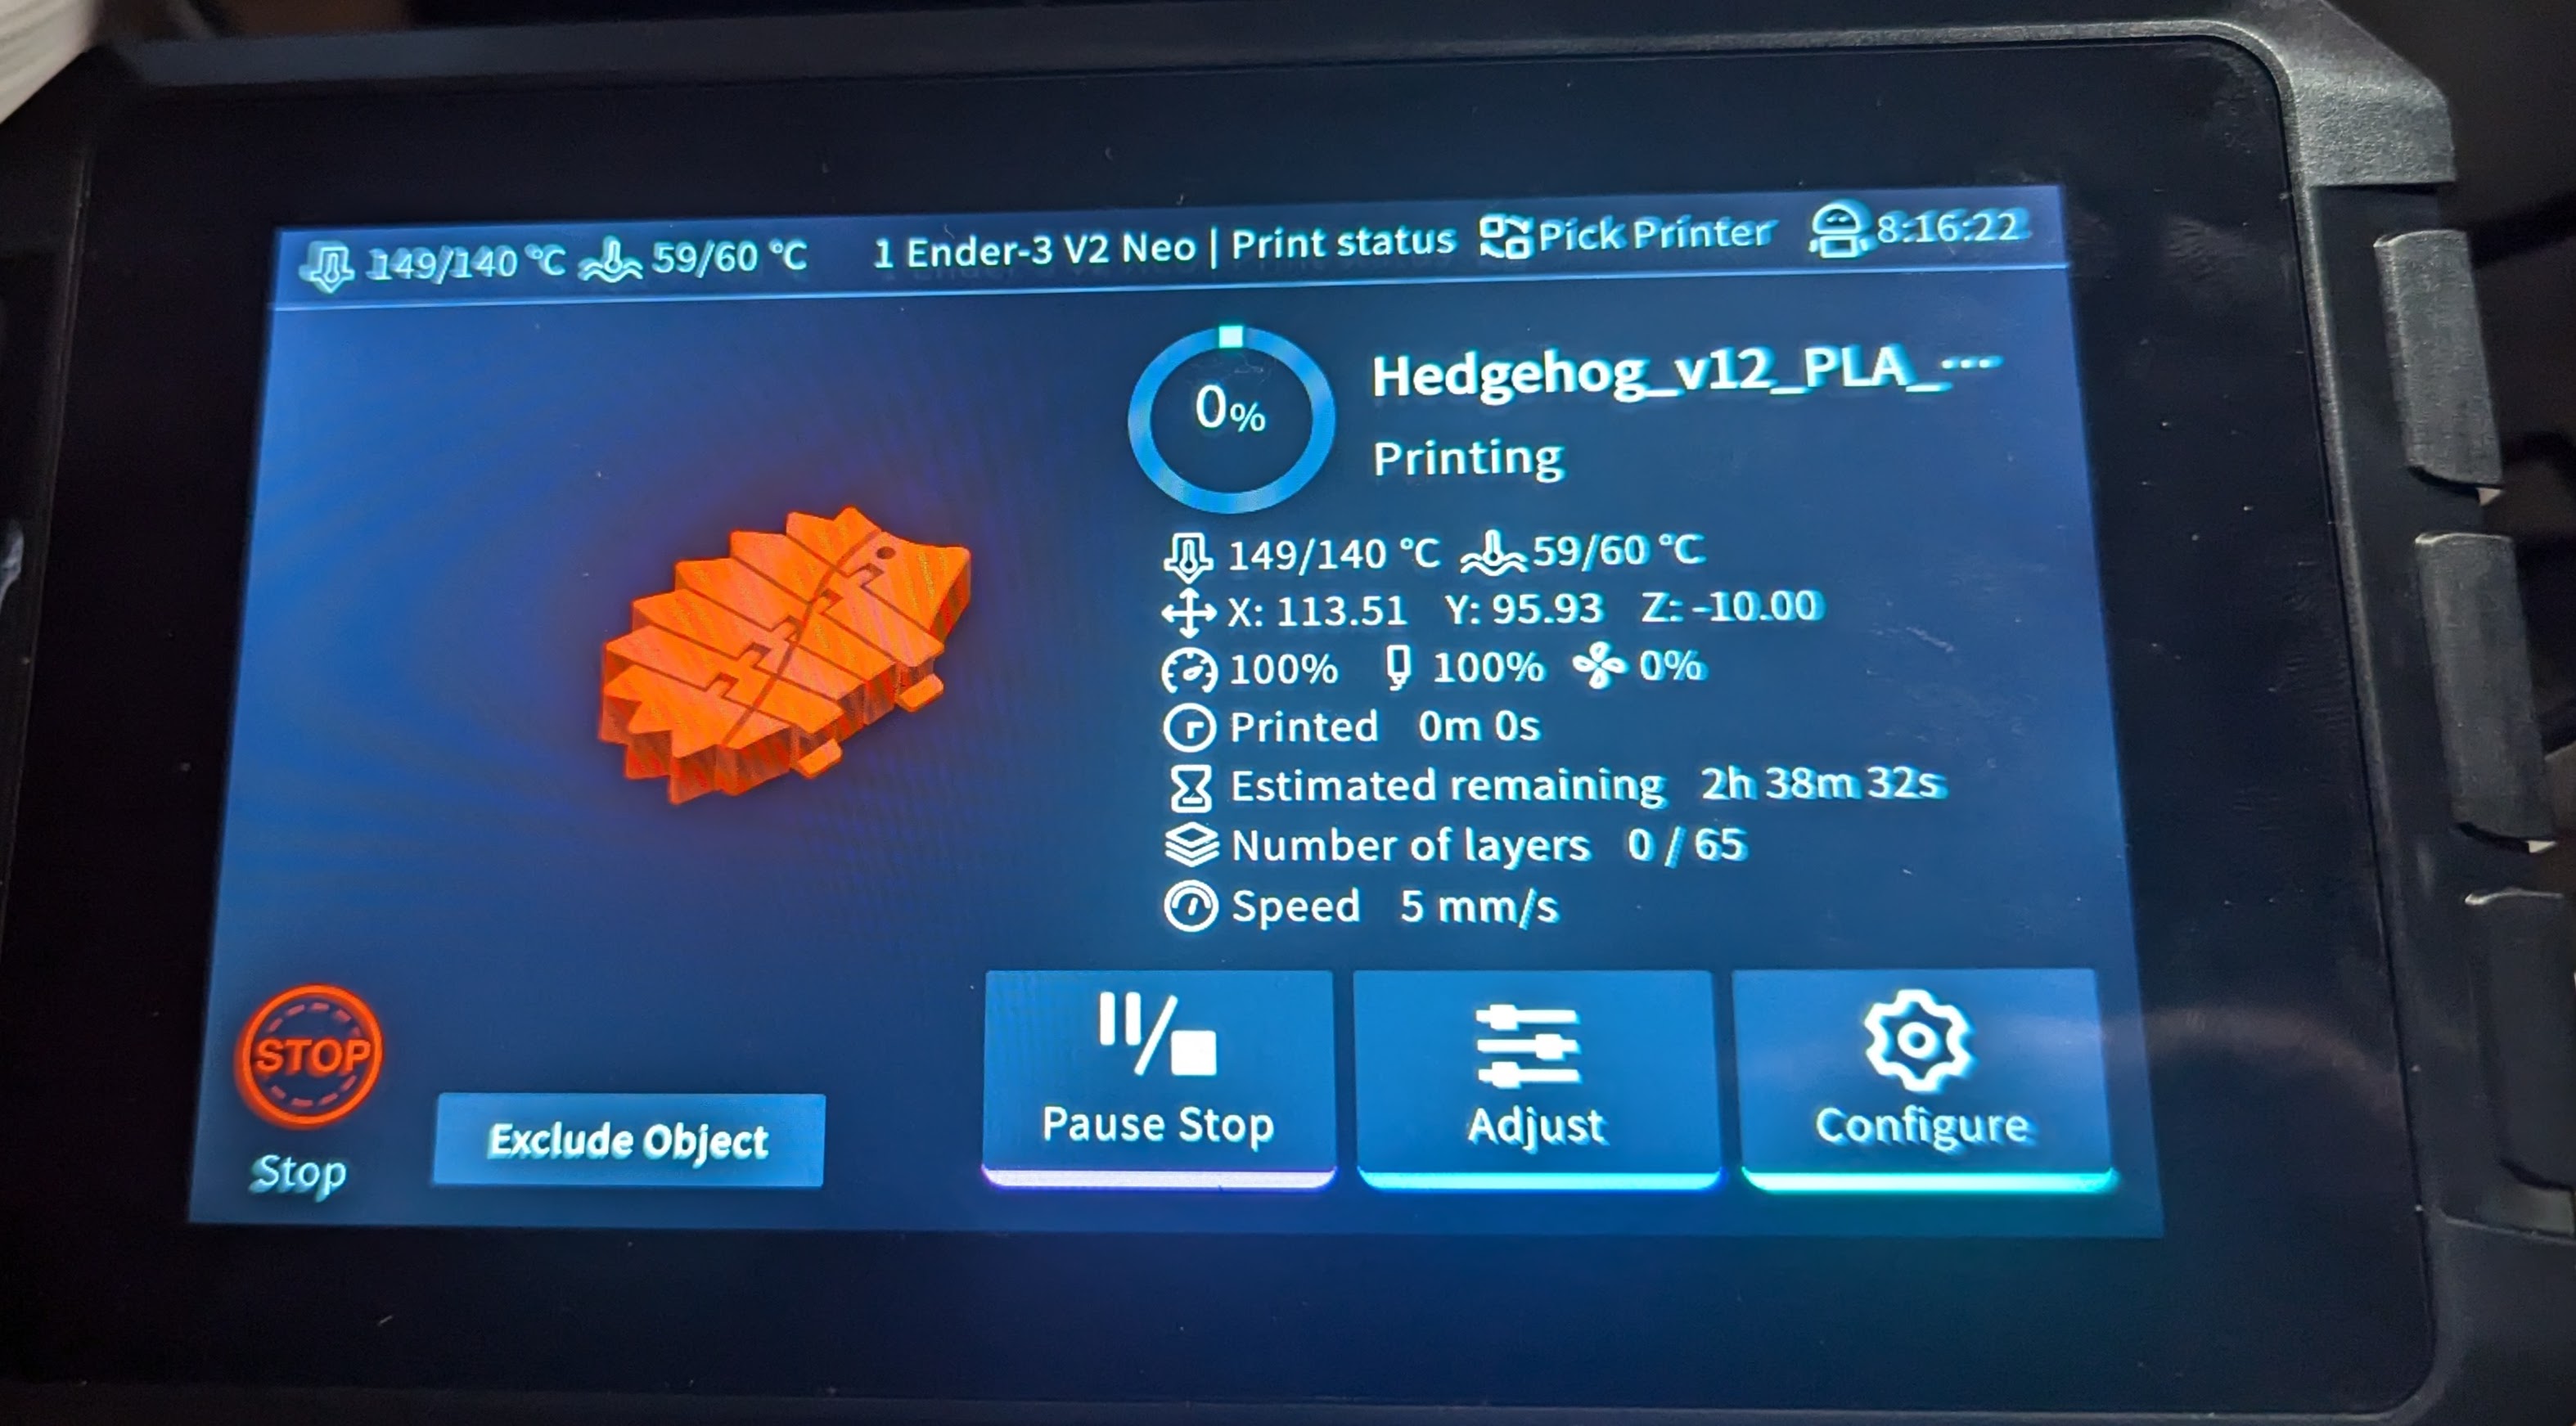
Even if you get a pad that claims to be “plug and play,” don’t count on it. For example, a Creality Sonic Pad’s instructions for installing with a Creality Ender 3 first asks you to take the printer apart to determine the type of motherboard you have. That’s not really plug and play! Any deviation from the stock machine is likely to require you to change the default profile.
Ch…Ch…Ch…Changes
In addition to just setting things up to match my exact hardware, I also needed to adjust the extruder step count. That has to be simple, right? Most firmware requires you to plug in the number of steps per millimeter of filament.
Klipper, on the other hand, wants to know how many millimeters extrude from a full rotation of the stepper. If you know how many steps (and microsteps) your printer uses, you can easily calculate either number from the other. For example, if you have 200 steps per rotation and 16 microsteps, that’s 3200 steps total. If your current steps per millimeter is 100, then your Klipper “rotation distance” is 3200/100=32.
Configuration Example
I had another major change to make. My printers have a non-standard filament sensor that detects the filament moving. That way, it can detect not only broken filaments but jammed filaments, too.
To install it, I had to add a few lines to my printer.cfg file and restart Klipper. Since I have more than one printer with the same sensor, I put all the lines in a single file and then included it in each printer. So the printer.cfg change was very simple:
[include sfs.cfg]
Then the real work is in sfs.cfg:
[filament_motion_sensor SFS_T0]
detection_length: 10.00
extruder: extruder
switch_pin: ^PA4
pause_on_runout: True
event_delay: 3.0
pause_delay: 0.5
runout_gcode:
  M117 Runout Detected!

[delayed_gcode DISABLEFILAMENTSENSOR]
initial_duration: 1
gcode:
 SET_FILAMENT_SENSOR SENSOR=SFS_T0 ENABLE=0

[gcode_macro SFS_ENABLE] ; Add this to PRINT_START
description: Enable smart filament sensor
gcode:
  M117 ENABLING the Smart Filament Sensor
  G92 E0
  SET_FILAMENT_SENSOR SENSOR=SFS_T0 ENABLE=1

[gcode_macro SFS_DISABLE] ; Add this to PRINT_END and PRINT_CANCEL
description: Disable smart filament sensor
gcode:
  M117 DISABLING the Smart Filament Sensor
  G92 E0
  SET_FILAMENT_SENSOR SENSOR=SFS_T0 ENABLE=0
This defines a few macros you can use elsewhere. Like Python, the indentation matters. You can organize your files using [include], and that’s especially useful if you have multiple printers that can share files.
Reference
So, how do you know what’s available? The Klipper reference. It will show you all the configuration sections you can use and what can possibly go in them. Don’t forget that some features — like print status notifications — will be in the Moonraker configuration which is a separate document.
Since the system is in Python, you can hack on it to your heart’s content. Just back up first. For example, you can add some custom Python scripts in the klipper/extras directory, like the one that can run arbitrary system commands from G-code.
Tinkering is what most of us like the best, and there’s plenty of opportunity to tinker with here. Klipper is also a good way to put new life in a very old printer since what runs on the printer is very simple, and all the heavy lifting is done elsewhere.
Klipper can easily do adaptive bed leveling, for example. If you can work in Python, it is also easy to experiment with things like exotic sensors.


This might sound like an advert, but trust me, it is not. Ender 3 V3 KE is insanely cheap at ebay for Germany buyers: 183 € with a discount code. You get an impressive tool. Really. Works well. Sprinting speed is astonishing.
But the company is doing everything to deter you of buying something from them again. There are obvious software bug. Clear to see for every user. Like basic translation errors. Or index-out-of-range-errors. Or index-pointing-to-wrong-item-errors. Often just simple beginner program errors. Fixes? No. Looks like they abandon their product as soon as possible. Last update 2024-05-13.
Stop making your own crappy software version of anything and focus on what you can best: why not simply manufacture the hardware and put the open source software on github?
You have access to all of the KE software via open sourced repos on the creality official github already. It doesn’t take much to find them but just in case:
https://github.com/CrealityOfficial/Ender-3_V3_KE_Klipper
https://github.com/CrealityOfficial/Ender-3_V3_KE_Annex
https://www.openk1.org/
You can download pre-rooted nebula pad images from that last link: https://www.openk1.org/index.php/articles/rooting-the-k1-max-and-ke
Hopefully there’s enough information there for you to crack on and use the nebula pad like you want to?
It’s on github:
https://github.com/CrealityOfficial/Ender-3_V3_KE_Klipper
https://github.com/CrealityOfficial/Ender-3_V3_KE_Annex
I had a farm of Ender 3 V2’s with Revo hotends…pretty nice… But changed them bambulab printers “just because” of annoyance.
Don’t get me wrong, bambulab printers have their own annoyances… But creality just misses tiny itchy things.
I don’t have access to the K1 series, but the pooping of the bambulab printers is actually a huge improvement for me. You really get a absolutely perfect print (after tuning to my filament vendor) every single time.
Prusa has a similar problem IMHO. Petg prints get so much cleaner (in “series production”) if you can wipe the nozzle (and purge a little bit). Little change with (for me) huge impact.
I made my first farm with creality because they used v-rollers. If you dig into literature, that’s actually the absolutely best choice for the fast axis. I got burned with linear rods and lmuu bearings once with some “industrial” flashforge printer. But my first P1P us still running strong….
Hopefully someone makes a steel-v-roller d-bot kinematics printer with clipper and poop-shoot soon… I’m just thinking of either extending my existing fleet of printers or starting a second sub-farm for an upcoming product.
Oh, and IDEX please… With nozzle whipping!
Having PLA for support in PetG prints allows for way less post processing. I’d pay premium!
73
Creality K1 series and V3/V3 Plus all do a nozzle wipe before each print. K2 Plus and CFS will do a nozzle wipe and they have a poop chute too, should be released very soon.
Pronterface works just fine and is a 1 step install on PC. USB to Prusa, job done. Take your Klipper nonsense elsewhere.
Klipper vastly out does pronterface, it’s not just a simple serial terminal app, it’s a full kinematic firmware, web ui etc. Nothing wrong with pronterface but trying to compare pronterface and klipper is like comparing a cheeseburger to the colour red.
How can it vastly out do “Connect”, “Print”? There’s only 2 features I wish Pronterface had: bgcode and “Are you sure?” (incase you close the program while printing!). I draw in SketchUp 2017, export as .stl, slice in PrusaSlicer, USB to my printer, connect and print. No Rpi, no wifi – just print and monitor on the PC.
You’re missing the point.
Let’s pick an example. Ringing/ghosting, you can tune your mechanics and Marlin settings to reduce this effect, but in exchange you get other effects. It’s a side effect of how Marlin works.
Klipper replaces Marlin, does the “work” it does not on the microcontroller, but on the Pi/PC, and with that, it can throw a lot more math at it. Allowing for more complex calculations that can better deal with these effects.
Klipper isn’t about replacing the workflow, it’s about replacing the weak “brain” that has been at it’s limits for 10 years.
We had a similar project in progress at Ultimaker, combined with a few other “secret” things, we could push machines to new limits without losing quality. But we never got the R&D funding to make it into a product at that time. The Factor 4 might include it, I’ve left 5 years ago (unrelated reasons), so I am not up to date with the development of that machine.
only monitoring from the computer it’s plugged into? Seems limited, with klipper, you can access your printer from any browser, so PC, laptop, phone, tablet, console. You can have software that will monitor the print for any errors and stop it before it becomes a problem. How about a plate full of prints and 1 fails? You’d probably stop the whole thing on marlin if things get hairy, klipper on the other hand, just exclude that model and carry on printing the rest. So many features above and beyond what pronterface does it’s not a comparison at all. Pronterface software is good enough for a lot of people, Klipper is better firmware/software/hardware all round.
Pronterface? What year is it 2015?
Printrun 2.1.0 Latest – released this 26 May 18:04
Come on now. I wouldn’t say that finding the version number of an Ender 3 motherboard by removing 3 screws and lifting a panel is akin to “taking the printer apart”.